The Best Fluffy Pancakes recipe you will fall in love with. Full of tips and tricks to help you make the best pancakes.
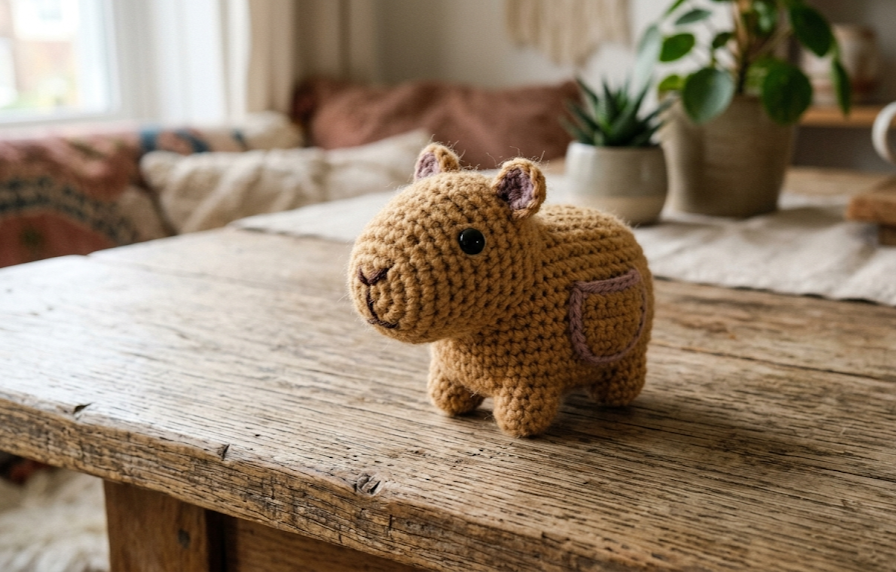
There is something undeniably charming about a tiny crocheted capybara that fits right in the palm of your hand. The pocket capybara has taken the crochet world by storm, and it is easy to see why — this adorable little creature is quick to make, requires minimal materials, and works up beautifully with chunky chenille yarn. Whether this is your first amigurumi project or you are adding to a growing collection of crocheted animals, this free pattern walks through every step clearly and simply.
This pocket capybara amigurumi is designed as a no-sew project, meaning the pieces are joined together as you crochet rather than sewn on afterward. The result is a sturdy, seamless little figure that holds its shape beautifully and makes a wonderful gift, desk companion, or handmade keepsake.
| Difficulty Beginner | Time 1–2 Hours | Hook Size 5.0 mm | Yarn Weight Bulky #5 | Finished Size 3–4 Inches |
Why You Will Love This Pattern
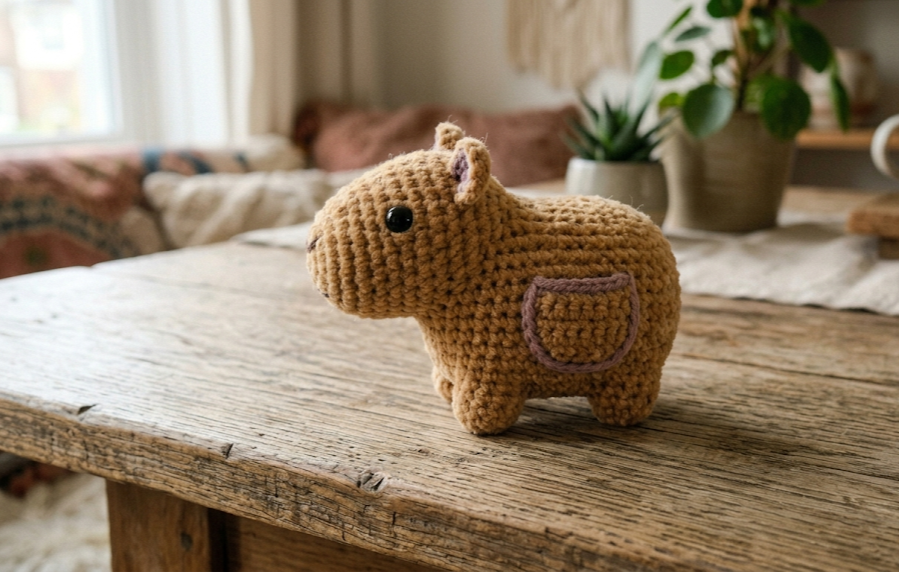
Chenille yarn gives this capybara its signature velvety, plush texture — it looks incredibly soft because it genuinely is. The compact size means the project works up in just a couple of hours, making it perfect for a weekend crafting session or an evening wind-down project. The no-sew construction also removes one of the trickiest parts of amigurumi for beginners: attaching limbs neatly.
The finished capybara sits at roughly 3 to 4 inches long, making it truly pocket-sized. It is the kind of project that produces an impressive result with a surprisingly small amount of effort, which is always satisfying.
Materials Needed
- Bulky weight (size 5) chenille or velvet yarn in warm tan or caramel brown — approximately 30 to 40 yards
- Small amount of dusty mauve or rose brown yarn for the ears, nose, and legs — approximately 10 yards
- 5.0mm crochet hook
- Two 9mm or 10mm black safety eyes
- Polyfill stuffing
- Yarn needle (for weaving in ends only)
- Scissors
- Stitch markers (optional but helpful)
Abbreviations
- MR — Magic ring
- sc — Single crochet
- inc — Increase (2 single crochets in the same stitch)
- dec — Decrease (invisible decrease: insert hook through front loops of next 2 stitches, yarn over and pull through both, yarn over and pull through 2 loops)
- sl st — Slip stitch
- ch — Chain
- BLO — Back loop only
- FLO — Front loop only
- st(s) — Stitch(es)
- rnd — Round
Pattern Instructions
Body (tan yarn)
The body is worked in continuous rounds. Use a stitch marker to track the beginning of each round.
Rnd 1: MR, 6 sc into ring (6 sts) Rnd 2: Inc in each st around (12 sts) Rnd 3: [Sc 1, inc] repeat 6 times (18 sts) Rnd 4: [Sc 2, inc] repeat 6 times (24 sts) Rnd 5–9: Sc in each st around (24 sts) — 5 rounds even Rnd 10: [Sc 2, dec] repeat 6 times (18 sts)
At this point, insert safety eyes between rounds 6 and 7, approximately 5 to 6 stitches apart. Begin stuffing the body firmly.
Rnd 11: [Sc 1, dec] repeat 6 times (12 sts) Rnd 12: Dec 6 times (6 sts)
Fasten off and close the opening by weaving the yarn tail through the front loops of the remaining 6 stitches, pulling tight to close. Weave in end.
Head (tan yarn)
Rnd 1: MR, 6 sc (6 sts) Rnd 2: Inc in each st (12 sts) Rnd 3: [Sc 1, inc] repeat 6 times (18 sts) Rnd 4: [Sc 2, inc] repeat 6 times (24 sts) Rnd 5–7: Sc in each st around (24 sts) Rnd 8: [Sc 2, dec] repeat 6 times (18 sts)
Stuff the head firmly.
Rnd 9: [Sc 1, dec] repeat 6 times (12 sts) Rnd 10: Dec 6 times (6 sts)
Close and fasten off, leaving a long tail for joining.
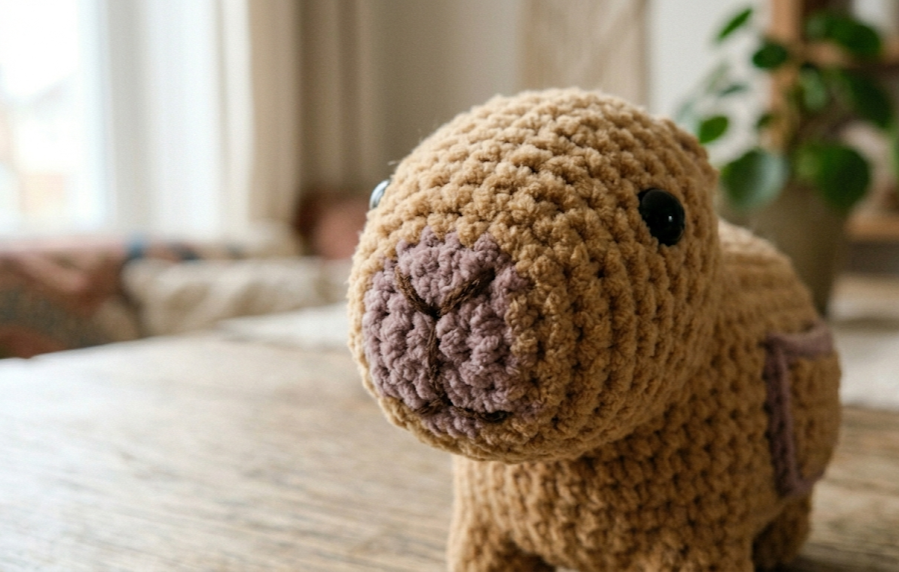
Place safety eyes between rounds 4 and 5, about 4 to 5 stitches apart. The capybara has a wide, flat face, so the eyes sit fairly far apart and slightly low on the face for that classic capybara look.
Snout (mauve yarn)
Rnd 1: MR, 6 sc (6 sts) Rnd 2: Inc in each st (12 sts) Rnd 3–4: Sc in each st around (12 sts)
Fasten off, leaving a tail for joining. Stuff lightly. The snout attaches to the front lower half of the head — it should look wide and prominent, just like a real capybara.
Ears — make 2 (mauve yarn)
Rnd 1: MR, 6 sc (6 sts) Rnd 2: Inc in each st (12 sts) Rnd 3: Sc in each st around (12 sts)
Fold flat and slip stitch across the opening to close. Fasten off with a tail for joining. Do not stuff.
Legs — make 4 (mauve yarn)
Rnd 1: MR, 6 sc (6 sts) Rnd 2: Inc in each st (12 sts) Rnd 3: Sc in each st around (12 sts) Rnd 4: [Sc 1, dec] repeat 4 times (8 sts) Rnd 5–7: Sc in each st around (8 sts)
Stuff the foot area only (the bottom third). Fasten off with a long tail for joining.
Assembly
Since this is a no-sew pattern, the pieces connect at their openings as you finish each one. However, the head and snout are joined using the yarn tail and a yarn needle — just a few anchor stitches around the perimeter of each piece where it meets the head or body.
Step 1: Attach the snout to the lower center of the head, lining up the flat surface. Use the yarn tail to stitch around the edge with small whip stitches, hiding them in the yarn texture.
Step 2: Position the ears on the top of the head, slightly toward the back, one on each side. Stitch each ear down securely.
Step 3: Attach the head to the front of the body. The head sits at a slight downward tilt — this gives the capybara its characteristic calm, content expression.
Step 4: Attach the four legs to the underside of the body. Front legs go roughly under the head join, and back legs go toward the rear of the body. All four legs should sit at the same height so the capybara stands or sits evenly.
Step 5: Weave in all remaining yarn ends securely through the body of the work.
Beginner Tips
Use stitch markers generously. Chenille yarn is beautiful but can make it hard to see individual stitches clearly. A marker at the start of each round prevents losing count.
Work decreases tightly. The invisible decrease (working through front loops only) keeps the surface smooth and avoids visible holes that can interrupt the plush texture.
Stuff firmly but not too hard. The capybara should feel solid but not stretched — overstuffing can distort the round shape and pull the safety eyes in awkward directions.
Keep tension consistent. If stitches feel loose, try dropping down a hook size. Tight, even tension gives amigurumi its clean, professional look.
Safety eyes go in before closing. Always attach safety eyes while there is still an opening to reach inside and secure the backing washer. Once the piece is closed, it becomes very difficult.
Variations to Try
Color swaps: Real capybaras range from light golden brown to dark chocolate. Try a warm honey tan, a cool gray-brown, or even an unexpected pastel version for a whimsical twist.
Mini version: Use fingering weight yarn and a 2.0mm hook to make a tiny capybara that fits on a keychain.
Seasonal capybara: The internet loves a capybara in a citrus hat (because real capybaras are famous for sitting in hot springs with fruit on their heads). Crochet a tiny orange or lemon slice to perch on top of the head for a viral-worthy variation.
Capybara family: Make a slightly larger version with worsted weight yarn for a mama capybara alongside the pocket-sized baby.
Accessories: A tiny crocheted flower crown or a little scarf in contrasting yarn makes a sweet finishing touch.
Final Thoughts
This pocket capybara pattern proves that amigurumi does not have to be complicated to be absolutely adorable. With just a few yards of chenille yarn and an afternoon of stitching, there is a tiny yarn capybara waiting to come to life. The no-sew construction keeps things approachable, and the quick finish time makes it endlessly giftable — birthdays, teacher appreciation, party favors, or simply because someone deserves a handmade capybara on their desk.
Save this pattern to your Pinterest boards and share the finished make — tag it with #FoodiePlumCrochet to be featured in the community. Every capybara made is a little burst of handmade joy in the world, and that is always worth sharing.
Caring for Your Finished Capybara
Once the pocket capybara is complete, knowing how to care for it keeps it looking its best for years. Chenille yarn is delicate and can mat if washed aggressively. Hand washing in cool water with a small drop of gentle soap is the safest option. Press the water out gently — never wring or twist chenille — then reshape the capybara and leave it to air dry on a clean towel. Avoid putting it in a dryer, as heat can cause the velvet fibers to clump and lose their softness.
For everyday storage, keeping the finished capybara away from direct sunlight prevents the yarn color from fading over time, especially important for lighter tan shades. A quick, gentle brush with a soft pet brush can also revive the plush texture if it starts to look a little flat after lots of handling.
Gifting Ideas
A pocket capybara makes one of the most personal and thoughtful handmade gifts across all ages. Tucked into a small gift box with tissue paper, it looks like something from a boutique shop. For children, pairing it with a little printed adoption certificate — like the bonus printable idea in the original inspiration — adds a layer of imaginative play that kids love. For adults, it makes a wonderful desk decoration, a travel companion, or a comfort object for someone going through a hard time.
Crocheted gifts carry something a store-bought toy simply cannot: the hours and intention behind every stitch. A pocket capybara takes just a few hours to complete, but the person who receives it gets something genuinely one-of-a-kind.