The Best Fluffy Pancakes recipe you will fall in love with. Full of tips and tricks to help you make the best pancakes.
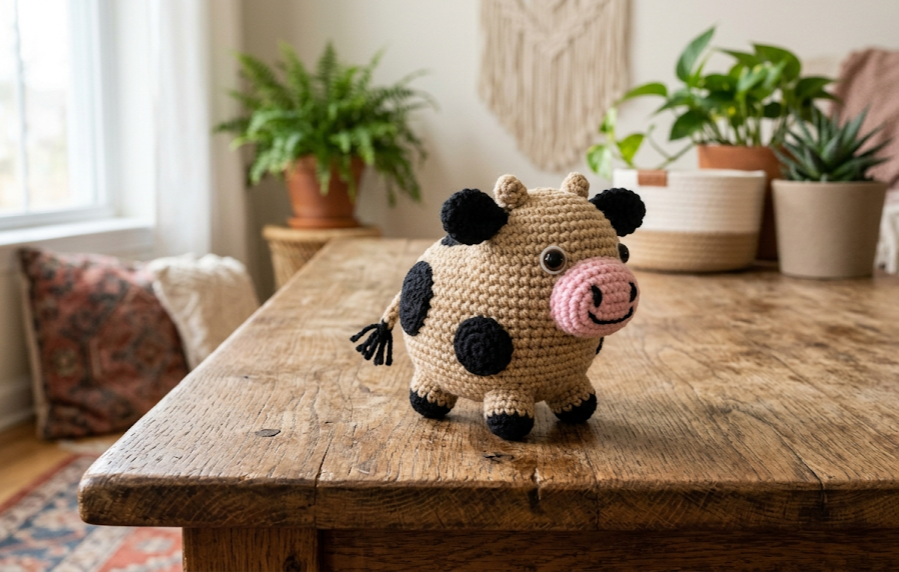
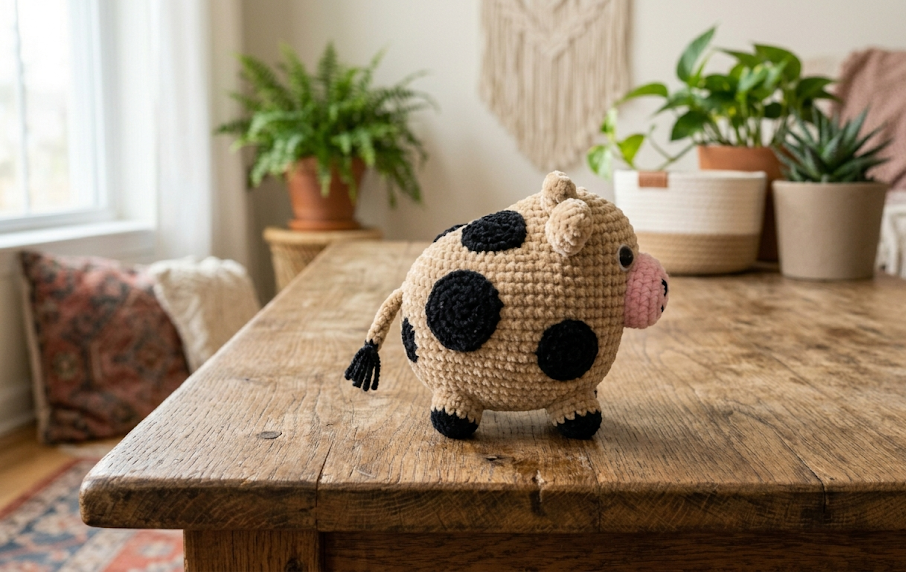
If you’ve been searching for the perfect beginner amigurumi project, look no further. This adorable mini cow crochet pattern is everything you need to fall in love with amigurumi. Small enough to finish in a single afternoon, this little cow is irresistibly squishy, surprisingly simple, and endlessly customizable. Whether you’re brand new to crocheting stuffed animals or you’ve made a few before and want a fast, satisfying project, this free mini cow pattern is exactly what your hook has been waiting for.
Amigurumi — the Japanese art of crocheting or knitting small stuffed animals — has taken the crafting world by storm, and it’s easy to see why. These tiny creatures are quick to make, affordable, and make the most heartfelt handmade gifts. This mini cow stands at roughly 4 inches tall, making it a great keychain accessory, shelf decoration, or baby-safe plushie when finished without small parts.
|
Difficulty
Beginner
|
Time
2–4 Hours
|
Hook Size
4.0–5.0 mm
|
Yarn Weight
Bulky (#5–6) Velvet
|
Finished Size
~4 inches tall
|
Materials You’ll Need
Before starting, gather everything on this list so your crochet session goes smoothly:
- Yarn: Chunky velvet yarn (also called chenille or velvet chenille yarn) in tan/beige and black. A small amount of pink yarn for the muzzle. Weight 5 (bulky) or weight 6 (super bulky) works best for that irresistibly soft, plush look.
- Crochet Hook: 4.0 mm to 5.0 mm depending on your yarn’s thickness and your tension.
- Safety Eyes: 8 mm or 9 mm black safety eyes, 2 pieces.
- Polyfill Stuffing: A small amount of polyester fiberfill for stuffing the body and head.
- Yarn Needle / Tapestry Needle: For sewing pieces together and weaving in ends.
- Scissors: Sharp fabric scissors.
- Stitch Markers: Optional but helpful for marking the beginning of each round.
- Pink Pom Pom or Pink Fuzzy Yarn: For the fluffy muzzle detail (optional but adorable).
Abbreviations
All abbreviations follow US crochet terminology:
- MR – Magic Ring
- sc – Single Crochet
- inc – Increase (2 sc in the same stitch)
- dec – Decrease / Invisible Decrease (sc2tog)
- sl st – Slip Stitch
- ch – Chain
- st(s) – Stitch(es)
- BLO – Back Loop Only
- FLO – Front Loop Only
- R – Round
Full Pattern Instructions
Body
The body is worked in continuous rounds (do not join unless stated). Use tan/beige yarn.
R1: MR, 6 sc into ring. (6 sts) R2: Inc in each st around. (12 sts) R3: *sc 1, inc* repeat around. (18 sts) R4: *sc 2, inc* repeat around. (24 sts) R5: *sc 3, inc* repeat around. (30 sts) R6–R10: sc in each st around. (30 sts) — 5 rounds even R11: *sc 3, dec* repeat around. (24 sts) R12: *sc 2, dec* repeat around. (18 sts)
Begin stuffing the body now with polyfill. Add a generous amount — the body should feel firm but still squishy.
R13: *sc 1, dec* repeat around. (12 sts) R14: dec around. (6 sts)
Fasten off, leaving a long tail for sewing. Close the hole with a few stitches and weave in the end.
Head
Use tan/beige yarn. The head is slightly larger than the body.
R1: MR, 6 sc. (6 sts) R2: inc in each st. (12 sts) R3: *sc 1, inc* repeat. (18 sts) R4: *sc 2, inc* repeat. (24 sts) R5: *sc 3, inc* repeat. (30 sts) R6: *sc 4, inc* repeat. (36 sts) R7–R11: sc around. (36 sts) — 5 rounds even R12: *sc 4, dec* repeat. (30 sts) R13: *sc 3, dec* repeat. (24 sts)
At this point, insert your safety eyes between R9 and R10, spaced about 8 stitches apart. Attach firmly before continuing.
R14: *sc 2, dec* repeat. (18 sts)
Stuff the head firmly.
R15: *sc 1, dec* repeat. (12 sts) R16: dec around. (6 sts)
Fasten off and close the same way as the body.
Ears (Make 2)
Use tan/beige yarn.
R1: MR, 6 sc. (6 sts) R2: inc in each st. (12 sts) R3: *sc 1, inc* repeat. (18 sts) R4: sc around. (18 sts) R5: *sc 1, dec* repeat. (12 sts)
Sl st to close, leaving a tail for sewing. Do not stuff the ears — they look best flat.
Legs / Hooves (Make 4)
Use black yarn for the bottom section (hoof) and switch to tan for the upper leg.
R1: MR, 6 sc in black. (6 sts) R2: inc in each st. (12 sts) R3: sc in BLO around. (12 sts) — this creates the hoof ridge R4: Switch to tan. sc around. (12 sts) R5: *sc 2, dec* repeat. (9 sts) R6–R7: sc around. (9 sts)
Stuff lightly. Fasten off, leaving a sewing tail. Flatten the top slightly before sewing on.
Tail
Using black yarn, ch 6. Sl st back down the chain to create a twisted tail. Fasten off with a sewing tail.
Muzzle
Use pink yarn or attach a small pink pom pom directly to the face. If crocheting:
R1: MR, 6 sc. (6 sts) R2: inc in each st. (12 sts) R3: *sc 1, inc* repeat. (18 sts) R4: sc around. (18 sts)
Fasten off with a long tail. Do not stuff. Sew flat onto the face.
Black Patches (Optional)
To add cow-style patches, cut small irregular shapes from black felt or use black yarn to surface embroider patches onto the body and head. Alternatively, crochet small flat oval shapes in black and sew them on.
Assembly Steps
Assembly is the most rewarding part — watch your little cow come to life!
- Attach the head to the body by aligning the bottom of the head with the top of the body. Using the sewing tail and tapestry needle, whip stitch around the entire seam. Pull tight and weave in.
- Sew the ears on either side of the head, positioned at approximately R4–R5 from the top. The ears should face slightly forward and outward.
- Attach the legs. Position two legs at the front of the body and two at the back, evenly spaced. The flat tops make them easy to sew flat against the body bottom.
- Sew on the muzzle in the center-lower area of the face, between and slightly below the safety eyes. Pull slightly to create a natural curve.
- Attach the tail at the back bottom of the body.
- Add patches now using felt, embroidery, or crocheted flat pieces.
- Weave in all remaining ends and trim neatly.
Beginner Tips
Tension matters more than you think. Velvet/chenille yarn can be tricky because you can’t always see each stitch clearly. Crochet a little tighter than usual to prevent the stuffing from showing through. If you’re new to velvet yarn, try a swatch before starting the full project.
Always use a stitch marker. Place it at the beginning of each round so you don’t lose count. It’s an easy habit that makes a huge difference.
Stuff as you go. Don’t wait until the very end — for the head and body especially, add stuffing as the opening gets smaller. It’s nearly impossible to stuff through a tiny hole at the end.
Invisible decrease is your best friend. Instead of a regular sc2tog, try the invisible decrease for smoother, less visible seams on the outside of the piece.
Safety eyes should go in before you close up. Once the head is mostly closed, it’s too late to add safety eyes without reopening seams. Mark the eye placement early with stitch markers before committing.
Variations and Color Ideas
One of the best things about this mini cow pattern is how many adorable variations are possible with just a few color swaps:
- Highland Cow: Swap the smooth yarn for a shaggy or fluffy yarn in brown or caramel tones. Use a long-pile fur yarn for the face fluff and a mini horn made with a slip stitch chain.
- Mint or Pastel Cow: Use soft mint, lilac, or baby blue instead of tan for a magical, fantasy-style cow. Works beautifully as a nursery decoration.
- Black and White Classic Dairy Cow: Use white as the base color and add larger black felt patches for the classic Holstein look.
- Tiny Keychain Version: Work with fingering or sport weight yarn and a 2.5 mm hook to make a teeny tiny keychain version. Skip the safety eyes and embroider them instead for safety.
- Seasonal Versions: Add a tiny crocheted scarf in fall colors, a mini Santa hat for Christmas, or a flower crown for spring.
Finishing Thoughts
This mini cow amigurumi is one of those patterns that works up faster than expected but leaves you wanting to make ten more. Once you nail the basic shapes, the variations are truly endless. The chunky velvet yarn gives a professional, boutique-quality finish even for complete beginners, making this a great pattern to share as a gift or sell at craft fairs.
The whole project can comfortably be finished in two to four hours, making it ideal for a cozy evening in or a weekend crafting session. Keep a few of these made up as quick go-to gifts — they’re always a hit with kids and adults alike.
Save This Pattern to Pinterest!
Loved this mini cow amigurumi pattern? Save it to your crochet boards so you can find it again easily. Share your finished makes and tag them with #FoodiePlumCrochet — there’s nothing better than seeing your adorable little cows! Happy crocheting! 🐄