The Best Fluffy Pancakes recipe you will fall in love with. Full of tips and tricks to help you make the best pancakes.
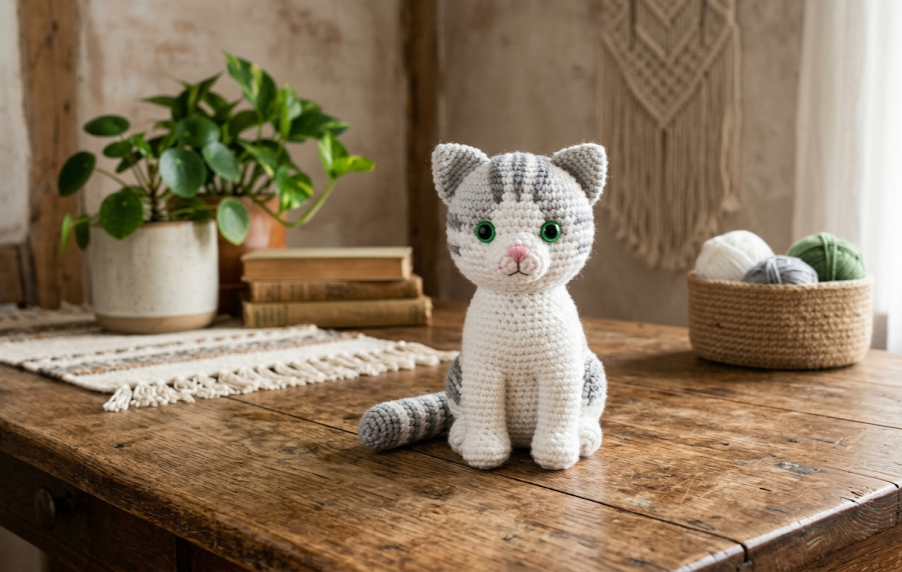
If there’s one amigurumi that stops the scroll every single time, it’s a fluffy white tabby kitten. With its soft chenille texture, green safety eyes, and delicate grey stripe details, this little crochet cat is absolutely irresistible — and the best part? It’s beginner-friendly. Whether this is your first amigurumi project or your fiftieth, this free crochet white tabby kitten pattern will walk you through every single stitch from the head to the tail tip.
This pattern makes an adorable plush kitten standing approximately 18 cm (7 inches) tall. It works up quickly using chunky chenille yarn, making it the perfect weekend project or handmade gift for a cat lover in your life.
Save this post to Pinterest and use the hashtag #FoodiePlumCrochet so the community can see your finished kitten!
| Difficulty | Time | Hook Size | Yarn Weight | Finished Size |
|---|---|---|---|---|
| Intermediate | 4-6 Hours | 5.0mm | Super Bulky | 10 inches |
Materials Needed
- Yarn: White chenille yarn (bulky weight / 6), approximately 150g; small amount of grey chenille or grey worsted weight yarn for stripe embroidery
- Hook: 5 mm crochet hook
- Safety eyes: 12 mm green safety eyes, 1 pair
- Stuffing: Polyester fiberfill
- Tapestry needle: For sewing and weaving in ends
- Stitch markers: To mark the beginning of each round
- Scissors
- Pink embroidery floss or yarn: For the nose
- Black embroidery floss: For whiskers and mouth detail
Abbreviations
- MR – Magic ring
- sc – Single crochet
- inc – Increase (2 sc in the same stitch)
- dec – Invisible decrease (draw up a loop in the front loop only of each of 2 stitches, yarn over and pull through all loops)
- sl st – Slip stitch
- ch – Chain
- BLO – Back loop only
- st(s) – Stitch(es)
- rnd – Round
- FO – Fasten off
- rep – Repeat
Pattern Instructions
Head
The head is worked in continuous rounds from the top down.
Rnd 1: MR, 6 sc (6 sts) Rnd 2: Inc in each st around (12 sts) Rnd 3: Sc 1, inc rep 6 times (18 sts) Rnd 4: Sc 2, inc rep 6 times (24 sts) Rnd 5: Sc 3, inc rep 6 times (30 sts) Rnd 6: Sc 4, inc rep 6 times (36 sts) Rnd 7: Sc 5, inc rep 6 times (42 sts) Rnd 8: Sc 6, inc rep 6 times (48 sts) Rnds 9–16: Sc in each st around (48 sts) — 8 rounds even Rnd 17: Sc 6, dec rep 6 times (42 sts) Rnd 18: Sc 5, dec rep 6 times (36 sts)
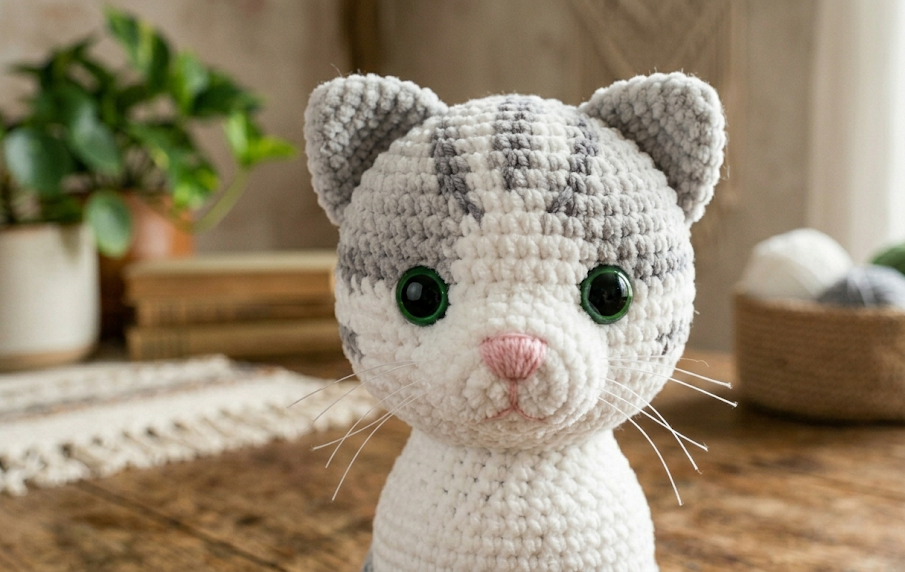
Before continuing, place safety eyes between rounds 10 and 11, approximately 9 stitches apart. Embroider the pink nose in the centre between the eyes using a small triangle of embroidery floss. Add the mouth curve and whiskers using black floss after assembly if preferred.
Rnd 19: Sc 4, dec rep 6 times (30 sts) Rnd 20: Sc 3, dec rep 6 times (24 sts)
Begin stuffing the head firmly with fiberfill.
Rnd 21: Sc 2, dec rep 6 times (18 sts) Rnd 22: Sc 1, dec rep 6 times (12 sts)
Continue stuffing. Do not fasten off — leave a long tail to sew to the body.

Ears (Make 2)
Rnd 1: MR, 6 sc (6 sts) Rnd 2: Inc in each st (12 sts) Rnd 3: Sc 1, inc rep 6 times (18 sts) Rnd 4: Sc in each st (18 sts)
Do not stuff. Flatten the ear and sl st across the opening to close. Leave a long tail. Sew to the top of the head, slightly back from centre. Embroider 2–3 thin grey lines at the base of each ear for the tabby marking.
Body
Rnd 1: MR, 6 sc (6 sts) Rnd 2: Inc in each st (12 sts) Rnd 3: Sc 1, inc rep 6 times (18 sts) Rnd 4: Sc 2, inc rep 6 times (24 sts) Rnd 5: Sc 3, inc rep 6 times (30 sts) Rnd 6: Sc 4, inc rep 6 times (36 sts) Rnds 7–18: Sc in each st around (36 sts) — 12 rounds even Rnd 19: Sc 4, dec rep 6 times (30 sts) Rnd 20: Sc 3, dec rep 6 times (24 sts) Rnd 21: Sc 2, dec rep 6 times (18 sts)
Stuff the body firmly. Leave a long tail for sewing.
After assembly, use grey yarn and a tapestry needle to embroider 3–4 horizontal stripe lines across the tummy and body for the classic tabby look.
Arms (Make 2)
Rnd 1: MR, 6 sc (6 sts) Rnd 2: Inc in each st (12 sts) Rnds 3–4: Sc in each st (12 sts) Rnd 5: Sc 1, dec rep 4 times (8 sts) Rnds 6–12: Sc in each st (8 sts)
Lightly stuff just the bottom half of each arm. Leave a long tail and sew to the sides of the body, just below the neck join.
Legs (Make 2)
Rnd 1: MR, 6 sc (6 sts) Rnd 2: Inc in each st (12 sts) Rnd 3: Sc 1, inc rep 6 times (18 sts) Rnds 4–5: Sc in each st (18 sts) Rnd 6: Sc 1, dec rep 6 times (12 sts) Rnds 7–14: Sc in each st (12 sts)
Stuff the foot and lower leg firmly. Leave a long tail and sew to the base of the body at the front. Add a few small grey embroidered ticks on each foot for paw toe details.
Tail
Rnd 1: MR, 6 sc (6 sts) Rnds 2–20: Sc in each st (6 sts)
Do not stuff or stuff very lightly. Leave a long tail and sew to the back lower base of the body at a slight angle. Embroider a grey tip at the end of the tail.
Tabby Stripe Embroidery
Using a tapestry needle and grey yarn:
- Embroider 3 horizontal lines across the forehead (the classic tabby “M” marking)
- Add 2–3 horizontal lines across the body and tummy
- Add scattered dash marks on the arms and legs
- Add a grey stripe at the tail tip
Use a simple running stitch or chain stitch for clean, defined lines. Don’t pull too tightly — a light hand keeps the chenille texture looking fluffy.
Assembly Steps
- Sew the head to the body, making sure the face is centred and looking forward.
- Attach the ears to the top of the head, angled slightly outward.
- Sew the arms to the upper sides of the body.
- Attach the legs to the lower front base of the body so the kitten can sit upright.
- Sew the tail to the back lower base.
- Embroider all stripe and detail markings using grey yarn.
- Add whiskers using black embroidery floss or thin wire, threading through the cheek area and trimming to equal lengths on both sides.
- Weave in all ends securely.
Beginner Tips
Stitch markers are your best friend. Always mark the first stitch of each round to keep accurate count — it’s very easy to lose track in continuous rounds, especially with chenille yarn where individual stitches can be harder to see.
Stuff as you go. Don’t wait until the very end to stuff — add filling gradually as the piece gets smaller. Waiting too long makes it nearly impossible to stuff the tips of arms and legs properly.
Chenille yarn tips. Chenille yarn creates the most luscious, soft texture for this kitten, but it can be tricky because the stitches aren’t always visible. Work slowly, feel for the stitch before inserting the hook, and use good lighting.
Invisible decrease. Always use the invisible decrease method (working in front loops only) with chenille. It creates a much neater result than a standard decrease, which can leave small holes.
Tension matters. Crochet tightly enough that no stuffing shows through the stitches — if stuffing peeks through, go down a hook size.
Pin before sewing. Before permanently sewing on limbs and ears, pin them in place with a straight pin and step back to check positioning. A small shift in placement can make a big difference to the final look.
Cute Variations to Try
Orange tabby kitten: Swap the white chenille for a warm orange or ginger yarn and use darker orange or brown for the stripes. Perfect for autumn-themed home decor.
Grey tabby: Use light grey chenille as the main colour with dark charcoal for the embroidered markings. Pair with yellow safety eyes for a striking look.
Black cat version: Work the entire pattern in black chenille, skip the stripes, and add bright green or gold eyes. A classic Halloween project!
Miniature version: Use fingering weight yarn and a 2 mm hook to create a tiny pocket-sized kitten that’s equally adorable.
Kitten with a bow: Add a small crocheted bow in pink or red chenille around the neck for an extra-sweet finishing touch.
Seasonal kitten: Attach a tiny crocheted pumpkin, heart, or snowflake to the kitten’s paws for seasonal gifting.
Finishing Notes
This white tabby kitten amigurumi makes a wonderful handmade gift for cat lovers, children, and crochet enthusiasts alike. It’s safe for children over 3 years old when safety eyes are attached securely; for younger children, consider embroidering the eyes instead.
Store finished amigurumi away from direct sunlight to preserve the bright white colour of the chenille yarn. Chenille plushies can be gently hand-washed if needed — lay flat to dry.
If this pattern brought your kitten to life, share a photo on Pinterest using #FoodiePlumCrochet — it means the world to see your beautiful makes! Don’t forget to save this pattern so you can make it again as a gift.