The Best Fluffy Pancakes recipe you will fall in love with. Full of tips and tricks to help you make the best pancakes.
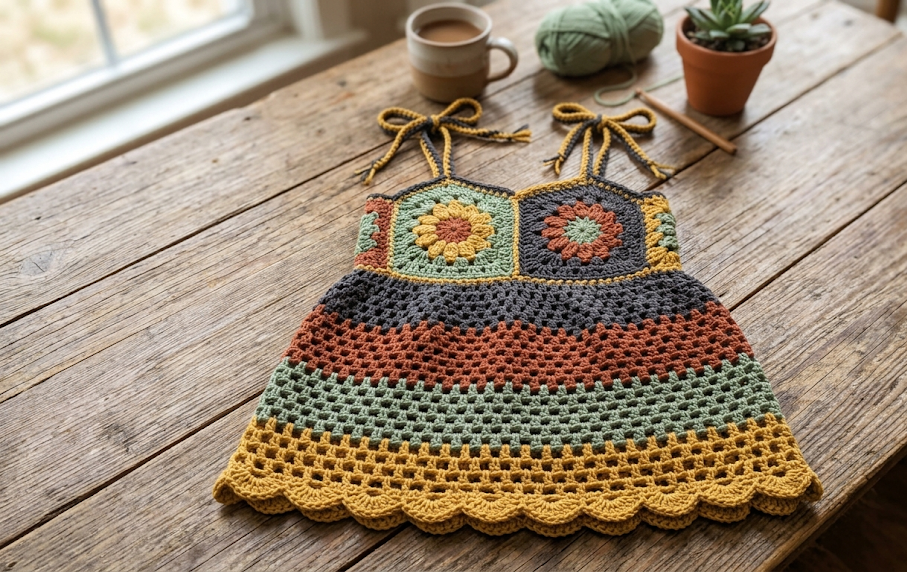
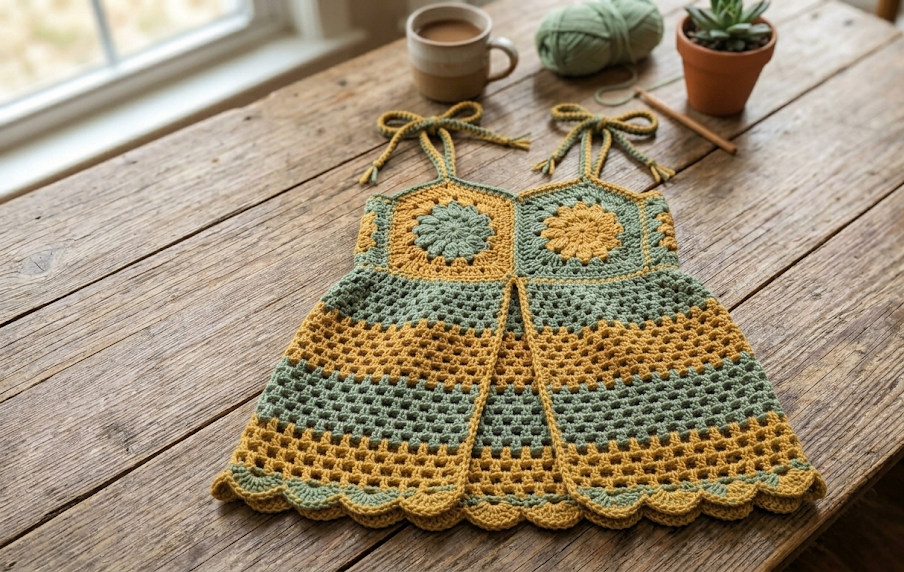
There is something truly magical about a handmade dress on a baby. This boho crochet baby sundress combines the timeless charm of granny square motifs with a dreamy color-blocked mesh skirt, creating a piece that looks like it belongs in a whimsical artisan boutique — but costs a fraction of the price when made with your own hands. With charcoal grey, terracotta rust, sage green, and mustard yellow worked in lacy horizontal stripes, this sundress is equal parts folk art and modern heirloom. The scalloped mustard hem and delicate tie straps finish the look with irresistible boho flair. This pattern is written for a 12–18 month size with a chest circumference of approximately 42 cm (16.5 in) and a total length of approximately 35 cm (14 in). Whether you are making it as a gift, a photo-shoot piece, or a summer staple for your little one, this dress is guaranteed to draw every eye in the room.
| Difficulty Intermediate | Time 10–14 Hours | Hook Size 3.5 mm (E/4) | Yarn Weight DK / Light Worsted | Finished Size Fits 12–18 Months |
Gauge
18 single crochet × 22 rows = 10 cm × 10 cm (4 in × 4 in)
Hook used: 3.5 mm (E/4)
Yarn weight: DK / Light Worsted (Weight 3)
Each granny square motif measures approximately 6 cm × 6 cm (2.4 in × 2.4 in) blocked.
Always work a gauge swatch before beginning. An accurate gauge ensures the bodice fits snugly across the chest without pulling and that the skirt length falls at the right spot.
Materials List
Yarn (DK / Light Worsted Weight 3):
- Color A — Charcoal Grey: approx. 80 m (87 yds)
- Color B — Terracotta Rust: approx. 70 m (77 yds)
- Color C — Sage Green: approx. 70 m (77 yds)
- Color D — Mustard Yellow: approx. 65 m (71 yds)
- Color E — White or Cream: approx. 25 m (27 yds) (granny square center accents)
Notions:
- 3.5 mm (E/4) crochet hook
- Yarn needle for weaving in ends
- Scissors
- Stitch markers × 4
- Rust-proof blocking pins and blocking mat (optional but recommended for granny squares)
- 2 small buttons or beads for strap ties (optional, decorative)
- Measuring tape
Abbreviations Table
| Abbreviation | Meaning |
|---|---|
| ch | chain |
| sl st | slip stitch |
| sc | single crochet |
| hdc | half double crochet |
| dc | double crochet |
| tr | treble crochet |
| sp | space |
| ch-sp | chain space |
| sk | skip |
| rep | repeat |
| pm | place marker |
| BLO | back loop only |
| MR | magic ring |
| RS | right side |
| WS | wrong side |
| ( ) | stitch count at end of round/row |
| [ ] | repeat instructions between brackets |
| join | slip stitch join to first stitch of round |
Pattern Instructions
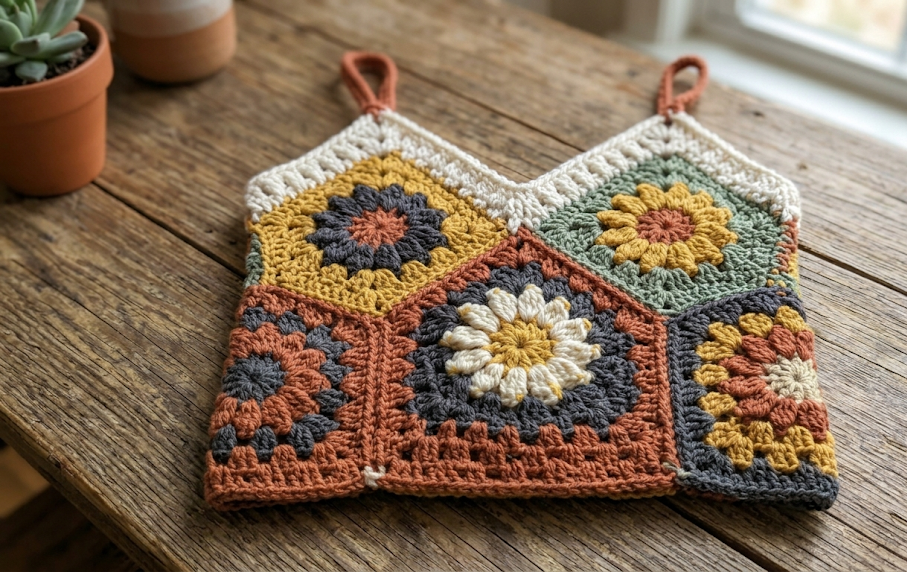
PART 1: GRANNY SQUARE MOTIF (Make 8 total — 4 for front bodice, 4 for back bodice)
These granny squares form the entire bodice yoke. Each square has a floral center in Color E (white) and Color D (mustard), outlined in Color A (charcoal grey).
Magic ring: A magic ring (also called a magic circle) is an adjustable loop that allows you to pull the center of your first round closed tightly so no hole remains — insert your hook into the loop, yarn over, pull up a loop, and work your stitches around the tail end of the ring.
Round 1 (Color E — White): Start with MR. Ch 3 (counts as first dc), 2 dc in MR, ch 2, [3 dc in MR, ch 2] 3 times. Pull ring closed. Join with sl st to top of ch-3. (12 dc, 4 ch-2 sp)
Round 2 (Color D — Mustard Yellow): Join in any ch-2 corner sp. Ch 3, 2 dc in same sp, ch 2, 3 dc in same sp (corner made), ch 1, [3 dc, ch 2, 3 dc] in next corner sp, ch 1 rep 3 times. Join with sl st to top of ch-3. (24 dc, 4 ch-2 corner sp, 4 ch-1 sp)
Round 3 (Color A — Charcoal Grey): Join in any ch-2 corner sp. Ch 3, 2 dc in same sp, ch 2, 3 dc in same sp, ch 1, 3 dc in next ch-1 sp, ch 1, [3 dc, ch 2, 3 dc] in corner sp, ch 1, 3 dc in ch-1 sp, ch 1 rep 3 times. Join with sl st to top of ch-3. (36 dc, 4 ch-2 corner sp, 8 ch-1 sp)
Fasten off. Block lightly. Each square should measure 6 cm × 6 cm.
PART 2: BODICE ASSEMBLY
Step 1 — Joining squares into strips: Arrange 4 squares in a 2 × 2 grid for the front bodice. Using Color A and a flat join method, hold two squares with wrong sides together and sl st through the back loops of both edges to join. (Back loop only — BLO — means inserting your hook under the single back strand of each stitch rather than both loops, creating a ridged seam on the WS.) Join all 4 front squares into a solid panel. Repeat for back bodice panel.
Step 2 — Joining front to back at sides: With RS facing, align front and back panels at side edges. Join Color A and sc through both thicknesses along each side seam, leaving the top 6 cm (2.4 in) open on each side for armhole space. (Do not close the top edge — this remains open for the V-neck and strap attachment.)
Front bodice panel dimensions: approximately 12 cm wide × 12 cm tall (4.7 in × 4.7 in)
Full joined bodice circumference: approximately 42 cm (16.5 in)
PART 3: V-NECKLINE EDGING
With RS facing and Color A, join yarn at center front of bodice top edge.
Row 1 (RS): Ch 1, sc evenly along the top edge of the bodice, working approximately 1 sc per dc and 1 sc per ch-sp. Place a stitch marker at the exact center front stitch. Turn. (approx. 36–38 sc total)
Row 2: Ch 1, sc across to 1 stitch before center marker, sc2tog (invisible decrease: insert hook through front loop of next st and front loop of following st, yarn over, pull through both, yarn over, pull through 2 loops), sc across to end. Turn. (1 stitch decreased at V-point)
Rows 3–4: Repeat Row 2. Fasten off. (Each row removes 1 stitch at center V, shaping the neckline)
PART 4: SKIRT (Worked in rounds, attached to lower edge of bodice)
The skirt is worked directly from the bottom edge of the assembled bodice downward in joined rounds. Colors change every 2 rounds to create the horizontal stripe effect.
Round 1 (Color B — Terracotta): With RS facing, join yarn at any bottom side seam of bodice. Ch 4 (counts as dc + ch 1), sk next st, dc in next st, ch 1, sk next st rep around bottom edge of bodice. Join with sl st to 3rd ch of ch-4. (approx. 22–24 dc, 22–24 ch-1 sp)
Round 2 (Color B): Ch 3, 2 dc in first ch-1 sp, 3 dc in next ch-1 sp rep around. Join with sl st to top of ch-3. (approx. 66–72 dc) [This increases the skirt flare]
Rounds 3–4 (Color B): Ch 4, sk 1 dc, dc in next dc, ch 1, sk 1 dc rep around. Join. (Open mesh continues)
Rounds 5–6 (Color C — Sage Green): Change to Color C. Rep Rounds 3–4 mesh pattern. (same stitch count)
Rounds 7–8 (Color C): Rep mesh rounds. Join. (same stitch count)
Rounds 9–10 (Color D — Mustard Yellow): Change to Color D. Rep mesh rounds. (same stitch count)
Total skirt length at this point: approximately 18–20 cm (7–8 in) from bodice join.
PART 5: SCALLOPED HEM BORDER (Color D — Mustard Yellow)
The scalloped border is worked directly onto the final round of the skirt in Color D.
Border Round 1: Sc in every dc and sc in every ch-1 sp around. Join. (approx. 132–144 sc)
Border Round 2 (Scallop): Sl st in next sc, sk 1 sc, 5 dc in next sc (scallop shell made), sk 1 sc rep around entire hem edge. Join with sl st. Fasten off. (approx. 33–36 shells)
PART 6: SHOULDER STRAPS (Make 2)
Foundation chain (Color A): Ch 60 (or length to fit over shoulder comfortably when tied, approximately 30 cm / 12 in unstretched).
Row 1: Sc in 2nd ch from hook and in every ch across. (59 sc)
Fasten off, leaving a 20 cm (8 in) tail for sewing. The strap is intentionally narrow (1 stitch wide) to create the delicate spaghetti-strap look seen in the original.
Attach straps: Sew one end of each strap to the upper back corners of the bodice using the long tail and a yarn needle. Leave the front ends free as ties — these cross over at the front and tie at the back of the neck, or tie directly at the shoulders.
Assembly Steps
- Block all 8 granny squares to 6 cm × 6 cm on a foam mat using rust-proof pins. Allow to dry completely (approximately 2–3 hours).
- Join squares into two 2 × 2 panels (front and back bodice) using the flat BLO slip stitch join in Color A.
- Join front and back panels along side seams with sc, leaving 6 cm open at the top corners of each side for armholes.
- Work V-neckline shaping (4 rows, decreasing 1 stitch per row at center V-point).
- Attach skirt directly to the lower bodice edge, working Rounds 1–10 of the mesh skirt in color order: terracotta (Rounds 1–4), sage green (Rounds 5–8), mustard yellow (Rounds 9–10).
- Work the scalloped hem border in mustard yellow.
- Chain and single crochet the two shoulder straps (each approximately 60 ch long). Sew the back end of each strap to the top back corners of the bodice, approximately 2 cm in from the side seam. Leave front ends loose for tying.
- Weave in all yarn ends securely using a yarn needle, taking care to bury ends within the color of the same yarn to avoid them showing on the RS.
- If desired, add a decorative label or small button to the bodice front as a brand/style detail.
Beginner/Intermediate Tips
Granny Square Tension: Keep your tension consistent through all 3 rounds of each square. Loose tension in Round 1 leads to a floppy center with a visible hole; tight tension in Round 3 causes the square to curl at the corners. Aim for flat, even corners.
Color Changes in the Skirt: When switching colors, complete the last yarn over of the final stitch in the old color with the new color. This creates a clean, invisible join at the color-change round.
Blocking the Bodice: Block the joined granny square panels before attaching the skirt. A lightly misted spray block (rather than full wet-blocking) works well for DK cotton or cotton-blend yarns and helps the squares lie flat without distorting.
Mesh Round Consistency: For the open mesh skirt, always count your dc and ch-1 spaces at the end of every round. Adding or losing even one stitch creates a visible diagonal line in the mesh. Use stitch markers to mark the round start.
Strap Length Adjustment: Fit the strap length to the specific baby you are dressing. For longer torsos, increase the foundation chain to 70–75 stitches. For smaller babies (9–12 months), reduce to 50 stitches.
Variations
- Monochrome Boho Version: Work the entire dress in a single natural oatmeal or ecru yarn. The texture of the granny squares and open mesh reads beautifully even without color contrast, and the result is a timeless heirloom piece.
- Pastel Rainbow Edition: Replace terracotta, sage, and mustard with lavender, soft pink, and sky blue. This version is ideal for spring celebrations or Easter gifting.
- Toddler Size Up: To scale this pattern to a 2T size, add an extra round to each granny square (making them 8 cm × 8 cm), adjust the bodice to a 3 × 2 grid, and add 4 additional rounds to the skirt before the hem border.
- Festival Top (No Skirt): Stop after Part 3 (neckline edging) and work 2 rounds of sc border around the entire bottom edge of the bodice in Color A for a finished edge. The granny square bodice works beautifully as a standalone crop top or swimsuit cover-up over a onesie.
Save this pattern to your Pinterest boards for later! 📌 Whether you are crocheting your first baby dress or adding to your pattern library, this boho sundress makes a stunning, colorful make. Tag your finished project with #FoodiePlumCrochet so we can see your beautiful work!