The Best Fluffy Pancakes recipe you will fall in love with. Full of tips and tricks to help you make the best pancakes.
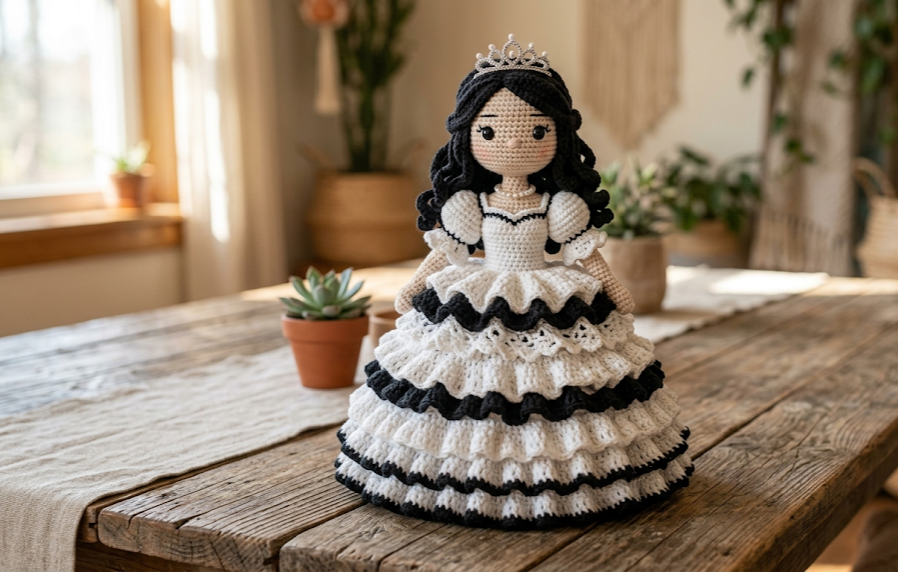
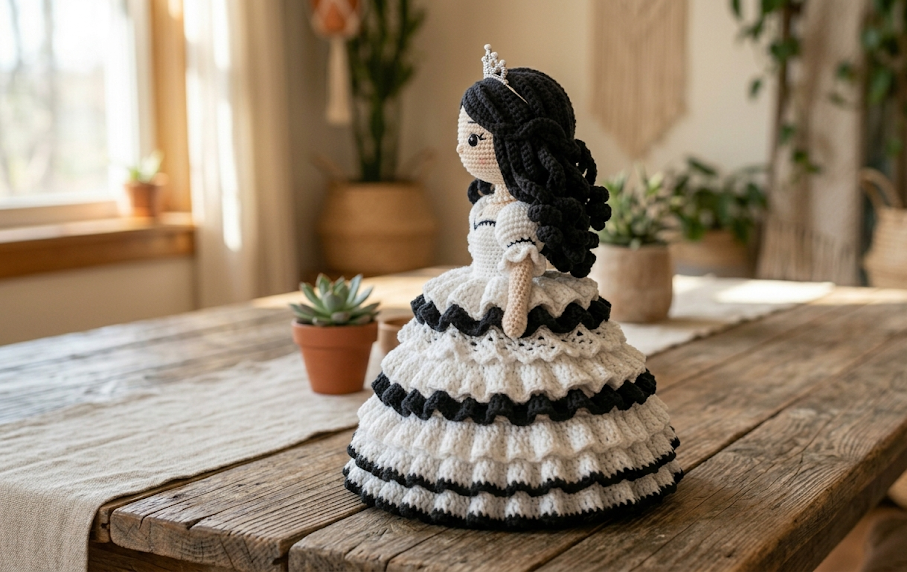
There is something profoundly magical about creating a keepsake with your own two hands, and this exquisite crochet wedding princess doll captures that magic perfectly. Dressed in a breathtaking, multi-layered tier gown with delicate scalloped lace trim, an elegant tiara, and beautifully cascading dark curls, this amigurumi art piece is designed to impress. Whether you are looking to craft a unique, handmade bridal shower gift, a personalized wedding cake topper, or a timeless heirloom doll for a special little one, this comprehensive pattern provides every detail necessary to bring this elegant bride to life.
Crafting an amigurumi doll of this caliber requires patience, precision, and an eye for detail. The seamless shaping of the body, the structural stability of the neck, and the mathematically perfect flow of the layered gown ruffles elevate this design from a simple toy to a masterpiece of yarn engineering. Every stitch is an opportunity to practice tension control, shaping techniques, and intricate garment building. Prepare to immerse yourself in a deeply rewarding creative journey as you transform basic yarn into an heirloom-quality princess doll.
|
Difficulty
Intermediate
|
Time
12-15 Hours
|
Hook Size
2.5 mm
|
Yarn Weight
Sport (Fine #2)
|
Finished Size
28 cm Tall
|
Gauge Swatch Specifications
To ensure your princess doll matches the intended proportions and stands at the correct height, checking your gauge is highly recommended. Amigurumi requires a dense, tight fabric so that the polyester fiberfill stuffing does not peek through the stitches.
- Gauge Swatch: 26 single crochet (sc) stitches and 28 rows over a 10cm x 10cm (4″ x 4″) square using a 2.5mm crochet hook and Sport weight cotton yarn.
- Hook Size Used: 2.5 mm (US B-1 or C-2 depending on manufacturer)
- Yarn Weight Used: Sport Weight (Fine / Category 2), 100% Mercerized Cotton
Materials List
- Yarn A: Sport Weight Cotton Yarn in Skin Tone/Beige (approx. 50 grams / 125 meters)
- Yarn B: Sport Weight Cotton Yarn in Off-White/Wedding White (approx. 100 grams / 250 meters)
- Yarn C: Sport Weight Cotton Yarn in Deep Black or Dark Espresso Brown (approx. 75 grams / 187 meters)
- Crochet Hook: 2.5 mm size
- Safety Eyes: 2 pieces of 10mm plastic safety eyes (dark brown or black)
- Structural Support: 1 piece of heavy-duty aluminum craft wire or plastic dowel (approx. 20cm long, 2mm-3mm diameter) for neck stabilization
- Stuffing: Premium Polyester Fiberfill / Hobby Fill
- Notions: Yarn needle, fine embroidery needle, pink blush makeup with a cotton swab, 10-12 mini rhinestone embellishments or a miniature silver tiara charm, silver metallic embroidery thread for the necklace.
- Tools: Stitch markers, scissors, straight pins for assembly.
Abbreviations Table
| Abbreviation | Stitch / Technique Name |
| ch | Chain stitch |
| st(s) | Stitch(es) |
| sl st | Slip stitch |
| sc | Single crochet |
| hdc | Half double crochet |
| dc | Double crochet |
| inc | Increase (2 single crochet stitches worked into the same stitch) |
| dec | Invisible decrease (single crochet two stitches together using front loops only) |
| BLO | Back Loops Only |
| FLO | Front Loops Only |
| MR | Magic Ring |
| Rnd(s) | Round(s) |
| Row(s) | Row(s) |
Pattern Instructions
Legs (Make 2)
Start with Yarn A (Skin Tone).
- Rnd 1: Work 6 sc into a Magic Ring. A magic ring is an adjustable loop used to start working in the round without leaving a hole in the center. (6)
- Rnd 2: [inc] repeat 6 times. (12)
- Rnd 3 – Rnd 25: sc in each st around. (12)
- Stuff the leg firmly with fiberfill every 5 rounds.
- Fasten off the first leg. Do not fasten off the second leg; proceed directly to joining the legs to form the body.
Body & Torso
Continue with Yarn A.
- Rnd 26: From the second leg, ch 3, join to the first leg with a sc. Work 11 more sc around the first leg, work 3 sc along one side of the ch 3, work 12 sc around the second leg, and work 3 sc along the opposite side of the ch 3. (30)
- Rnd 27 – Rnd 32: sc in each st around. (30)
- Switch to Yarn B (Off-White) to transition to the bridal underwear/bodice base.
- Rnd 33: sc in each st around. (30)
- Rnd 34: In BLO, sc in each st around. Working in Back Loops Only leaves a prominent front loop ridge on the outside of the piece to attach the skirt later. (30)
- Rnd 35 – Rnd 38: sc in each st around. (30)
- Rnd 39: [dec, 13 sc] repeat 2 times. An invisible decrease is performed by inserting the hook into the front loops of the next two stitches, yarning over, pulling through both front loops, yarning over, and pulling through both loops on the hook. (28)
- Rnd 40: sc in each st around. (28)
- Rnd 41: [dec, 12 sc] repeat 2 times. (26)
- Rnd 42: sc in each st around. (26)
- Rnd 43: [dec, 11 sc] repeat 2 times. (24)
- Stuff the torso firmly with fiberfill.
- Switch to Yarn A (Skin Tone).
- Rnd 44: In BLO, sc in each st around. (24)
- Rnd 45: [dec, 2 sc] repeat 6 times. (18)
- Rnd 46: [dec, 1 sc] repeat 6 times. (12)
- Rnd 47 – Rnd 49: sc in each st around to form the neck column. (12)
- Do not fasten off. Proceed directly to the Head.
Head
Continue with Yarn A.
- Rnd 50: [inc] repeat 12 times. (24)
- Rnd 51: [inc, 1 sc] repeat 12 times. (36)
- Rnd 52: [inc, 5 sc] repeat 6 times. (42)
- Rnd 53: [inc, 6 sc] repeat 6 times. (48)
- Rnd 54: [inc, 7 sc] repeat 6 times. (54)
- Rnd 55 – Rnd 67: sc in each st around. (54)
- Preparation for Armature Support: Insert your 20cm craft wire down through the neck column, pushing it roughly 10cm deep into the center of the torso stuffing. The remaining 10cm of wire will extend directly upward into the middle of the head cavity, preventing the doll’s head from drooping. Wrap any exposed top ends of the wire with a layer of masking tape for safety. Stuff the neck column tightly around the wire.
- Safety Eye Placement: Insert 10mm safety eyes between Rnd 59 and Rnd 60, leaving an interim space of 10 stitches between them. Secure the backings tightly inside.
- Rnd 68: [dec, 7 sc] repeat 6 times. (48)
- Rnd 69: [dec, 6 sc] repeat 6 times. (42)
- Rnd 70: [dec, 5 sc] repeat 6 times. (36)
- Rnd 71: [dec, 4 sc] repeat 6 times. (30)
- Stuff the head firmly with polyester fiberfill, ensuring the stuffing is distributed evenly around the central wire core.
- Rnd 72: [dec, 3 sc] repeat 6 times. (24)
- Rnd 73: [dec, 2 sc] repeat 6 times. (18)
- Rnd 74: [dec, 1 sc] repeat 6 times. (12)
- Rnd 75: [dec] repeat 6 times. (6)
- Fasten off, leaving a 20cm tail. Thread the tail through the front loops of the final 6 stitches, pull tightly to close the top of the head perfectly, and weave in the end securely.
Arms (Make 2)
Start with Yarn A (Skin Tone).
- Rnd 1: Work 6 sc into a Magic Ring. (6)
- Rnd 2: [inc, 2 sc] repeat 2 times. (8)
- Rnd 3 – Rnd 24: sc in each st around. (8)
- Stuff the lower half of the arms lightly; leave the upper half unstuffed so they lay flat against the sides of the body.
- Rnd 25: Flatten the top opening of the arm and work 4 sc through both layers simultaneously to close the tube. Fasten off, leaving a 25cm tail for sewing.
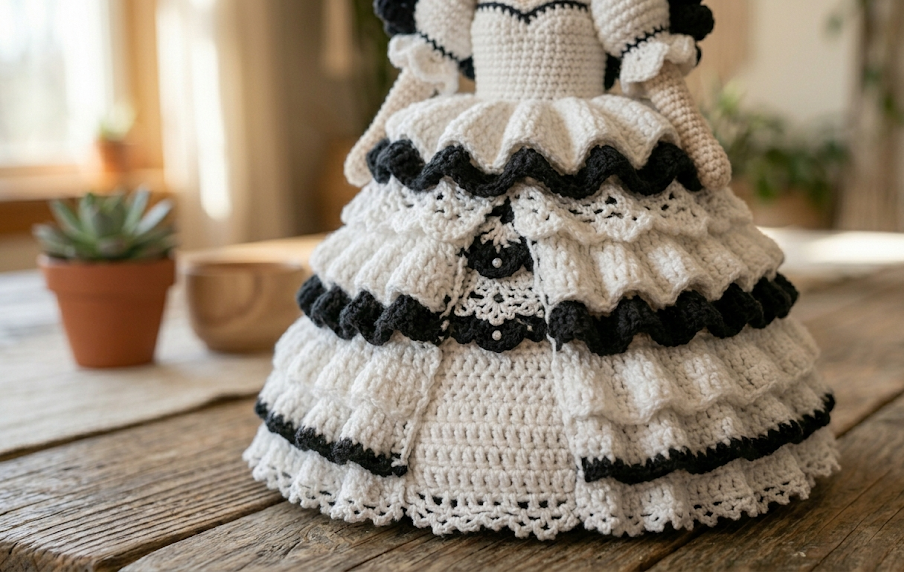
Elaborate Gown Skirt Base
Attach Yarn B (Off-White) to the exposed front loop ridge left behind on Rnd 34 of the body.
- Rnd 1: Work FLO sc in each st around. (30)
- Rnd 2: [inc, 4 sc] repeat 6 times. (36)
- Rnd 3: [inc, 5 sc] repeat 6 times. (42)
- Rnd 4: [inc, 6 sc] repeat 6 times. (48)
- Rnd 5: [inc, 7 sc] repeat 6 times. (54)
- Rnd 6: In BLO, sc in each st around. (54)
- Rnd 7 – Rnd 11: sc in each st around. (54)
- Rnd 12: [inc, 8 sc] repeat 6 times. (60)
- Rnd 13: In BLO, sc in each st around. (60)
- Rnd 14 – Rnd 19: sc in each st around. (60)
- Rnd 20: [inc, 9 sc] repeat 6 times. (66)
- Rnd 21: In BLO, sc in each st around. (66)
- Rnd 22 – Rnd 32: sc in each st around. (66)
- Rnd 33: [ch 3, skip 1 st, sl st in next st] repeat around to create a delicate foundation loop mesh. (33 mesh spaces)
- Rnd 34 (Scalloped Lace Edge): Into each ch-3 space around, work: (1 sc, 1 hdc, 3 dc, 1 hdc, 1 sc). Sl st into the connecting sl st of the previous round. Fasten off and weave in all loose ends.
Skirt Ruffles (Top & Middle Tiers)
- Top Ruffle Tier: Attach Yarn B to the exposed front loops of Rnd 6 of the Skirt Base.
- Rnd 1: ch 2, work 2 dc into each front loop stitch around. (108 dc)
- Rnd 2 – Rnd 5: dc in each st around. (108)
- Rnd 6: [ch 3, skip 1 st, sl st in next st] repeat around. Fasten off.
- Middle Ruffle Tier: Attach Yarn B to the exposed front loops of Rnd 13 of the Skirt Base.
- Rnd 1: ch 2, work 2 dc into each front loop stitch around. (120 dc)
- Rnd 2 – Rnd 6: dc in each st around. (120)
- Rnd 7: [ch 3, skip 1 st, sl st in next st] repeat around. Fasten off.
Dress Bodice & Off-Shoulder Sleeves
Attach Yarn B to the front loop ridge left on Rnd 44 of the neck/torso area, working downwards toward the waist.
- Row 1: sc in each st around, ch 1, turn. (24)
- Row 2 – Row 5: sc in each st across, ch 1, turn. (24)
- Row 6 (Sweetheart Neckline shaping): 6 sc, 1 hdc, 2 dc in next st, sl st 2, 2 dc in next st, 1 hdc, 11 sc. Fasten off.
- Sleeves (Make 2): ch 12. Row 1: 1 sc in second ch from hook and each ch across. (11) Row 2: ch 3, [skip 1 st, sl st in next st] across. Fasten off, leaving a tail.
Hair Cap & Wavy Curls
Using Yarn C (Black).
- Rnd 1: Work 6 sc into a Magic Ring. (6)
- Rnd 2: [inc] repeat 6 times. (12)
- Rnd 3: [inc, 1 sc] repeat 6 times. (18)
- Rnd 4: [inc, 2 sc] repeat 6 times. (24)
- Rnd 5: [inc, 3 sc] repeat 6 times. (30)
- Rnd 6: [inc, 4 sc] repeat 6 times. (36)
- Now we begin the individual cascading hair strands attached directly to the cap:
- Strands 1 – 10 (Back & Sides): ch 45, turn, work 2 hdc into each ch stitch starting from the 3rd ch from your hook all the way back to the base cap, sl st into the next base cap loop. This creates an automatic, beautiful corkscrew curl.
- Strands 11 – 15 (Side Bangs/Braid frames): ch 20, turn, work 1 hdc into each ch stitch back to the base cap, sl st into the next base cap loop.
- Strands 16 – 18 (Front Bangs): ch 10, turn, work 1 sc into each ch stitch back to the base cap, sl st into the next base cap loop.
- Fasten off, leaving a long 40cm yarn tail for sewing the hair cap onto the head.
Tiara / Crown Headpiece
Using Yarn B (Off-White).
- Row 1: ch 26, turn, 1 sc in second ch from hook and next 24 chains. ch 1, turn. (25)
- Row 2: 25 sc across, ch 1, turn. (25)
- Row 3 (Tiara Peaks): [sl st 1, skip 1 st, work (2 dc, ch 2, sl st in 2nd ch from hook to make a picot, 2 dc) all into the next st, skip 1 st] repeat 6 times across to create the structural white background frame. Fasten off, leaving a long tail for head placement.
Assembly Steps
- Position and Secure the Arms: Pin the flat-closed tops of the completed arms to the sides of the torso, precisely one row beneath the neckline transition (Rnd 45). Sew securely through both layers of the body using the yarn tail, ensuring they hang symmetrically.
- Attach the Hair Cap: Place the main hair cap over the top of the doll’s head, positioning the front short bangs (Strands 16-18) slightly offset to the side above the eyes. Pin the base cap securely in place. Using the long tail of Yarn C, stitch neatly around the perimeter of the hair cap base. Let the long cascading corkscrew curls fall naturally over the shoulders and down the back.
- Affix the Tiara: Curve the completed white tiara piece into a crescent shape and position it directly onto the top of the head, sitting right along the front edge of the hair cap line. Sew the bottom edge flat down into the head stitches.
- Embellish and Decorate: Sew or fabric-glue your rhinestone accents or a miniature silver tiara charm directly onto the center peaks of the crochet crown. Using silver metallic embroidery thread, embroider a delicate v-shape chain around the doll’s neck to replicate a sparkling crystal bridal necklace.
- Add Facial Makeup Finishes: Dip a clean cotton swab lightly into real cosmetic pink blush. Gently apply a soft circle of blush onto the doll’s cheeks right beneath the outer corners of the safety eyes to achieve a youthful, glowing bridal blush look.
Beginner/Intermediate Tips
- Tension Control for Clothing Tiers: When transitioning from the tight, firm body stitching to the flowing ruffles of the dress, consciously loosen your tension slightly. Double crochets look best when they have a bit of movement, allowing the tiers of the gown to cascade outward naturally without curling tightly inward.
- The Perfect Invisible Decrease: Always use the invisible decrease method for the head and upper torso. Regular decreases leave small bumps and tiny visible gaps in amigurumi, whereas working into the front loops only creates a smooth, continuous fabric surface.
- Managing Hair Curls: Corkscrew curls can twist uncontrollably during assembly. Use straight pins to organize and place each strand exactly where you want it on the doll’s shoulders before sewing or gluing them down permanently.
Variations
- Classic Ivory or Pastel Accent Gown: Substitute Yarn B with a rich cream, soft ivory, or light blush pink yarn to match a specific real-world wedding dress style or thematic color palette.
- Personalized Hair Transformations: Adjust the length of the chains on the hair strands to match the bride! Shorten the chains to 15 for a sleek bob look, or alter Yarn C to blonde, auburn, or silver-gray.
- Blossoming Veil Enhancement: Instead of a structural crown, attach a piece of real tulle fabric gathered at the back of the hair cap with small crochet roses for a romantic bohemian bridal veil aesthetic.
- Glitz and Glamour Sparkle Yarn: Mix a metallic silver or gold blending thread together with your white cotton yarn when working the dress ruffles to create an all-over shimmering starlight dress effect.