
The Best Fluffy Pancakes recipe you will fall in love with. Full of tips and tricks to help you make the best pancakes.

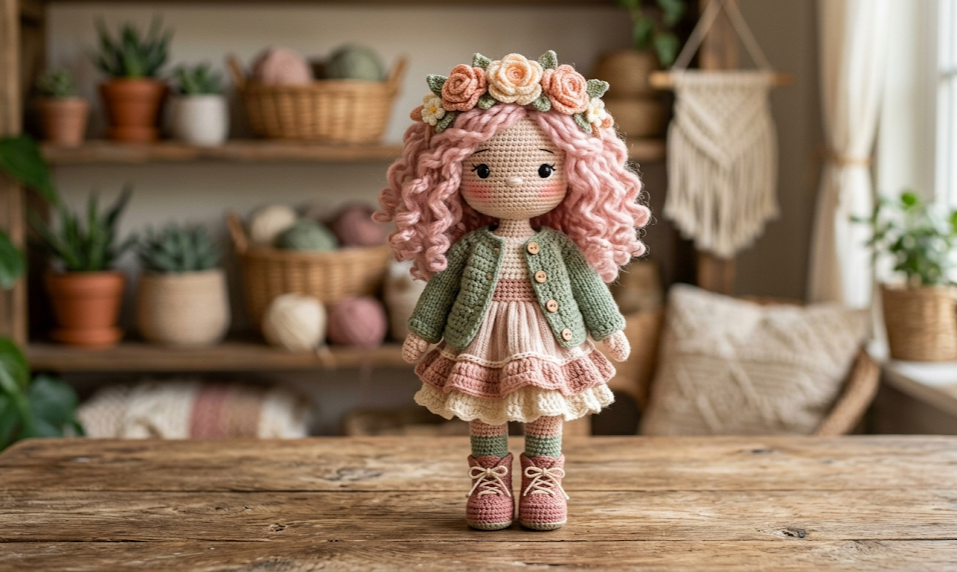
There’s something irresistibly calming about a handmade doll with a sleepy smile, a crown of crocheted roses, and hair the color of a sunset. Posy is exactly that kind of doll — soft, romantic, and just detailed enough to feel like a real keepsake rather than a quick craft project. With her dusty rose curls, sage green cardigan, and a wrap-around scarf that begs to be fussed with, she’s the kind of project that crocheters return to again and again, working on one part each evening until she comes fully to life on the table in front of them.
This pattern is written for the intermediate-to-advanced crocheter who already feels confident with amigurumi basics — magic rings, continuous rounds, and simple shaping — and who is ready for a bigger project that combines doll-making with flower-making, garment construction, and a little bit of embroidery. She’s perfect as a nursery shelf decoration, a thoughtful handmade gift, a photography prop for boho-themed shoots, or simply a relaxing weekend-after-weekend project for yourself. Nothing about Posy is rushed, and that’s exactly the point — every round builds slowly into something that feels worth the time.
By the end of this pattern, you’ll have a fully poseable 30cm soft doll dressed in three layers of clothing, topped with a crown of tiny crocheted flowers, and finished with hand-laced boots. Let’s gather the yarn and get started.
|
Difficulty
Advanced
|
Time
18–22 hrs
|
Hook Size
2.5mm / 3.5mm
|
Yarn Weight
Fingering / DK / Bulky
|
Finished Size
30cm (12 in)
|
GAUGE
Gauge matters more in doll-making than almost any other crochet project, because a looser gauge means stuffing will peek through the stitches and the doll will lose its shape.
- Body/face gauge: 18 sts x 20 rows = 10cm x 10cm (4in x 4in) square, worked in single crochet (sc)
- Hook used for gauge: 2.5mm
- Yarn used for gauge: Fingering weight (#2) cotton-acrylic blend
- Work your gauge swatch tighter than you would for a garment — amigurumi crochet should feel dense and firm, almost stiff, so the stuffing stays invisible.
MATERIALS LIST
- Fingering weight (#2) yarn, ivory/blush (skin tone) — 50g
- DK weight (#3) yarn, sage green (cardigan, wrap scarf, headscarf) — 60g
- DK weight (#3) yarn, dusty rose (underdress) — 30g
- DK weight (#3) yarn, ivory/cream (overskirt, flower petals, lace trim) — 30g
- DK weight (#3) yarn, blush pink (boots) — 15g
- Bulky boucle or eyelash yarn, dusty rose (hair curls) — 40g
- Small scraps: peach and cream (flower petals), sage green (leaves)
- 2.5mm crochet hook (body, face, clothing)
- 3.5mm crochet hook (hair loops, flowers)
- Polyester fiberfill stuffing
- Tapestry needle (yarn needle)
- Stitch markers
- Embroidery floss — black or dark brown (eyes/lashes), pink (optional blush stitching)
- Sewing needle and thread (for securing flowers and boots laces)
- Small amount of craft glue or hot glue (optional, for reinforcing flower crown)
- Straight pins (for positioning pieces during assembly)
ABBREVIATIONS
| Abbreviation | Meaning |
|---|---|
| ch | chain |
| sc | single crochet |
| inc | increase (2 sc in same stitch) |
| dec | invisible decrease |
| sl st | slip stitch |
| st(s) | stitch(es) |
| rnd(s) | round(s) |
| BLO | back loop only |
| MR | magic ring |
| rep | repeat |
| sp | space |
| ( ) | stitch count at end of round/row |
| * * | repeat instructions between asterisks |
PATTERN INSTRUCTIONS
Gauge Swatch: Before starting, ch 19 and work 20 rows of sc with the 2.5mm hook and fingering weight yarn. Measure the square — it should be 10cm x 10cm. If your swatch is larger, go down a hook size; if smaller, go up.
Technique note — Magic Ring (MR): Instead of chaining and joining into a circle (which leaves a small hole), wrap yarn around two fingers, insert hook through the loop, and pull up the first round of stitches through it. Pulling the tail afterward closes the hole completely. This is used at the start of every round piece in this pattern.
Technique note — Invisible Decrease (dec): Insert hook into the front loop only of the next stitch, then the front loop only of the following stitch, yarn over and pull through both loops, then complete as a normal single crochet. This decrease sits flatter and is far less visible than a standard sc2tog.
PART 1: HEAD (make 1, ivory/blush)
Rnd 1: MR, 6 sc (6) Rnd 2: inc in each st around (12) Rnd 3: sc 1, inc x6 (18) Rnd 4: sc 2, inc x6 (24) Rnd 5: sc 3, inc x6 (30) Rnd 6: sc 4, inc x6 (36) Rnds 7–12: sc in each st around (36) — work 6 even rounds Rnd 13: sc 4, dec x6 (30) Rnd 14: sc 3, dec x6 (24) Begin stuffing firmly at this point, adding more as you decrease. Rnd 15: sc 2, dec x6 (18) Rnd 16: sc 1, dec x6 (12) Rnd 17: dec x6 (6) Fasten off, leaving a long tail. Weave tail through remaining 6 sts, pull closed.
PART 2: BODY (make 1, ivory/blush)
Rnd 1: MR, 6 sc (6) Rnd 2: inc in each st around (12) Rnd 3: sc 1, inc x6 (18) Rnd 4: sc 2, inc x6 (24) Rnd 5: sc 3, inc x6 (30) Rnds 6–12: sc in each st around (30) — 7 even rounds Rnd 13: sc 3, dec x6 (24) Rnd 14: sc 2, dec x6 (18) Stuff firmly. Rnd 15: sc 1, dec x6 (12) Rnd 16: dec x6 (6) Fasten off, leaving a long tail for sewing to head.
PART 3: ARMS (make 2, ivory/blush)
Rnd 1: MR, 5 sc (5) Rnd 2: inc in each st around (10) Rnds 3–12: sc in each st around (10) — 10 even rounds Stuff lightly, leaving the last 2cm unstuffed and flat for sewing. Fasten off, leave long tail for attaching to body.
PART 4: LEGS & BOOTS (make 2)
Begin in blush pink for the boot: Rnd 1: MR, 6 sc (6) Rnd 2: inc in each st around (12) Rnd 3: sc 1, inc x6 (18) Rnds 4–6: sc in each st around (18) — 3 even rounds Rnd 7: sc 1, dec x6 (12) Switch to ivory/blush (skin tone) for the leg, carrying the boot color tail inside to weave in later. Rnds 8–15: sc in each st around (12) — 8 even rounds Stuff firmly through the boot and leg. Fasten off, leaving a long tail for attaching to body. With sewing needle and pink embroidery floss, stitch 3 small straight “laces” up the front of each boot, finishing with a tiny bow knot at the top.
PART 5: HAIR CAP & CURLS
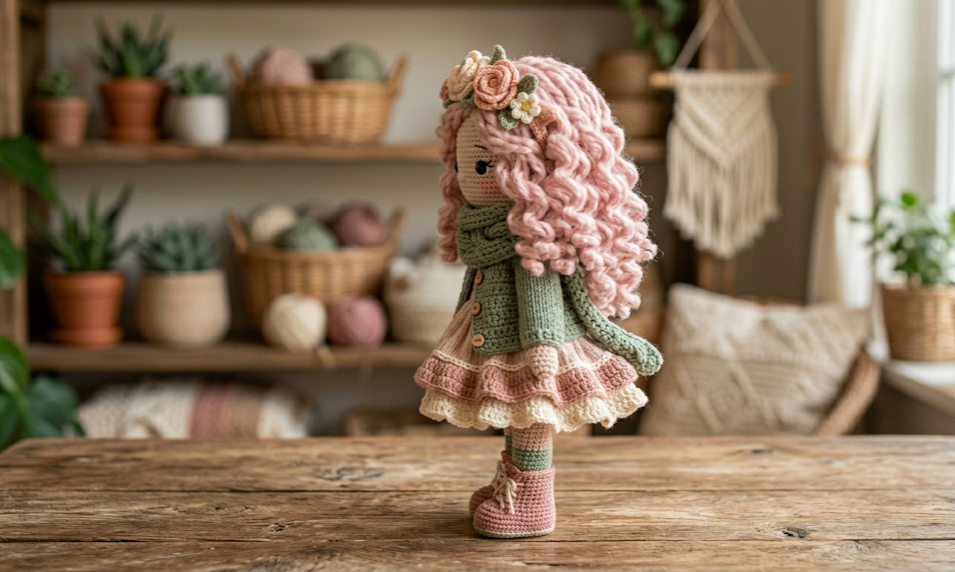
The hair is built in two layers: a fitted skin-matching base cap, then loopy bulky-yarn curls sewn on top.
Hair Cap (ivory/blush, 2.5mm hook): Rnd 1: MR, 6 sc (6) Rnd 2: inc in each st around (12) Rnd 3: sc 1, inc x6 (18) Rnd 4: sc 2, inc x6 (24) Rnd 5: sc 3, inc x6 (30) Rnd 6: sc 4, inc x6 (36) Rnds 7–9: sc in each st around (36) — 3 even rounds Fasten off. This dome will sit on top of the head like a cap and is sewn down around its edge only, leaving the sides open for hair to fall through.
Curls (dusty rose bulky boucle, 3.5mm hook): Technique note — Loop Stitch: Insert hook into stitch, wrap yarn around two fingers to create a loop, pull through, then yarn over and pull through both loops to lock it in place. This creates a dangling loop of yarn that becomes a “curl” once trimmed and shaped.
Working directly into the sewn-down edge of the hair cap, sc around using bulky yarn, then on the return round work a loop stitch in every stitch to create a full ring of curls framing the face. Repeat for 2–3 rounds, increasing loop length slightly on the lower rounds so curls cascade past the shoulders. Trim loop ends and gently twist each curl around a finger to set its shape; steam lightly with an iron held a few cm away if curls need extra hold.
PART 6: HEADSCARF (sage green, 2.5mm hook)
Row 1: Ch 22, sc in 2nd ch from hook and each ch across (21) Technique note — working into the chain: when chaining a foundation row, always skip the first chain from the hook before placing your first stitch; that skipped chain becomes the “turning” chain. Rows 2–4: ch 1, turn, sc in each st across (21) Fasten off, leaving long tails at both corners for tying behind the head.
PART 7: CARDIGAN (sage green, 2.5mm hook)
Worked as one flat rectangle, then folded and seamed at the shoulders.
Row 1: Ch 30, sc in 2nd ch from hook and each ch across (29) Rows 2–14: ch 1, turn, sc in each st across (29) — 13 even rows Fasten off.
Fold the rectangle in half widthwise to find the shoulder line. Mark 6 sts in from each fold edge for armholes and leave these unsewn. Sew side seams from the hem up to the armhole markers on both sides, leaving the top open as a neckline and the marked sections open as armholes. Turn right-side out.
PART 8: WRAP SCARF (sage green, 2.5mm hook)
Ch 60, sc in 2nd ch from hook and each ch across (59) Row 2: ch 1, turn, sc in each st across (59) Fasten off. This long single strip wraps twice around the doll’s neck and is tacked in place with a few invisible stitches once positioned.
PART 9: UNDERDRESS (dusty rose, 2.5mm hook)
Worked top-down starting at the waist as a tube, then flared for the skirt.
Rnd 1: Join yarn around the doll’s torso at waist height with sl st, ch 1, sc evenly around — 24 sc (24) Rnds 2–4: sc in each st around (24) — 3 even rounds Rnd 5: sc 3, inc x6 (30) Rnd 6: sc in each st around (30) Rnd 7: sc 4, inc x6 (36) Rnds 8–10: sc in each st around (36) — 3 even rounds Fasten off.
PART 10: OVERSKIRT & LACE TRIM (ivory/cream, 2.5mm hook)
Rnd 1: Join yarn at waist over the underdress, ch 1, sc evenly around — 24 sc (24) Rnd 2: sc 3, inc x6 (30) Rnd 3: sc 4, inc x6 (36) Rnd 4: sc 5, inc x6 (42) Rnds 5–6: sc in each st around (42) — 2 even rounds Lace trim row: Rnd 7: sk 1 st, 5 dc in next st, sk 1 st, sl st in next st rep around — this creates a scalloped shell edge along the hem. Fasten off.
PART 11: FLOWER CROWN — Flowers (make 6) & Leaves (make 4)
Flower (peach or cream, 3.5mm hook): Rnd 1: MR, 5 sc (5) Rnd 2: ch 3, sl st in same st, sl st in next st rep around to form 5 petals Fasten off, leaving a tail for sewing.
Leaf (sage green, 2.5mm hook): Ch 6, sl st in 2nd ch from hook, sc in next 2 ch, hdc in next 2 ch, 3 sc in last ch (working into the opposite/second side of the chain), hdc in next 2 ch, sc in next 2 ch, sl st in last ch. Technique note — second side of the chain: after working up one side of the foundation chain, continue stitching down the unused loops on the underside of the same chain to create a symmetrical leaf or petal shape. Fasten off, leaving a tail for sewing.
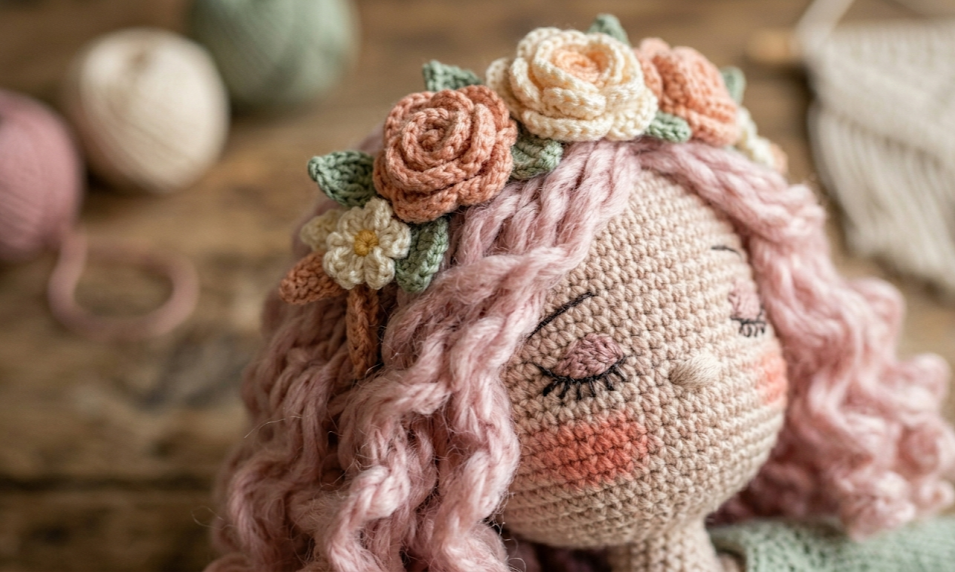
Sew flowers and leaves directly onto the hair curls and headscarf in a cluster around one side of the head, layering 3–4 flowers with leaves tucked between them.
ASSEMBLY STEPS
- Insert a small ball of stuffing into the neck opening of the head, then sew the head onto the body’s top opening, inserting it about 1cm down into the body cavity before stitching for a secure, wobble-free neck join.
- Pin the arms at shoulder height, one on each side of the body, roughly 2cm below the neck seam, and sew firmly in place using a whip stitch through both layers.
- Pin the legs to the bottom front of the body, spaced about 2cm apart, angled very slightly outward, and sew securely around the flattened top edge of each leg.
- Embroider the face before adding hair: use black or dark brown floss to stitch two curved closed-eye lash lines roughly 2cm apart, then add a small smile in the same floss centered below the nose area. Brush pink blush color or stitch tiny pink straight stitches onto each cheek.
- Sew the hair cap onto the head along its edge only, centering it so curls will fall evenly on both sides of the face.
- Tie the headscarf around the crown of the head, knotting the long tails at the nape of the neck and trimming any excess.
- Slide the underdress down over the body to waist height and tack the top edge in place with a few stitches if it feels loose.
- Add the overskirt over the underdress in the same way, letting the scalloped lace hem fall slightly longer than the underdress beneath it.
- Dress the doll in the cardigan, sliding the arms through the armholes, and leave it open at the front.
- Wrap the long scarf twice around the neck, crossing the ends at the front, and tack lightly with 2–3 invisible stitches so it stays in place.
- Position the flower crown cluster on one side of the head, just above the ear, and secure with several small stitches through the hair cap and a dot of craft glue underneath for extra hold.
- Tie the boot laces into small bows and trim any excess thread.
BEGINNER/INTERMEDIATE TIPS
- Use a stitch marker on the first stitch of every round and move it up each time — amigurumi is worked in a continuous spiral with no joining slip stitch, so it’s easy to lose track of where a round starts.
- Stuff a little at a time as you decrease, rather than all at once at the end — this prevents lumps and keeps the head and body perfectly round.
- When changing colors mid-round (as in the legs), drop the old color, pick up the new one, and crochet over both tails for a few stitches to avoid having to weave them in later.
- If your loop stitch curls look too tight or springy, steam them lightly with an iron held a few centimeters away (never touching) — this relaxes the boucle yarn into soft waves.
- Pin pieces like the cardigan and flower crown in place before sewing and step back to check placement; doll faces and proportions are very sensitive to even small asymmetries.
VARIATIONS
- Autumn Acorn Doll: Swap the palette for burnt orange, burgundy, and brown, and replace the flower crown with tiny crochet acorns and oak leaves.
- Lavender Fields Doll: Use lavender and dusty purple for the hair and dress, with a crown of small purple flower clusters instead of roses.
- Mini Keychain Version: Scale the whole pattern down using thread-weight yarn and a 1.75mm hook for a 10cm pocket-sized doll perfect for bag charms.
- Boyish Boho Doll: Replace the dress and overskirt with simple shorts and a vest, and swap the flower crown for a small knit cap with a single flower pin.
- Bridal Bouquet Doll: Make the entire outfit in ivory and white tones with a longer lace overskirt and a fuller flower crown for a wedding-themed keepsake.
SAVE THIS PATTERN
If you loved making Posy, save this pin so you can find your way back to every part of this pattern whenever you need it. Tag your finished doll and share her with the community using #FoodiePlumCrochet — we love seeing every curl, flower, and stitch you add to make her your own.



