
The Best Fluffy Pancakes recipe you will fall in love with. Full of tips and tricks to help you make the best pancakes.

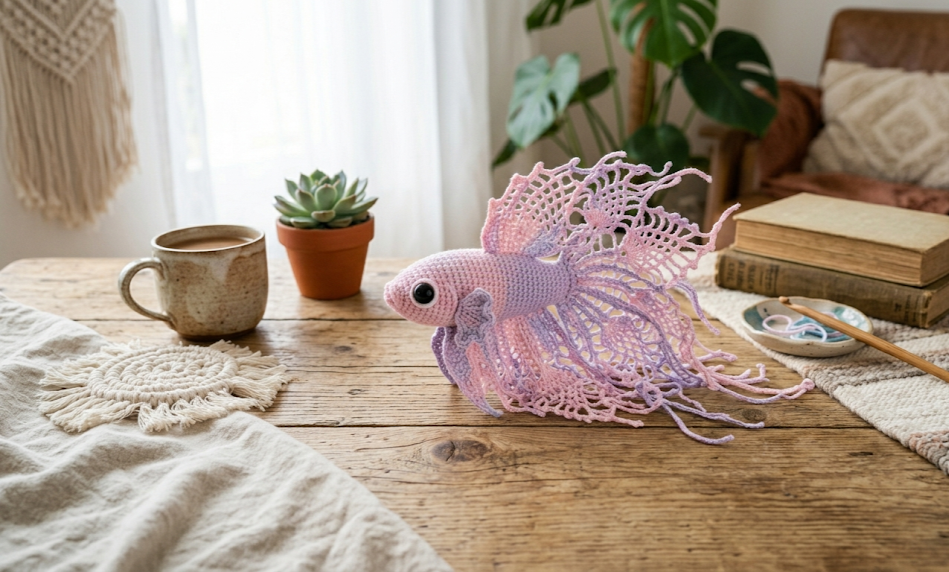
Crochet has a unique way of breathing life into soft fibers, turning simple strands of yarn into enchanting keepsakes. If you have ever been mesmerized by the elegant, fluid movements of an aquarium fish, this project is bound to capture your heart. The Mini Fancy Betta Fish is an absolute showstopper of a pattern, combining the plush texture of chenille yarn with the delicate, lace-like appearance of fine cotton thread. The result is a stunning amigurumi piece that embodies majesty and whimsical style, making it a perfect addition to a nursery, a creative office desk, or a thoughtful handmade gift for an aquatic enthusiast.
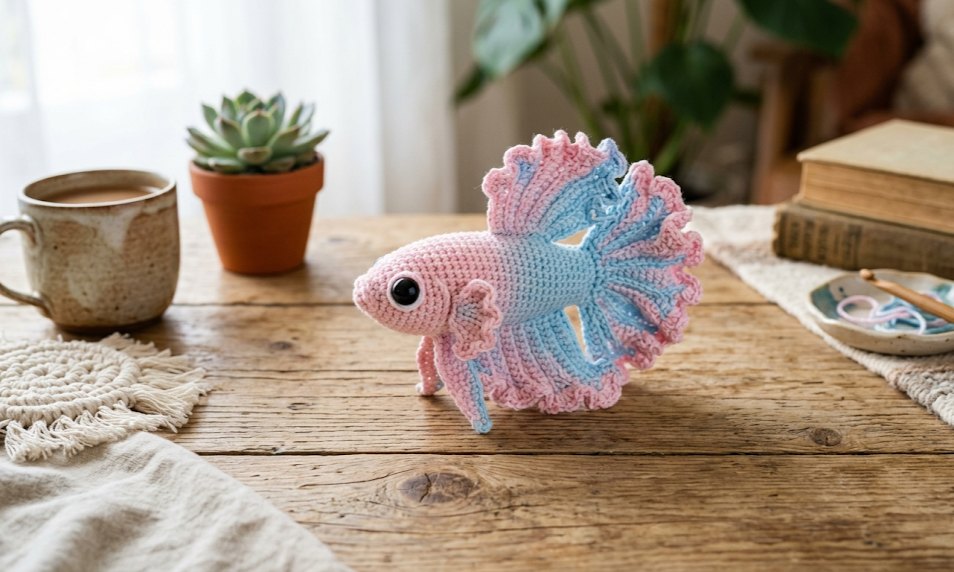
This beautiful creature features a softly sculpted pastel gradient body that tapers gracefully into an spectacular arrangement of flowing fins. By pairing two contrasting yarn weights and introducing a touch of subtle metallic shimmer, you can create a gorgeous, multi-dimensional underwater marvel that looks complex but breaks down into wonderfully logical steps. Whether you are expanding your amigurumi skills or looking for a majestic weekend project, this comprehensive pattern will guide you step-by-step through every stitch, round, and delicate detail.

| Difficulty Intermediate | Time 3-4 Hours | Hook Size 3.5mm / 2.5mm | Yarn Weight Bulky & Fine | Finished Size ~15 cm |
Gauge and Swatch Details
Achieving an accurate gauge ensures that your amigurumi remains firm enough to keep stuffing hidden, while allowing the lacy cotton fins to drape perfectly.
- Gauge Swatch: 16 stitches and 18 rows over a 10cm x 10cm square using single crochet with chenille yarn and a 3.5mm crochet hook.
- Hook Sizes Used: 3.5 mm (for the plush body) and 2.5 mm (for the fine lace fins).
- Yarn Weights Used: Bulky/Chunky (Weight 5) chenille yarn and Fine/Sport (Weight 2) cotton yarn.
Materials List
Before diving into your project, gather your crafting materials to ensure a smooth, uninterrupted crochet experience:
- Body Yarn: 80 grams of Soft Chenille Yarn in a pastel gradient pattern (pink, lavender, light blue shades).
- Fin Yarn: 20 grams of Fine Cotton Yarn in a matching soft blue or light pink tone.
- Accent Thread: Very thin metallic thread (silver or iridescent) for an optional subtle shine woven lightly through the fins.
- Notions:
- 3.5 mm and 2.5 mm crochet hooks
- Pair of 10 mm safety eyes
- Small decorative glass beads (2–3 mm, lightweight) for optional edge detailing
- 40 grams of premium polyester stuffing
- Sturdy yarn needle
- Fine sewing needle (if adding beads)
- Sharp embroidery scissors
Abbreviations Table
Refer to this comprehensive guide for all stitch shortcuts utilized throughout the pattern instructions:
| Abbreviation | Stitch / Technique Description |
| ch | Chain stitch |
| sc | Single crochet |
| inc | Increase (work 2 single crochet stitches into the same stitch) |
| dec | Decrease (invisible single crochet decrease across 2 stitches) |
| sl st | Slip stitch |
| MR | Magic Ring |
| Rnd | Round number |
| Row | Row number |
| st(s) | Stitch(es) |
Pattern Instructions
Part 1 — Body
The body of the Mini Fancy Betta Fish is worked from the nose backward using the plush chenille yarn and a 3.5 mm hook. Work in continuous spiral rounds without joining.
Rnd 1: Begin by creating a Magic Ring (MR). Note: A Magic Ring is an adjustable loop technique that allows you to pull the center opening completely closed to prevent stuffing leak. Work 6 sc into the MR. (6)
Rnd 2: Work an inc in each of the next 6 sts around. (12)
Rnd 3: [sc in the next st, inc in the following st] repeat 6 times around. (18)
Rnd 4: [sc in the next 2 sts, inc in the following st] repeat 6 times around. (24)
Rnd 5: [sc in the next 3 sts, inc in the following st] repeat 6 times around. (30)
Rnd 6: sc in each of the next 30 sts around. (30)
Rnd 7: sc in each of the next 30 sts around. (30)
Rnd 8: sc in each of the next 30 sts around. (30)
Rnd 9: sc in each of the next 30 sts around. (30)
Rnd 10: sc in each of the next 30 sts around. (30)
Rnd 11: [sc in the next 3 sts, dec] repeat 6 times around. Note: An invisible decrease is worked by inserting your hook into the front loops only of the next two stitches, pulling up a loop, and completing a normal single crochet. (24)
Face Detail Break: Pause your stitching here to insert the 10 mm safety eyes securely between Rnd 5 and Rnd 6. Space the eyes approximately 8 stitches apart on opposite sides of the face, ensuring they line up symmetrically. Press the washers firmly onto the back of the posts until they click into place.
Part 2 — Head Shape & Taper
Continue working with your chenille yarn from the body boundary to complete the rear body taper.
Rnd 12: sc in each of the next 24 sts around. (24)
Rnd 13: sc in each of the next 24 sts around. (24)
Rnd 14: sc in each of the next 24 sts around. (24)
Fasten off the chenille yarn, leaving a generous 20 cm tail for closing and sewing. Stuff the main body firmly with polyester stuffing, shaping it into a smooth, plump aerodynamic fish silhouette. Use the yarn needle to weave the yarn tail through the front loops of the remaining 24 stitches, pulling tight to close the back end neatly.
Part 3 — Fins (Make 6 to 8 Panels)
Switch to your fine cotton yarn and the 2.5 mm crochet hook to fashion the sprawling, lightweight fin extensions. If you wish to incorporate a metallic sheen, hold your thin metallic thread together alongside your cotton yarn throughout these panels.
Row 1: ch 12. (12)
Row 2: Beginning in the second chain from your hook, work 1 sc across into each of the next 11 chains, turn. (11)
Row 3: ch 2, skip the first st, sc into the next st, [ch 2, skip 1 st, sc] repeat across to the end of the row to create an open lace effect, turn. (6 mesh spaces)
Row 4: sl st evenly along the entire scalloped outer edge to add structure and a clean line. (11)
Fasten off each panel, leaving an extra-long tail for assembly. For an enhanced fairy-tale finish, use a fine sewing needle and thread to carefully sew tiny glass beads along the structural outer ridges of Row 4.
Part 4 — Side Fins (Make 2)
These are the delicate pectoral fins placed near the gill area. Use the fine cotton yarn and 2.5 mm hook.
Rnd 1: Work 6 sc into a MR. (6)
Rnd 2: [sc in the next st, inc in the following st] repeat 3 times around. (9)
Rnd 3: sc in each of the next 9 sts around. (9)
Rnd 4: sc in each of the next 9 sts around. (9)
Fasten off, flattening the side fins into small paddles. Leave a tail for joining.
Assembly Steps
Bringing your Mini Fancy Betta Fish together requires patience and precise alignment to give it an elegant, swimming look.
- Fin Layering Preparation: Take your 6 to 8 completed fin panels. Arrange them into overlapping stacks of three or four panels to form a dense, high-volume cluster for the spectacular tail structure.
- Attaching the Tail: Position the main tail cluster at the very back edge of the tapered body (Rnd 14). Using a yarn needle, securely sew the base rows of the fin panels directly into the chenille fabric. Ensure the stitches pass deep through multiple layers so the heavy tail does not droop.
- Placing Pectoral Fins: Position the two side fins symmetrically on either side of the fish body, approximately 3 rows behind the safety eyes (around Rnd 8). Angle them slightly downward to replicate a gliding posture, and stitch them flat against the body.
- Mouth Details: Using a scrap piece of pink cotton yarn, embroider a slight, soft horizontal expression right at the tip of the nose (Rnd 1) to form a cute, realistic mouth structure.
- Finishing Flourishes: Weave all remaining yarn tails deep into the center of the plush body. Pull slightly and snip closely; the ends will retract cleanly inside the stuffing.
Beginner/Intermediate Tips
- Handling Chenille Yarn: Plush chenille yarn can easily shed or “shed fluff” if pulled too forcefully or ripped back frequently. Maintain a relaxed tension, and use a smooth hook to avoid snagging.
- Finding Hidden Stitches: Because chenille yarn is incredibly fuzzy, stitch definitions can become hidden. Always use a locking stitch marker in the first stitch of your round so you do not lose track of your counts.
- Tension Control for Lace: When switching to the fine cotton fin panels, keep your chains consistently loose. Tight chain loops will cause the lace structure to warp and twist instead of spreading flat like a magnificent underwater fan.
Creative Variations
- The Midnight Neon Betta: Swap the pastel hues for dark navy blue or black chenille yarn for the body, and use vibrant neon purple, magenta, and electric blue cotton for the fins. Woven with silver metallic thread, it mimics a glowing abyssal wonder.
- Grand Display Size: Double the scale of your fish by using super bulky blanket yarn for the body with a 6.0 mm hook. Create the fins out of standard medium weight acrylic yarn to keep the sizing proportional.
- Wall Hanging Aquarium Art: Instead of keeping it as a standalone plush toy, attach a clear monofilament fishing line to the center dorsal ridge. Suspend your fancy betta from a piece of weathered driftwood for an artistic bohemian mobile display.
- Beaded Veil-Tail: Expand the length of your fin panels by chaining 24 instead of 12. String a delicate pearl bead onto every single lace mesh loop on Row 3 to craft a majestic veil-tail betta.
Love this pattern? Pin it for later!
Save this stunning amigurumi design to your favorite crochet boards on Pinterest so you never lose track of it. Click the button below to pin it now!



