
The Best Fluffy Pancakes recipe you will fall in love with. Full of tips and tricks to help you make the best pancakes.

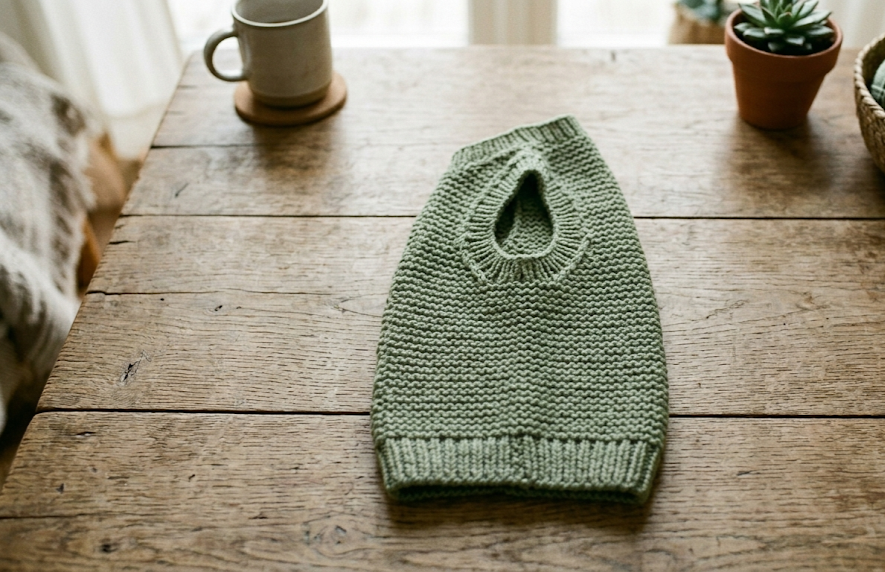
There’s something about a hand-knit baby vest that feels timeless. This sage green garter stitch vest, with its textured chevron panels and single wooden button, is the kind of piece that looks equally at home over a long-sleeve onesie in autumn or layered with a cotton dress in early spring. It’s structured enough to hold its shape on tiny shoulders, soft enough for all-day wear, and simple enough that an intermediate knitter can finish it in a few cozy evenings.
This vest is designed for babies and toddlers who are just starting to need “real” layers — something with a bit more structure than a cardigan but still easy to get on and off. The mock-collar neckline and single button at the chest make dressing quick, which any parent will appreciate. The body is worked in a simple garter stitch base with vertical panels of a chevron-textured cable pattern running down the front and back, giving the whole piece visual interest without being fussy to knit.
If you’ve made a basic garter stitch square before and feel ready to try a small amount of simple cabling, this pattern is a perfect next step. The cable panels use only two stitches crossed at a time, repeated in a chevron formation, so there’s no need for a cable needle if you don’t want one — they can be worked with the slip-and-knit method described below.
Sage green was chosen here because it’s wonderfully gender-neutral and pairs beautifully with cream, mustard, rust, or dusty pink accessories. But this pattern is just as lovely in oatmeal, dusty blue, or soft lavender — see the variations section for more ideas.

|
Difficulty
Intermediate
|
Time
6–8 hours
|
Hook Size
4mm (US 6)
|
Yarn Weight
DK (Light Worsted)
|
Finished Size
6–12 months
|
Gauge
- 22 stitches and 32 rows = 10cm x 10cm square, measured over garter stitch, blocked
- Hook/Needle used: 4mm (US 6) straight or circular needles
- Yarn weight used: DK weight (light worsted, category 3)
- Always knit a gauge swatch first. If your swatch is smaller than 10cm, go up a needle size. If larger, go down a size. Getting gauge right ensures the finished vest matches the size listed below.
Materials List
- Yarn: DK weight yarn (100% cotton or cotton-acrylic blend recommended for structure and breathability), approximately 220–250 yards (200–230m) in Sage Green
- Needles: 4mm (US 6) straight or circular needles, plus a spare needle or stitch holder
- Notions:
- 1 wooden button, approximately 20mm diameter
- Tapestry/yarn needle for weaving in ends
- Stitch markers (4–6)
- Sewing needle and matching thread (to attach button securely)
- Measuring tape
- Blocking pins and mat (optional but recommended)
Finished size: Fits 6–12 months. Chest circumference approximately 50cm (20in), total length approximately 32cm (12.5in). To size up or down, see the Variations section.
Abbreviations Table
| Abbreviation | Meaning |
|---|---|
| K | Knit |
| P | Purl |
| St(s) | Stitch(es) |
| RS | Right side |
| WS | Wrong side |
| CO | Cast on |
| BO | Bind off |
| Rep | Repeat |
| Patt | Pattern |
| RT | Right cross (slip 1 to cable needle, hold to back, k1, k1 from cable needle) |
| LT | Left cross (slip 1 to cable needle, hold to front, k1, k1 from cable needle) |
| Sl | Slip stitch |
| M1 | Make one increase |
| K2tog | Knit two stitches together (decrease) |
| Pm | Place marker |
| Sm | Slip marker |
| Garter st | Knit every row (on straight needles) |
Pattern Instructions
Part 1: Back Panel
Cast on 58 sts using a long-tail cast on.
Rows 1–6: Knit every row (garter st border). (58 sts)
Row 7 (Set-up row, RS): K10 (side garter panel), pm, work Row 1 of Chevron Cable Panel (see below) over next 38 sts, pm, K10 (side garter panel). (58 sts)
Chevron Cable Panel (worked over 38 sts, repeated):
Note: RT and LT can be worked without a cable needle by slipping the first stitch onto your right needle, knitting the second stitch, then using your left needle tip to lift the slipped stitch over and knit it — this avoids needing a separate cable needle.
- Row 1 (RS): RT, LT rep across, ending k2
- Row 2 (WS): Purl across
- Row 3 (RS): K1, RT, LT, rep to last st, k1
- Row 4 (WS): Purl across
- Rep Rows 1–4 to form the chevron texture, shifting the cross position every 4 rows to create the V-shaped pattern visible in the finished fabric
Continue working side panels in garter stitch (knit every row) while repeating the Chevron Cable Panel over the center 38 sts, until piece measures 20cm (8in) from cast-on edge, ending on a WS row.
Armhole Shaping:
Row 1 (RS): BO 4 sts, patt to end. (54 sts)
Row 2 (WS): BO 4 sts, patt to end. (50 sts)
Rows 3–4: K2tog at each end of row. (46 sts)
Continue in established pattern without further shaping until armhole measures 11cm (4.5in) from shaping start, ending on a WS row. (46 sts)
Shoulder/Neck Shaping:
Row 1 (RS): Patt 16 sts, BO center 14 sts, patt 16 sts. (16 sts each shoulder)
Working each shoulder separately:
Row 2: BO 3 sts at neck edge, patt to end. (13 sts)
Row 3: BO 3 sts at neck edge, patt to end. (10 sts)
BO remaining 10 sts.
Rep for second shoulder. (10 sts each side, all bound off)
Part 2: Front Panel (Left and Right, worked as two pieces)
Cast on 30 sts for each front piece.
Rows 1–6: Knit every row (garter border). (30 sts)
Row 7 (Set-up, RS): K10 (side garter, outer edge), pm, work Chevron Cable Panel Rows 1–4 over 19 sts, pm, K1 (center front garter edge). (30 sts)
Note: the front panels mirror each other — when working the second front, reverse the position of the cable panel and garter edge so the two fronts match symmetrically when buttoned.
Continue as for back, working armhole shaping and neck shaping on the appropriate side only (outer edge for armhole, center edge for neck), matching back panel measurements:
Armhole Shaping (outer edge only):
BO 4 sts once, then k2tog at outer edge every RS row twice. (23 sts)
Neck Shaping (center edge, beginning 6cm above armhole shaping):
BO 3 sts at neck edge every RS row, 3 times total. (14 sts)
Continue straight until shoulder matches back length, then BO remaining 14 sts.
Make second front as a mirror image.
Part 3: Collar (Mock Turtleneck)
With RS facing, pick up and knit 64 sts evenly around neckline (including back neck and both front neck edges).
Rows 1–8: Knit every row (garter st). (64 sts)
BO all sts knitwise, fairly loosely so the collar doesn’t pucker.
Part 4: Armhole Edging
With RS facing, pick up and knit 50 sts evenly around each armhole opening.
Rows 1–3: Knit every row. (50 sts)
BO all sts knitwise.
Rep for second armhole.
Part 5: Button Band (Right Front, worn-left-over-right for this vest)
With RS facing, pick up and knit 40 sts along the center front edge of the right front panel (the edge that will overlap).
Rows 1–4: Knit every row. (40 sts)
BO knitwise.
Part 6: Buttonhole Band (Left Front)
With RS facing, pick up and knit 40 sts along center front edge of left front panel.
Row 1: Knit every row.
Row 2 (Buttonhole row): K18, BO 2 sts, k18. (40 sts, with 2-st gap)
Row 3: K18, CO 2 sts over gap (using backward loop CO), k18. (40 sts)
Row 4: Knit across.
BO knitwise.
Assembly Steps
- Block all pieces before sewing together: wet block or steam block to measurements (back panel 25cm wide, fronts 13cm wide each, both 20cm long to armhole), pinning the chevron cable panel flat so the texture sits evenly.
- Sew shoulder seams first, joining back shoulder stitches to front shoulder stitches using mattress stitch, working from the armhole edge in toward the neck.
- Sew side seams from the bottom hem up to the armhole shaping, using mattress stitch for an invisible seam on the right side.
- Attach the collar if not already picked up directly onto the garment; otherwise, sew the short collar seam closed if picked up flat.
- Position the button 2.5cm down from the top of the right front band and centered on the band’s width. Hand-sew through all layers using sewing thread for extra durability (yarn alone can stretch over time).
- Align the buttonhole on the left band so it sits directly over the button when fronts are overlapped by approximately 2cm.
- Weave in all loose ends using a tapestry needle, running each tail through at least 5cm of stitches on the wrong side.
- Final steam block the whole vest laid flat, smoothing the garter stitch edges and collar so they sit neatly without rolling.

Beginner/Intermediate Tips
- If working RT and LT without a cable needle feels awkward at first, practice on a swatch — the motion becomes much faster after the first few repeats.
- Use stitch markers at every panel boundary (side panel to cable panel) so you always know where you are, especially since the cable crossing position shifts every 4 rows.
- Garter stitch grows differently than stockinette when blocked — always swatch and block your swatch before measuring gauge, since unblocked garter stitch will measure smaller than the finished result.
- When picking up stitches for the collar and bands, pick up slightly more than you think you need along curved edges (like the neckline) and decrease evenly on the first row if necessary — this prevents a tight, puckered collar.
- Cotton-blend DK yarn is recommended over pure acrylic for this pattern because it holds the garter ridges crisply and won’t pill as quickly with regular toddler wear and washing.
Variations
- Colorblock Version: Knit the side garter panels in a contrasting color (like mustard or cream) while keeping the chevron cable panel in sage green for a playful two-tone look.
- Sleeved Cardigan: Add simple garter stitch sleeves at the armholes (picked up and knit in the round, decreasing toward the cuff) to convert this into a long-sleeve cardigan for cooler weather.
- Double Button Closure: Space two smaller buttons vertically down the front band instead of one large button, for a more tailored, structured look.
- Size Up for Toddlers: Add 8 sts total to the cast-on (split evenly between side panels), and add one extra repeat to the cable panel width, to size this up for 18–24 months.
- Striped Garter Sides: Work the side garter panels in 4-row stripes alternating sage and cream, leaving the cable panel solid, for added texture contrast.
Save This Pattern
If you loved this sage garter stitch baby vest, save this pin so you can come back to it anytime you’re ready to cast on! Tag your finished vest with #FoodiePlumCrochet so we can see your version — we’d love to feature it.



