
The Best Fluffy Pancakes recipe you will fall in love with. Full of tips and tricks to help you make the best pancakes.

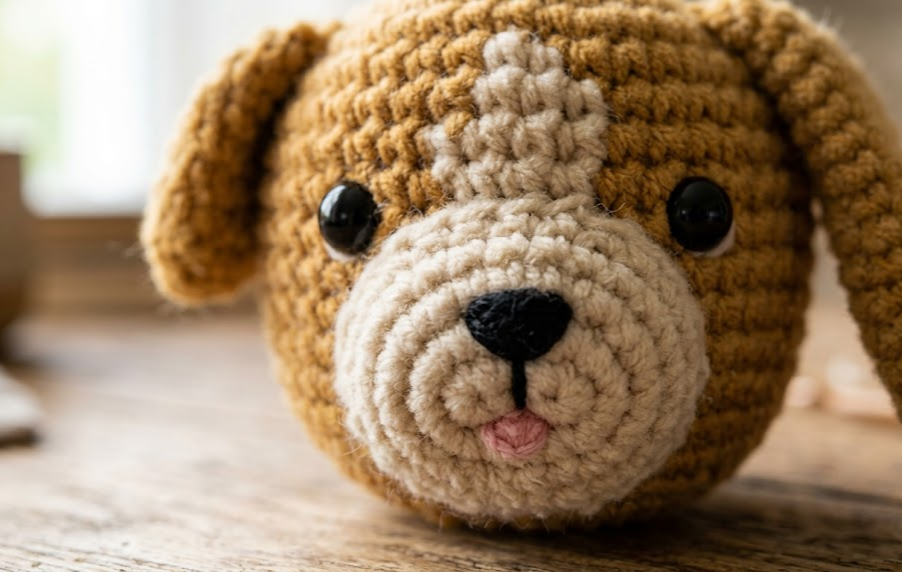
If you’ve been searching for the perfect quick-and-cuddly project, this no-sew mini puppy amigurumi pattern is about to become your new favorite. These tiny puppy heads are impossibly soft, endlessly customizable, and small enough to finish in under two hours. Whether you’re making a keychain, a bag charm, a fridge magnet, or a whole litter of mini puppies in every color of the rainbow, this pattern is beginner-friendly and works up in a single evening.
What makes this pattern special is the no-sew construction. Instead of crocheting each piece separately and stitching everything together at the end (which is often the part beginners dread most), this puppy is built using color changes and integrated shaping, so nearly everything is worked in one continuous piece. The only sewing involved is attaching the ears, which takes just a couple of minutes per puppy.
This pattern is perfect for anyone who loves quick-win crochet projects, animal amigurumi collectors, gift-makers looking for an easy handmade present, and beginners who want to practice color changes, magic rings, and basic shaping without committing to a large project. Once you make one, you’ll want to make an entire pack in every yarn color you own.

|
Difficulty
Beginner
|
Time
1.5–2 Hours
|
Hook Size
2.5mm
|
Yarn Weight
Sport/Fingering
|
Finished Size
5–6cm Tall
|
Gauge
- 5 single crochet (sc) x 6 rows = 2.5cm x 2.5cm (1in x 1in)
- Hook used: 2.5mm
- Yarn weight used: Sport/fingering weight velvet-style yarn (DK weight yarn also works if you want a slightly larger puppy — just size up to a 3mm hook)
Gauge isn’t critical for this project since it’s a stuffed toy rather than a wearable, but matching gauge will help you get the exact 5–6cm finished size shown in the photos.
Materials List
- Sport or fingering weight velvet/chenille-style yarn in honey brown (main color) — approx. 8g
- Small amount of cream yarn for muzzle and inner ears — approx. 3g
- Tiny amount of black yarn or black embroidery thread for nose
- Tiny amount of pink yarn or embroidery thread for tongue
- 2.5mm crochet hook
- Stitch marker (or a small scrap of contrasting yarn)
- Two 4mm safety eyes (or black embroidery thread if making for a young child)
- Polyester fiberfill stuffing
- Tapestry/yarn needle
- Small pair of embroidery scissors
Abbreviations Table
| Abbreviation | Meaning |
|---|---|
| MR | Magic Ring |
| ch | Chain |
| sc | Single Crochet |
| inc | Increase (2 sc in same stitch) |
| dec | Invisible Decrease |
| BLO | Back Loop Only |
| st(s) | Stitch(es) |
| rnd | Round |
| ( ) | Stitch count at end of round |
Pattern Instructions
Technique Note — Magic Ring (MR): This is a starting technique that lets you crochet your first round of stitches into an adjustable loop, then pull it tight to close the center hole completely, leaving no gap.
Technique Note — Invisible Decrease (dec): Insert your hook into the front loop only of the next two stitches, yarn over, and pull through both loops, then complete as a normal single crochet. This creates a smoother, less bulky decrease than a standard one.

Part 1: Head (start with Honey Brown)
- Rnd 1: 6 sc into MR (6)
- Rnd 2: inc in each st around (12)
- Rnd 3: sc, inc repeat around (18)
- Rnd 4: sc 2, inc repeat around (24)
- Rnd 5: sc 3, inc repeat around (30)
- Rnd 6-9: sc around, no increases (30) — 4 rounds total
- Rnd 10: sc 3, dec repeat around (24)
- Rnd 11: sc around (24) — begin stuffing firmly here
- Rnd 12: sc 2, dec repeat around (18)
- Rnd 13: sc, dec repeat around (12)
- Rnd 14: dec around, finish stuffing before closing (6)
Fasten off, leaving a long tail. Weave the tail through the front loops of the remaining 6 stitches, pull tight to close, and weave the end inside the head to hide it.
Part 2: Muzzle (Cream yarn)
- Rnd 1: 6 sc into MR (6)
- Rnd 2: inc in each st around (12)
- Rnd 3: sc around (12)
Fasten off, leaving a long tail for attaching. Lightly stuff the muzzle before sewing it onto the lower-center front of the head, about 1cm above the bottom edge.
Part 3: Ears (make 2 — Cream for inner, Honey Brown for outer, worked as one no-sew piece)
- Rnd 1: with honey brown, 6 sc into MR (6)
- Rnd 2: inc in each st around (12)
- Rnd 3: sc around (12)
- Rnd 4: sc around (12)
Fasten off leaving a long tail. Fold the ear flat so the last round forms a straight edge, then sew this flat edge to the side of the head, angled slightly forward, about 1cm above where the muzzle meets the head. This is where “no-sew” refers to the body construction — the ears are the only piece that requires a few stitches to attach.
Assembly Steps
- Insert two 4mm safety eyes into the head at Round 8, spaced approximately 1.5cm apart, just above the top edge of where the muzzle will sit.
- Stuff the head firmly, especially the top and sides, before closing the final round.
- Sew the muzzle onto the front of the head, centered, about 1cm from the bottom edge, using small stitches around the outer edge.
- Using black embroidery thread, stitch a small triangle nose at the top-center of the muzzle, then add 2–3 straight stitches down from the nose to form the center face line.
- Using pink yarn or thread, add 2–3 short straight stitches just below the center face line to create the tongue.
- Sew both ears to the sides of the head, positioned symmetrically about 1.5cm apart at the top, angled slightly outward and forward like a puppy’s floppy ears.
- Weave in all remaining ends and trim closely.
- If making a keychain or bag charm, attach a jump ring and clasp through a few stitches at the top-back of the head before final stuffing closes fully.
Beginner/Intermediate Tips
- Velvet/chenille yarn splits easily — crochet slowly and use a smaller hook than you’d normally pair with the yarn weight to keep stitches tight and even.
- Stuff firmly but in small amounts at a time — overstuffing all at once can distort the round shape.
- When placing safety eyes, insert them before you finish stuffing so you can still reach inside to attach the backing washers.
- If your invisible decreases look loose, snug up the stitch immediately after completing it by giving the working yarn a small tug.
- Keep a locking stitch marker in your first stitch of each round — with no visible seam line, it’s easy to lose track of where a round starts.
Variations
- Rainbow Litter: Make six puppies in six completely different color combinations (blue/cream, sage/yellow, lilac/pink, yellow/brown, cream/grey) to recreate a full puppy family set.
- Giant Size: Upgrade to a worsted weight yarn and 4mm hook to make a huggable 15cm version instead of a mini.
- Ornament Version: Skip the keychain hardware and instead sew a ribbon loop into the top of the head to turn it into a hanging holiday ornament.
- Spotted Puppy: Add small oval patches of a contrasting color yarn embroidered onto the head and ears for a spotted breed look.
- Bow or Bandana Add-On: Crochet a tiny chain-and-triangle bandana or a small bow to sew onto the top of the head for extra personality.
Save this pattern now so you don’t lose it, and tag your finished puppies with #FoodiePlumCrochet — I’d love to see your whole mini puppy litter come to life!



