
The Best Fluffy Pancakes recipe you will fall in love with. Full of tips and tricks to help you make the best pancakes.

Introduction
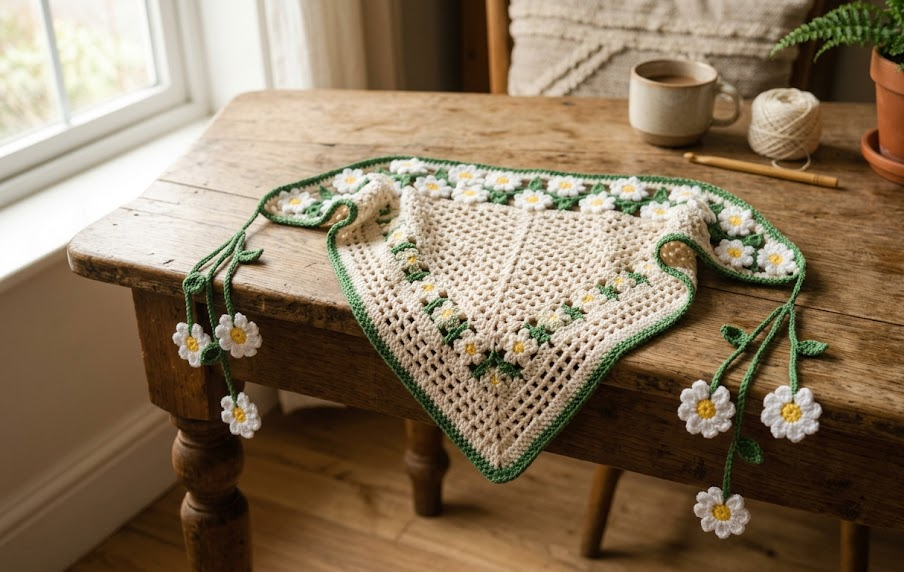
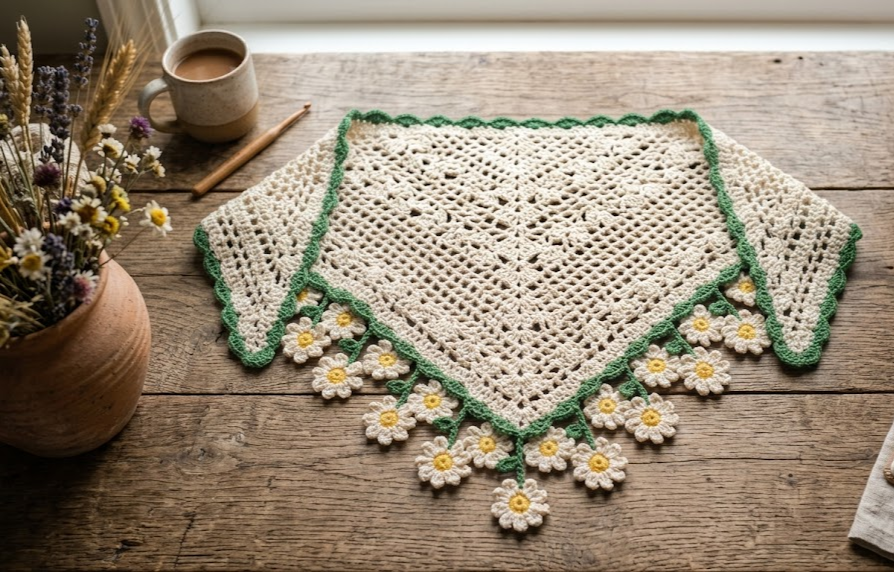
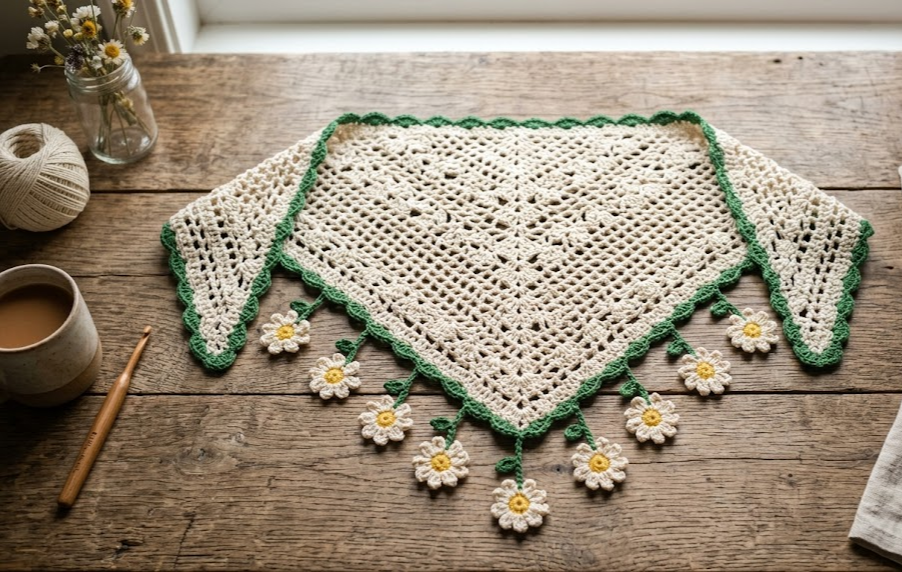
Delicate, lightweight, and inspired by blooming spring meadows, this Crochet Daisy Triangle Bandana Scarf combines elegant lace with cheerful floral accents. The airy mesh fabric keeps the scarf comfortable during warmer seasons while the cascading daisy edging adds movement and charm.
Designed for intermediate crocheters, this project introduces repeating mesh stitches, decorative edging, and small motif construction without becoming overwhelming. Whether worn around the neck, tied as a stylish head scarf, draped over the shoulders, or gifted to someone who loves handmade accessories, this pattern creates a timeless piece suitable for every season.
The finished scarf measures approximately 34 inches across the top edge with a center depth of about 19 inches, creating a flattering triangular silhouette that drapes beautifully.
|
Difficulty
Intermediate
|
Time
8–12 Hours
|
Hook Size
3.5 mm (E/4)
|
Yarn Weight
DK Weight (#3)
|
Finished Size
34 × 19 inches
|
Gauge
Gauge Swatch:
Work the Mesh Pattern for 22 stitches and 12 rows.
Finished swatch should measure:
10 cm × 10 cm (4″ × 4″)
Hook Used:
3.5 mm (E/4)
Yarn Weight:
DK Weight (#3)
If your swatch is larger than 10 cm, reduce hook size.
If your swatch is smaller than 10 cm, increase hook size.
Materials
Yarn
Cream DK Cotton — 280 g
Forest Green DK Cotton — 60 g
White DK Cotton — 40 g
Mustard Yellow DK Cotton — 10 g
Tools
3.5 mm crochet hook
Yarn needle
Sharp scissors
Stitch markers
Blocking mats
Rust-proof T-pins
Measuring tape
Crochet Abbreviations
| Abbreviation | Meaning |
|---|---|
| ch | chain |
| sl st | slip stitch |
| sc | single crochet |
| hdc | half double crochet |
| dc | double crochet |
| tr | treble crochet |
| st | stitch |
| sp | space |
| rep | repeat |
| sk | skip |
| RS | right side |
| WS | wrong side |
| BLO | back loop only |
| FLO | front loop only |
Technique Note
Whenever instructed to work BLO, insert the hook into only the back loop of the stitch to create extra flexibility and texture.
Main Triangle Pattern
The triangle increases from the top center.
Chain 4.
Join into a ring using a slip stitch.
Row 1
Ch 3 (counts as dc).
Work 2 dc into ring.
Ch 2.
Work 3 dc into ring.
Turn.
(6 dc, ch-2 space)
Row 2
Ch 3.
Work 2 dc in first stitch.
Dc in each stitch until ch-2 space.
Work 2 dc, ch 2, 2 dc into ch-2 space.
Dc across remaining stitches.
Work 3 dc into final stitch.
Turn.
(12 dc)
Row 3
Ch 3.
Dc across.
Increase in center ch-2 space using:
2 dc
ch 2
2 dc
Increase in final stitch.
Turn.
(18 dc)
Row 4
Ch 4.
Skip first stitch.
*Dc.
Ch 1.*
Repeat across until center.
Work:
2 dc
ch 2
2 dc
Continue mesh pattern to end.
Increase in last stitch.
Turn.
(24 dc)
Row 5
Continue mesh pattern exactly as established.
Increase at beginning.
Increase in center.
Increase at end.
Turn.
(30 dc)
Row 6
Repeat Row 5.
(36 dc)
Row 7
Repeat mesh increase.
(42 dc)
Row 8
Repeat.
(48 dc)
Row 9
Repeat.
(54 dc)
Row 10
Repeat.
(60 dc)
Row 11
Repeat.
(66 dc)
Row 12
Repeat.
(72 dc)
Row 13
Repeat.
(78 dc)
Row 14
Repeat.
(84 dc)
Row 15
Repeat.
(90 dc)
Row 16
Repeat.
(96 dc)
Row 17
Repeat.
(102 dc)
Row 18
Repeat.
(108 dc)
Row 19
Repeat.
(114 dc)
Row 20
Repeat.
(120 dc)
Row 21
Repeat.
(126 dc)
Row 22
Repeat.
(132 dc)
Row 23
Repeat.
(138 dc)
Row 24
Repeat.
(144 dc)
Row 25
Repeat.
(150 dc)
Row 26
Repeat.
(156 dc)
Row 27
Repeat.
(162 dc)
Row 28
Repeat.
(168 dc)
Row 29
Repeat.
(174 dc)
Row 30
Repeat.
(180 dc)
Row 31
Repeat.
(186 dc)
Row 32
Repeat.
(192 dc)
Row 33
Repeat.
(198 dc)
Row 34
Repeat.
(204 dc)
Row 35
Repeat.
(210 dc)
Row 36
Repeat.
(216 dc)
Row 37
Repeat.
(222 dc)
Row 38
Repeat.
(228 dc)
Row 39
Repeat.
(234 dc)
Row 40
Repeat one final mesh increase row.
Fasten off cream yarn.
(240 dc)
Crochet Daisy Flower Pattern
Make 18–22 flowers, depending on how full you would like the garland to appear.
Round 1 – Center
Using mustard yellow yarn:
Create a magic ring.
Technique Note: A magic ring forms an adjustable center that can be pulled tight after completing the first round.
Ch 1.
Work 8 sc into the ring.
Join with sl st to first sc.
Fasten off.
(8 sc)
Round 2 – Petals
Join white yarn into any stitch.
Ch 3, work 3 dc into same stitch, ch 3, sl st into same stitch.
This creates one petal.
Repeat around every stitch.
Join with sl st.
Fasten off leaving an 8-inch tail for sewing.
(8 petals)
Small Leaf Pattern
Make 40–44 leaves.
Using green yarn:
Ch 8.
Row 1
Sc in second chain.
Hdc in next.
Dc in next 2.
Hdc in next.
Sc in final chain.
Rotate to opposite side of foundation chain.
Sc.
Hdc.
Dc in next 2.
Hdc.
Sc.
Join with sl st.
Leave a 6-inch tail.
(12 stitches)
Hanging Vine Pattern
Each vine measures approximately 4½ inches (11 cm).
Using green yarn:
Chain 18.
Row 1
Sc in second chain.
Sc across.
Turn.
(17 sc)
Row 2
Ch 1.
Sc across.
Fasten off.
(17 sc)
Repeat for all hanging vines.
You will need approximately 18 vines.
Decorative Border
Join green yarn at one upper corner.
Border Round 1
Sc evenly around entire triangle.
Work:
3 sc
into each corner.
Join with sl st.
(Approximately 290 sc)
Border Round 2
Ch 2.
*Skip one stitch.
Dc.
Ch 1.*
Repeat around.
Corners:
(dc, ch2, dc)
Join.
(Approximately 290 stitches)
Border Round 3
Sc around entire scarf.
At every third chain space:
Chain 8.
Attach vine.
Continue around.
Join.
(Approximately 290 sc with 18 attachment points)
Flower Attachment
Each vine receives one flower.
Using yarn tails:
Sew flower securely onto bottom of vine.
Center flower carefully.
Weave in ends.
Repeat for every vine.
Leaf Placement
Attach one leaf approximately 1 inch (2.5 cm) above each flower.
Alternate leaf direction for a natural appearance.
Every third flower may receive two leaves.
Tie Cords
Using green yarn:
Chain 60.
Row 1
Sl st back through every chain.
Fasten off.
(60 slip stitches)
Repeat once.
Attach one cord to each upper corner.
Blocking Instructions
Wet block after assembly.
Pin upper edge straight.
Stretch lower point gently until center depth measures 19 inches (48 cm).
Allow to dry completely.
Assembly
Step 1
Weave in every yarn end before attaching flowers.
Step 2
Attach tie cords securely to both upper corners.
Sew through at least three stitches for strength.
Step 3
Sew vines onto every third mesh opening along the lower border.
Maintain approximately 2 inches (5 cm) between vines.
Step 4
Attach flowers to vine tips.
Each flower should hang approximately 4½ inches (11 cm) below the border.
Step 5
Attach leaves above flowers.
Alternate left and right positioning for balance.
Step 6
Steam lightly without flattening flower petals.
Avoid direct iron contact.
Beginner & Intermediate Tips
- Count stitches after every row to keep the triangle symmetrical.
- Use stitch markers to identify the center increase.
- Keep chain spaces relaxed so the mesh remains open and airy.
- Block the finished scarf to enhance stitch definition and improve drape.
- Sew flowers on after blocking to preserve their shape.
- Use cotton yarn for crisp flowers or bamboo blends for a softer drape.
- Weave yarn tails through multiple stitches before trimming to improve durability.
- If your edges begin to curl, work with slightly looser tension on the border rounds.
Variations
Wildflower Meadow
Replace white flowers with lavender, pink, pale yellow, and baby blue blossoms.
Vintage Cottage
Use ivory yarn with sage green vines and cream flowers for an heirloom-inspired look.
Autumn Garden
Crochet flowers in burnt orange, mustard, burgundy, and rust for a fall accessory.
Summer Festival
Use rainbow flowers with bright green vines to create a cheerful festival scarf.
Elegant Wedding Wrap
Work the entire scarf in soft ivory with pearl beads sewn into each flower center for a bridal accessory.
Finishing Section — Why This Crochet Daisy Triangle Bandana Scarf Is Worth Making
The Crochet Daisy Triangle Bandana Scarf is a beautiful example of how simple crochet techniques can be transformed into a wearable handmade accessory full of personality. The combination of an airy lace triangle base, delicate floral details, and cascading green vines creates a piece that feels both vintage-inspired and fresh.
This scarf works beautifully as a neck accessory, head wrap, shoulder cover, or even a decorative piece for a cottage-style outfit. The lightweight DK yarn keeps it comfortable during spring and summer, while the floral border gives it a handmade botanical charm.
The open mesh body makes the project enjoyable to crochet because the fabric grows quickly without requiring complicated stitches. The daisy flowers and leaves add the special finishing touch that makes this scarf stand out from ordinary crochet accessories.
Whether you are making it for yourself, creating a thoughtful handmade gift, or adding a floral crochet piece to your collection, this pattern offers a rewarding project with a stunning final result.
Care Instructions
To keep your Crochet Daisy Triangle Bandana Scarf looking beautiful:
- Hand wash gently in cool water.
- Use mild yarn-friendly detergent.
- Avoid twisting or wringing the fabric.
- Lay flat to dry while reshaping the triangle.
- Store folded in a dry place.
- Avoid hanging for long periods to prevent stretching.
With proper care, the cotton crochet stitches will maintain their shape and the flowers will keep their delicate structure.
Final Styling Ideas
This floral triangle scarf can be styled in many ways:
- Tie it around your neck with the triangle point facing forward for a classic bandana look.
- Wear it as a head scarf for a romantic boho style.
- Drape it over your shoulders as a lightweight summer wrap.
- Pair it with linen dresses, denim jackets, or neutral outfits for a handmade cottage-inspired appearance.
The adjustable tie cords make it easy to customize the fit, allowing the scarf to work for different styling preferences.
Pinterest CTA
Love this floral crochet accessory? Save this Crochet Daisy Triangle Bandana Scarf Pattern to your favorite crochet board so you can come back to it when you are ready to create your own handmade flower-inspired piece. 🌼



