
The Best Fluffy Pancakes recipe you will fall in love with. Full of tips and tricks to help you make the best pancakes.

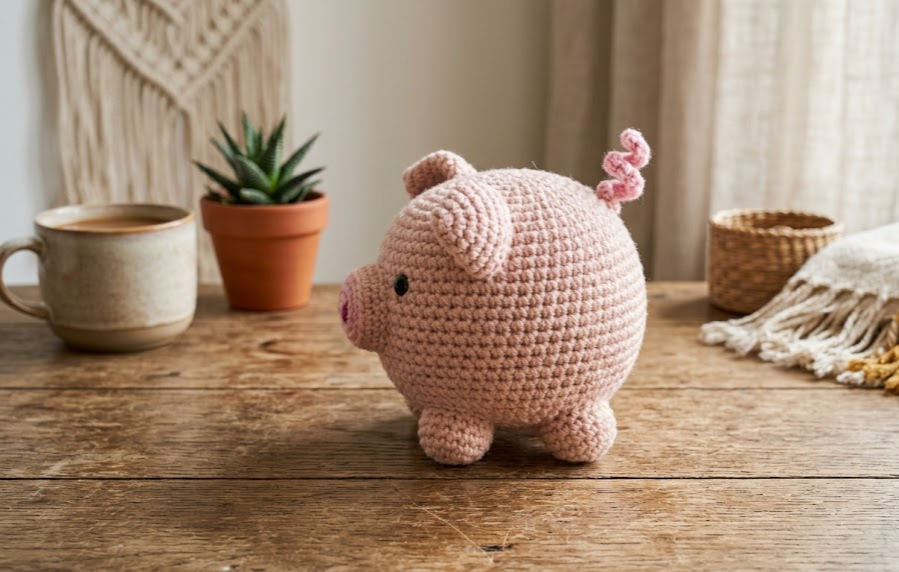
If you’ve been searching for a project that’s equal parts cute, cozy, and quick to finish, this amigurumi pig pattern is about to become your new favorite. With its plump rounded belly, tiny curled tail, and sweet little snout, this little piggy is impossible not to smile at. It’s the perfect make for anyone who loves farmhouse-style décor, wants a handmade gift for a child, or simply enjoys collecting adorable amigurumi animals on a shelf.
This pattern is written for the confident beginner or intermediate crocheter — someone who already knows the basics of single crochet and increasing/decreasing in the round, and is ready to tackle a few fun details like a wired curly tail and a separately crocheted snout. The finished piggy measures roughly 12cm tall and 15cm long, making it the ideal size for a nursery shelf, a desk companion, or a farm-themed nursery mobile.
Whether you’re crocheting this as a solo project or as part of a whole barnyard family (a cow, a sheep, and a chicken would make adorable companions), this pattern walks you through every stitch from start to finish. No prior amigurumi experience with pigs required — just grab your hook and yarn, and let’s get started.

|
Difficulty
Intermediate
|
Time
4–5 Hours
|
Hook Size
3.5mm (E/4)
|
Yarn Weight
Worsted (#4)
|
Finished Size
12cm x 15cm
|
Gauge
Gauge isn’t critical for amigurumi since you’re not fitting a garment, but it does affect your finished size and how tightly your stuffing shows through the stitches. For a nice firm fabric that won’t let stuffing peek through:
- 18 stitches x 20 rows = 10cm x 10cm (4in x 4in) square in single crochet
- Hook used: 3.5mm (US E/4)
- Yarn used: Worsted weight (Medium #4) yarn
If your gauge swatch comes out looser than this, drop down a hook size (try 3.0mm). If it’s tighter, size up slightly (try 3.75mm). Amigurumi is always worked at a tighter tension than garment crochet to keep stuffing from showing through the fabric.
Materials List
- Worsted weight (Medium #4) yarn in blush pink — approximately 40g / 90m
- Small amount of dark pink or rose worsted weight yarn for the snout (optional contrast, or use the same pink)
- 3.5mm (US E/4) crochet hook
- Two 6mm black safety eyes
- Polyester fiberfill stuffing
- Tapestry needle (yarn needle) for sewing pieces together
- Stitch marker (to track the start of each round)
- Small amount of black or dark brown embroidery thread (for nostrils)
- One 5cm piece of 20-gauge craft wire (for the curly tail armature)
- Scissors
Abbreviations Table
| Abbreviation | Meaning |
|---|---|
| ch | chain |
| sc | single crochet |
| inc | increase (2 sc in same stitch) |
| dec | invisible decrease (see technique note) |
| st(s) | stitch(es) |
| rnd | round |
| rep | repeat |
| MR | magic ring |
| BLO | back loop only |
| ( ) | stitch count at end of round/row |
Pattern Instructions
Technique Note — Magic Ring (MR): A magic ring lets you start amigurumi pieces with a tight, hole-free center. Wrap yarn around two fingers to form a loop, insert your hook into the loop, pull up a stitch, then work your first round of stitches directly into the loop. Once the round is complete, pull the yarn tail to cinch the loop closed.
Technique Note — Invisible Decrease (dec): Instead of a standard decrease, insert your hook into the front loop only of the next stitch, then the front loop only of the following stitch, yarn over, and pull through both loops, then yarn over and pull through the last loop. This creates a smoother, less bulky decrease that’s ideal for amigurumi shaping.
All pieces are worked in continuous rounds (do not join or turn) unless otherwise noted. Use a stitch marker to keep track of where each round begins.
Part 1: Body (make 1)
- Rnd 1: MR, 6 sc into ring (6)
- Rnd 2: inc in each st around (12)
- Rnd 3: sc, inc rep around (18)
- Rnd 4: sc 2, inc rep around (24)
- Rnd 5: sc 3, inc rep around (30)
- Rnd 6: sc 4, inc rep around (36)
- Rnd 7: sc 5, inc rep around (42)
- Rnds 8–14: sc even in each st around, repeat for 7 rounds (42)
- Rnd 15: sc 5, dec rep around (36)
- Rnd 16: sc 4, dec rep around (30)
- Rnd 17: sc 3, dec rep around (24) — begin stuffing firmly now, adding more as you go
- Rnd 18: sc 2, dec rep around (18)
- Rnd 19: sc 1, dec rep around (12) — add final stuffing, packing it into the edges
- Rnd 20: dec rep around (6)
Fasten off, leaving a long tail. Weave the tail through the front loops of the remaining 6 stitches, pull tight to close the hole, and secure.
Part 2: Snout (make 1)
- Rnd 1: MR, 6 sc into ring (6)
- Rnd 2: inc in each st around (12)
- Rnd 3: sc even around (12)
- Rnd 4: sc even around (12)
Fasten off, leaving a long tail for sewing. Stuff lightly (just enough to give it a slight dome, not firm like the body). Using black embroidery thread, stitch two small straight lines side by side on the front of the snout to create nostrils, about 1cm apart. Set aside.
Part 3: Ears (make 2)
- Rnd 1: MR, 4 sc into ring (4)
- Rnd 2: inc in each st around (8)
- Rnd 3: sc even around (8)
Fasten off, leaving a long tail for sewing. Flatten the piece so the last round forms a small rounded triangle shape — do not stuff.
Part 4: Legs (make 4)
- Rnd 1: MR, 6 sc into ring (6)
- Rnd 2: inc in each st around (12)
- Rnds 3–5: sc even around, repeat for 3 rounds (12)
Fasten off, leaving a long tail for sewing. Stuff lightly, leaving the top 1cm unstuffed and flattened so it sits flush against the body when sewn on.
Part 5: Curly Tail (make 1) — Wire Armature Instructions
- Take your 5cm piece of 20-gauge craft wire and bend one end into a small loop so it doesn’t poke through the yarn later.
- Ch 12 with your pink yarn.
- Sc in the 2nd ch from hook and in each ch across (11 sc). (Technique note: working into the “2nd chain from hook” simply means skipping the very first chain closest to your hook and starting your single crochets in the next one — this avoids a gap at the base.)
- Fasten off, leaving a long tail.
- Lay the wire along the crocheted strip and fold the yarn strip around the wire, whip-stitching the long edge closed with your tapestry needle so the wire is fully enclosed inside a yarn tube.
- Wrap the finished tube around a pencil or chopstick and hold for a few seconds to help it hold a curled shape, then slide it off.
- Insert the straight (looped) end of the tail about 1.5cm into the back of the body before sewing, so the wire is anchored inside the stuffing and won’t pull out.
Assembly Steps
- Using the long tail left on the snout, pin it to the center-front of the head/body, positioned about one-third of the way up from the bottom. Sew in place using a whip stitch, stuffing a tiny bit more filling underneath if it looks flat.
- Insert the safety eyes about 1.5cm apart, just above the top edge of the snout, and secure the backs firmly from inside before you finish stuffing that area if not already closed.
- Pin the two ears about 2cm apart on top of the head, angled slightly forward. Sew around the curved bottom edge of each ear, leaving the flattened top edge loose so the ear flops slightly forward.
- Position the four legs evenly around the bottom of the body, spacing them so the front two are about 3cm apart and the back two are about 3cm apart, with roughly 4cm between the front and back pairs. Sew each leg on using a whip stitch around the flattened top opening.
- Insert the wired end of the curly tail 1.5cm into the back of the body, just above where the back legs meet the body. Sew around the base of the tail to secure it firmly in place.
- Weave in all remaining yarn tails and trim.
Beginner/Intermediate Tips
- Use a stitch marker on every single round — with 42 stitches in the body’s widest rounds, it’s very easy to lose track of where you started.
- Stuff firmly but in small amounts at a time. Adding one large clump of stuffing creates lumps; adding small pinches as you go keeps the shape smooth and round.
- When sewing the snout on, pin it first with a scrap of yarn or a stitch marker and step back to check placement before committing — a snout that’s even slightly off-center changes the whole expression.
- If your invisible decreases still look a little bulky, try tugging gently on the working yarn immediately after completing the stitch — this tightens it neatly into the fabric.
- Keep the wire tail piece away from small children’s toys, as it contains a wire core — this project is best suited as a decorative piece rather than a baby toy.
Variations
- Mini Piglet: Use a 2.5mm hook and DK weight yarn to make a pocket-sized version, roughly 7cm tall, perfect for keychains or ornaments.
- Spotted Farm Pig: Add small oval patches of white or black yarn embroidered onto the body for a classic spotted farm-pig look.
- Piggy Bank Display: Skip the eyes and instead crochet a small coin slot detail on top, turning this into a decorative (non-functional) piggy bank display piece.
- Pastel Rainbow Piglets: Make a set of three in lavender, mint, and pale yellow instead of pink for a whimsical nursery mobile or shelf display.
Pinterest CTA
Loved this little piggy? Save this pattern to your Pinterest board so you can come back to it anytime you’re ready to crochet! Tag your finished piggy with #FoodiePlumCrochet — we love seeing your handmade creations!



