
The Best Fluffy Pancakes recipe you will fall in love with. Full of tips and tricks to help you make the best pancakes.

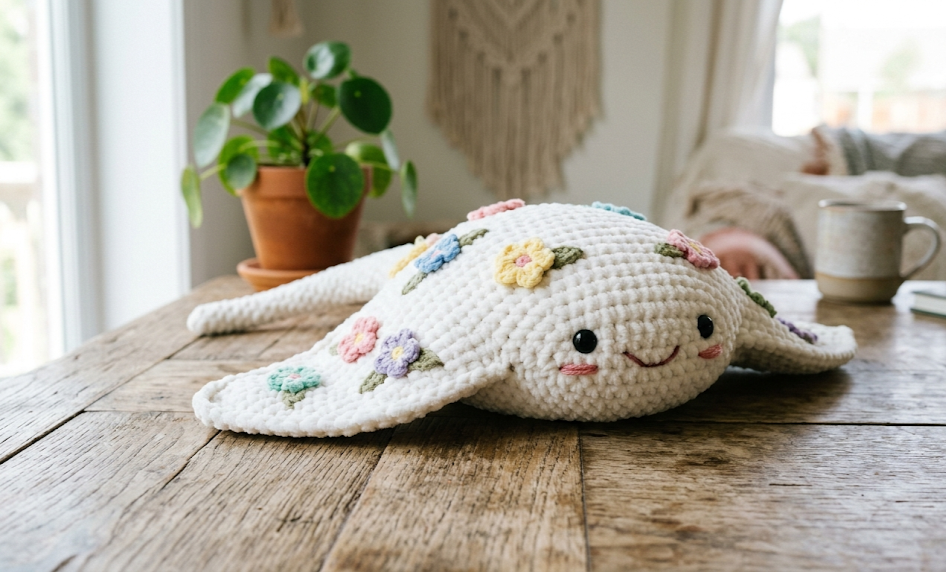
If you’ve ever wanted to bring the gentle beauty of the ocean into your living room without the saltwater, this crochet stingray amigurumi is exactly what your craft basket has been missing. With its soft, billowy chenille yarn body, sweet embroidered face, and a sprinkle of pastel flower-shaped spots across its back, this little ray feels less like a sea predator and more like a plush cloud that decided to take the shape of one. It’s the kind of project that makes people stop scrolling and start asking, “wait, you made that?”
This pattern is perfect for crocheters who already feel comfortable with basic amigurumi shaping — single crochets, increases, decreases, and magic rings — and who are ready to step up into a slightly more involved project with multiple small pieces that come together into one big, huggable result. It’s also a wonderful gift idea: think nursery decor, a beach-themed baby shower present, or a coastal-cute addition to a shelf full of crochet sea life. The chenille yarn gives this stingray an irresistibly soft, almost velvety texture that makes it nearly impossible to put down once it’s finished — fair warning, you may end up making more than one.
Unlike a lot of amigurumi patterns that rely on standard worsted weight yarn, this project leans into chenille yarn for its main body, which creates a plush, fuzzy finish that mimics the look of a stuffed animal from a high-end toy store. The pastel chenille flowers scattered across the back add a playful, whimsical touch without overwhelming the simple, calming color palette. Whether you’re a seasoned amigurumi maker looking for a new challenge or an intermediate crocheter ready to level up your skills, this stingray pattern offers a satisfying balance of simple shaping and creative detail work.
Let’s get into the gauge, materials, and the full step-by-step pattern so you can start stitching your own pastel stingray today.
|
Difficulty
Intermediate
|
Time
4-5 Hours
|
Hook Size
4.0mm
|
Yarn Weight
Bulky Chenille
|
Finished Size
20cm x 28cm
|
Gauge
Gauge in amigurumi doesn’t need to be exact, since the project is worked in the round and stuffed firmly, but matching a similar gauge will help your finished stingray come out close to the size shown here.
- Approximate gauge: 16-18 single crochets and 18-20 rows per 10cm (4 inch) square, worked in single crochet in continuous rounds
- Hook size used: 4.0mm crochet hook
- Yarn weight used: Bulky weight chenille yarn for the body and tail; light worsted/DK weight standard yarn for the flower and face details
If your tension naturally runs tighter or looser, don’t worry — just make sure your stitches are tight enough that stuffing doesn’t peek through, which is the most important thing for amigurumi.
Materials List
- White chenille yarn (main body and tail) — approximately 100-120g
- Pastel chenille yarn in a mixed multicolor skein (yellow, pink, blue, green, purple) — approximately 20-30g for the flower spots
- White standard yarn (small amount, for tail detailing)
- Yellow standard yarn (small amount, for flower centers)
- Green standard yarn (small amount, for accents)
- Blue standard yarn (small amount, for accents)
- Purple standard yarn (small amount, for accents)
- 10mm safety eyes (1 pair)
- Polyester stuffing (fiberfill)
- 4.0mm crochet hook
- Yarn needle (for sewing pieces together and weaving in ends)
- Stitch marker (optional but helpful for tracking rounds)
- Scissors
Abbreviations Table
| Abbreviation | Meaning |
|---|---|
| MR | Magic Ring — an adjustable loop that starts amigurumi pieces with no hole in the center |
| sc | Single crochet |
| inc | Increase — two single crochets worked into the same stitch |
| dec | Decrease — two single crochets worked together as one stitch (invisible decrease recommended) |
| st(s) | Stitch(es) |
| rnd(s) | Round(s) |
| ( ) | Stitch count at the end of the round |
| BLO | Back loop only — worked into just the back loop of a stitch, used here for the flattened tail texture |
Technique note on Magic Ring (MR): Wrap the yarn around two fingers to form a loop, insert your hook into the loop, pull up a loop of yarn, then crochet your first round of stitches around both strands of the loop. Pull the tail to close the ring tight once the round is complete.
Technique note on invisible decrease: Insert your hook into the front loop only of the next stitch, then the front loop only of the following stitch, yarn over, and pull through both loops, then through the final loop on your hook. This creates a smoother, less bulky decrease than a standard sc2tog.
Pattern Instructions
Part 1: Body
Worked in continuous rounds (do not join, use a stitch marker if needed) using white chenille yarn.
- Rnd 1: 6 sc in MR (6)
- Rnd 2: inc in each st around (12)
- Rnd 3: *(sc, inc) repeat 6 times (18)
- Rnd 4: *(2 sc, inc) repeat 6 times (24)
- Rnd 5: *(3 sc, inc) repeat 6 times (30)
- Rnd 6: *(4 sc, inc) repeat 6 times (36)
- Rnds 7-10: sc around (36) — repeat this round 4 times total
- Rnd 11: *(4 sc, dec) repeat 6 times (30)
- Rnd 12: *(3 sc, dec) repeat 6 times (24)
- Rnd 13: *(2 sc, dec) repeat 6 times (18)
Begin stuffing the body firmly at this point, adding more stuffing as you close the final rounds so the shape stays smooth and rounded. Fasten off, leaving a long tail for sewing the body to the tail piece later.
Part 2: Tail
Worked using white standard yarn (not chenille — this keeps the tail slim and easy to shape).
- Rnd 1: 4 sc in MR (4)
- Rnd 2: inc in each st around (8)
- Rnd 3: *(sc, inc) repeat 4 times (12)
- Rnd 4: *(3 sc, inc) repeat 3 times (15)
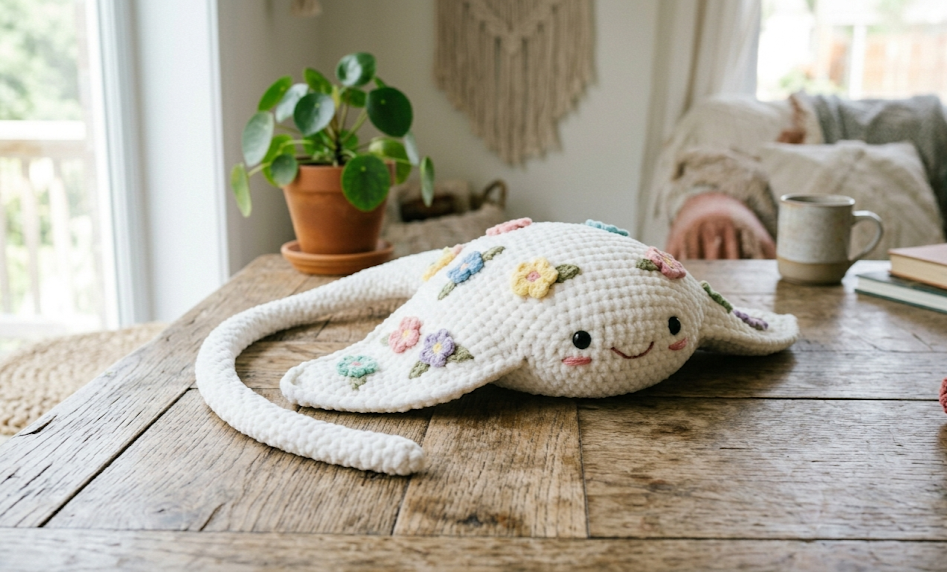
After completing rnd 4, flatten the piece lightly by pressing it between your fingers — this creates the thin, tapered look of a stingray’s tail rather than a round, stuffed shape. Fasten off, leaving a long tail for sewing.
Part 3: Flowers (Make 5)
Worked using pastel chenille yarn, one flower color per piece.
- Rnd 1: 6 sc in MR (6)
Fasten off after rnd 1, leaving a short tail. Using a small length of yellow standard yarn, sew a few straight stitches into the center of each flower to create a contrasting yellow center.
Part 4: Face Details (small pastel circles)
Worked using pastel standard yarn (one small piece for cheek/face accents).
- Rnd 1: 6 sc in MR (6)
Fasten off, leaving a long tail for sewing to the face.
Part 5: Face Details (second piece, larger accent)
Worked using pastel standard yarn.
- Rnd 1: 6 sc in MR (6)
Fasten off, leaving a long tail.
Part 6: Special Spots (Make 4)
Worked using pastel standard yarn, varying colors for visual interest.
- Rnd 1: 6 sc in MR (6)
Fasten off, leaving a long tail for sewing onto the body.
Assembly Steps
- Insert the safety eyes into the front of the body, positioning them about 4-5cm apart and roughly two-thirds of the way down the rounded front point of the body, before stuffing is fully complete in that section.
- Stuff the body firmly, making sure the shape stays smooth and rounded with no lumps, paying special attention to the front “nose” point and the wider back section.
- Attach the tail to the back center point of the body, sewing around the full base of the tail piece with a whip stitch using the long tail left from the tail piece. The tail should extend outward in a smooth curve, roughly 12-15cm from the body.
- Embroider the smile below the safety eyes using a simple curved backstitch in black or dark grey yarn, about 1.5cm below the eye line.
- Add pink cheek details (if using small circles of pink yarn or pink yarn embroidery) just below and to the outside of each eye for a rosy, sweet expression.
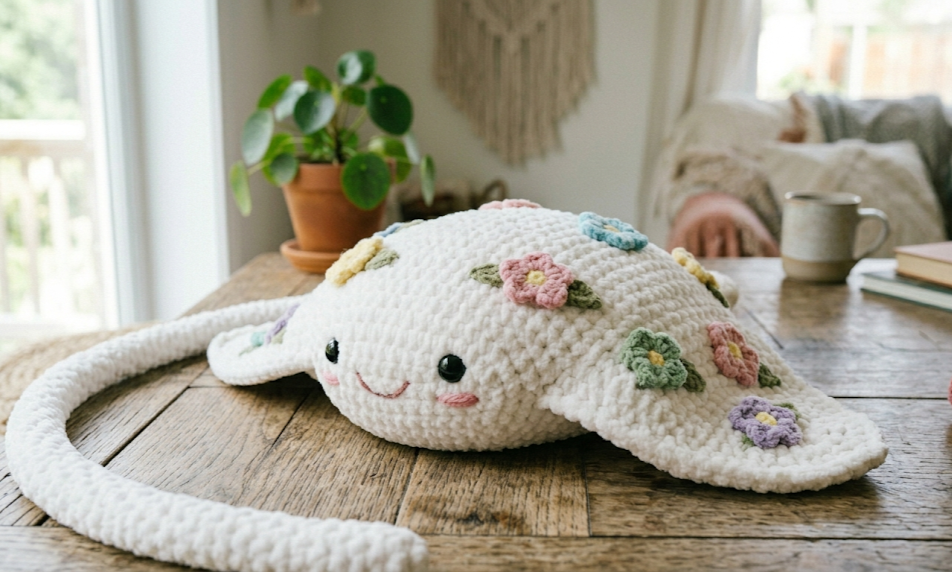
- Attach the 5 flowers randomly across the top of the body and tail, spacing them roughly 3-4cm apart so they feel scattered rather than gridded. Sew each one flat using the long tail, tucking the end into the body before trimming.
- Attach the 4 special spots in the gaps between the flowers, again spacing them so the overall look feels organic and playful rather than symmetrical.
- Weave in all remaining ends using a yarn needle, pulling each tail through the body and trimming close to the surface.
Approximate finished size: 20cm wide x 28cm long (including tail), though this will vary slightly based on tension and stuffing firmness.
Beginner/Intermediate Tips
- Chenille yarn splits easily, so crochet a little slower and more deliberately than you would with smooth acrylic — pulling too hard on a chenille stitch can fray the strand.
- Use stitch markers on rnds 7-10 of the body, since these are unmarked plain rounds and it’s easy to lose count of how many you’ve completed.
- When attaching the flowers and spots, pin them in place first with a removable stitch marker or scrap yarn before sewing, so you can step back and check the spacing looks balanced.
- If your chenille yarn feels too thick for a 4.0mm hook and your stitches feel too tight to work into, size up to a 4.5mm hook rather than fighting your tension.
- Stuff the tail only lightly compared to the body — overstuffing will make it round instead of flat and tapered, losing the signature stingray silhouette.
Variations
- Color swap: Make the body in soft grey or pale blue chenille yarn for a more “ocean” toned ray instead of the dreamy white version.
- Mini size: Use a 3.0mm hook with DK weight yarn instead of chenille to make a pocket-sized version perfect for keychains or bag charms.
- Galaxy stingray: Swap the pastel flowers for sparkly metallic-thread yarn spots in deep purples and blues for a nighttime, starry effect.
- Nursery mobile version: Make 3-4 mini stingrays in coordinating pastel colors and attach them to a wooden ring or dowel to create a hanging mobile for a baby’s room.
- Two-tone tail: Crochet the tail in a contrasting pastel color rather than matching white, for a fun pop of color that draws the eye along the curve.
Save this pattern now so you don’t lose it in your feed later — pin it, share it with a crochet friend who needs a new project, and tag your finished stingray so we can see how yours turns out! #FoodiePlumCrochet



