
The Best Fluffy Pancakes recipe you will fall in love with. Full of tips and tricks to help you make the best pancakes.

There’s something irresistible about a dress that turns heads for being handmade instead of hiding it. This black and white granny square midi dress does exactly that — it leans fully into its crochet roots, celebrating every joined seam and textured center round as part of the design rather than something to disguise. Built from classic granny square motifs in a monochrome palette of black, white, and soft heather grey, this dress has a fitted bodice, delicate straps, a square neckline, and a full, swingy midi skirt that moves beautifully with every step.
This pattern is a wonderful project for anyone who has made a handful of granny squares before and is ready to turn that skill into a wearable piece. It’s not a beginner-level project, since it involves shaping, joining dozens of motifs, and finishing details like straps and edging, but if you’re comfortable with basic granny squares and simple increases, this dress is absolutely within reach. Expect to spend several relaxing weeks on it — the kind of project you pick up in the evenings, square by square, until suddenly you have a finished garment that looks like it came from a boutique.
The result is a piece that works beautifully for summer weddings, festivals, beach days, or just an elevated day-to-day look layered over a slip. Because it’s made from individual motifs, it’s also endlessly customizable — swap the palette, resize the squares, or shorten the hem, and you have an entirely new dress using the same technique.
Below you’ll find everything you need: gauge, materials, abbreviations, and a complete, round-by-round pattern for the bodice, straps, and skirt, followed by assembly instructions and finishing tips.
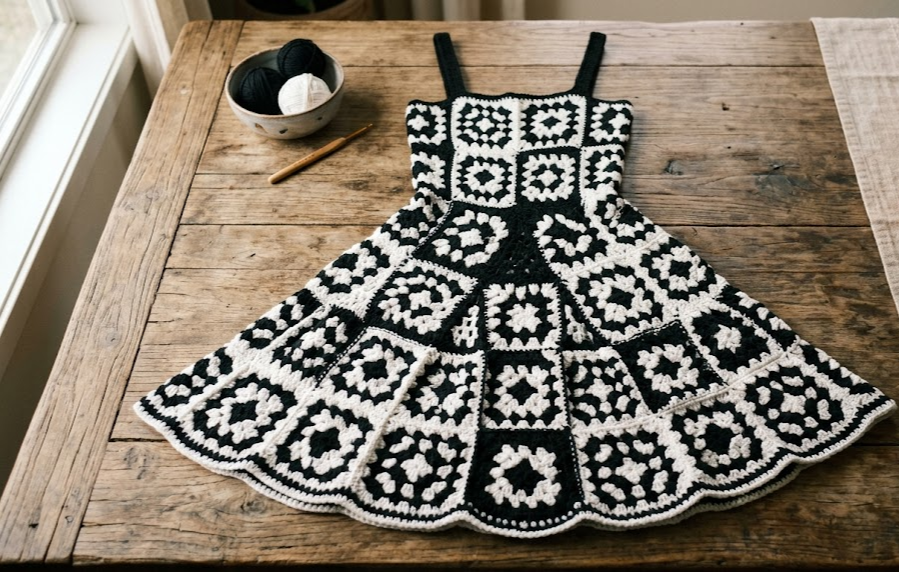
|
Difficulty
Intermediate
|
Time
28–35 Hours
|
Hook Size
4mm (G/6)
|
Yarn Weight
DK / Light Worsted
|
Finished Size
Midi, S/M
|
Gauge
- One granny square motif = 10cm x 10cm (4in x 4in) after blocking
- 18 stitches and 20 rows per 10cm (4in) square in standard granny square pattern
- Hook used: 4mm (US G/6)
- Yarn used: DK / light worsted weight (Weight 3), cotton or cotton-blend recommended for structure and drape
Always crochet a test square and block it before starting the full dress. Motif size directly determines how many squares you’ll need and how the finished dress will fit, so don’t skip this step.
Materials List
- DK weight cotton or cotton-blend yarn in black — approximately 600g (for square borders, edging, and straps)
- DK weight cotton or cotton-blend yarn in white — approximately 500g (for square backgrounds)
- DK weight cotton or cotton-blend yarn in heather grey — approximately 250g (for square centers)
- 4mm (US G/6) crochet hook
- Yarn needle for weaving in ends and joining
- Stitch markers
- Measuring tape
- Scissors
- Optional: blocking mats and pins for finishing squares
Abbreviations Table
| Abbreviation | Meaning |
|---|---|
| ch | chain |
| sl st | slip stitch |
| sc | single crochet |
| dc | double crochet |
| tr | treble crochet |
| sp | space |
| st(s) | stitch(es) |
| rnd | round |
| rep | repeat |
| RS | right side |
| WS | wrong side |
| MR | magic ring |
| BLO | back loop only |
| ( ) | stitch count at end of round/row |
| [ ] | instructions to repeat as indicated |
Pattern Instructions
Part 1: Standard Granny Square Motif (make 64 total)
Technique note: A magic ring (MR) lets you start a round with a closed, adjustable center loop instead of chaining and joining, which prevents a visible hole at the center of your square.
With grey, MR.
Rnd 1: Ch 3 (counts as first dc), 2 dc into ring, ch 2, [3 dc into ring, ch 2] 3 times, join with sl st to top of ch-3. Fasten off grey. (12 dc, 4 ch-2 sps)
Rnd 2: Join white in any ch-2 corner space. Ch 3 (counts as first dc), (2 dc, ch 2, 3 dc) in same sp, ch 1, *(3 dc, ch 2, 3 dc) in next corner sp, ch 1; rep from * twice more, join with sl st to top of ch-3. Fasten off white. (24 dc, 4 corner ch-2 sps, 4 side ch-1 sps)
Rnd 3: Join black in any ch-2 corner space. Ch 3, (2 dc, ch 2, 3 dc) in same sp, ch 1, 3 dc in next ch-1 sp, ch 1, *(3 dc, ch 2, 3 dc) in next corner sp, ch 1, 3 dc in next ch-1 sp, ch 1; rep from * twice more, join with sl st to top of ch-3. (36 dc total, 4 corner ch-2 sps, 8 side ch-1 sps)
Rnd 4: Continue in black. Ch 3, (2 dc, ch 2, 3 dc) in same corner sp, ch 1, [3 dc in next ch-1 sp, ch 1] twice, *(3 dc, ch 2, 3 dc) in next corner sp, ch 1, [3 dc in next ch-1 sp, ch 1] twice; rep from * twice more, join with sl st to top of ch-3. Fasten off, weave in ends. (48 dc total)
Repeat this motif 64 times, blocking each square to 10cm x 10cm as you finish it.
Part 2: Bodice Assembly
The bodice uses 8 whole squares (4 front, 4 back) arranged in a 2×2 grid on each side, joined edge to edge with a flat slip-stitch join through the back loops for a neat, low-profile seam.
Technique note: Joining through the BLO (back loop only) keeps the seam flat on the right side while leaving a subtle ridge on the wrong side, which is ideal for garment construction.
- Lay out 4 squares in a 2×2 grid for the front bodice panel and 4 squares in a 2×2 grid for the back bodice panel.
- With black yarn and RS facing, join adjacent squares by working sl st through the BLO of matching stitches along each edge, working from corner to corner.
- Once both panels are fully joined internally, join the front and back panels together at both side seams, leaving the top 8cm (3in) of each side open for the armhole.

Part 3: Straps
With black, ch 8.
Row 1: Sc in 2nd ch from hook and each ch across, turn. (7 sc)
Rows 2–60 (or to desired length): Ch 1, sc in each st across, turn. (7 sc)
Technique note: Working into the “2nd ch from hook” on Row 1 means skipping the first chain from your hook and starting your single crochet in the next one — this keeps your stitch count accurate on the first row.
Make 2 straps, trying the dress on as you go to measure the correct length from the front bodice top edge, over the shoulder, to the back bodice top edge.
Part 4: Skirt Assembly
The skirt is made from 56 squares arranged in 7 horizontal rows of 8 squares, joined the same way as the bodice, with each row slightly wider than the last to create the A-line flare. Rows increase in width by adding a half-square trapezoid motif between every 4th square starting at row 4, which is worked as follows:
Half-Square Panel (make 12):
With grey, ch 4, join with sl st to form a ring.
Row 1: Ch 3, 4 dc into ring, turn. (5 dc)
Row 2: Ch 3, dc in same st, dc in each st across, 2 dc in last st, turn. (7 dc)
Row 3: Join white, ch 3, dc in same st, dc in each st across, 2 dc in last st, turn. (9 dc)
Row 4: Ch 3, dc in each st across, 2 dc in last st, turn. (10 dc)
Row 5: Join black, ch 3, dc in each st across, 2 dc in last st, fasten off. (11 dc)
Insert these half-square panels between full squares in rows 4 through 7 to widen the hem gradually, spacing them evenly (roughly every 4th seam) so the flare is symmetrical all the way around.
Assembly Steps
- Join the 4 front bodice squares and 4 back bodice squares into two 2×2 panels using black BLO slip stitch joins.
- Join the front and back bodice panels at the sides, leaving 8cm (3in) unjoined at the top of each side for armholes.
- Attach the two straps: pin the top of each strap 3cm in from the front armhole edge and 3cm in from the back armhole edge, then sl st securely in place. Try the dress on before fastening off to confirm strap length and adjust before finishing.
- Join skirt squares into 7 horizontal rows of increasing width (8, 8, 8, 9, 10, 11, 12 squares per row from waist to hem, incorporating half-square panels from row 4 onward).
- Join the rows to each other along their top and bottom edges to build the full skirt cone shape.
- Attach the finished skirt to the bottom edge of the bodice with a single row of sc in black, working evenly around the full waist circumference — about 92cm (36in) for a Small/Medium.
- Work one full round of sc in black around the entire neckline for a clean finished edge.
- Work one full round of sc in black around the entire hem for a clean finished edge.
- Weave in all remaining ends and steam-block the finished dress flat, pinning gently into shape and letting it dry fully before wearing.
Beginner/Intermediate Tips
- Block every single square to exactly 10cm before joining — even small size variations between squares will show up as a wavy hemline once you have dozens joined together.
- Keep a small notebook or spreadsheet tracking how many squares you’ve completed in each color combination; with 64+ squares, it’s easy to lose count.
- When joining, always work with the dress laid flat on a table rather than in your lap — it keeps tension even and prevents twisted seams.
- If BLO slip stitch joining feels tight, size up to a 4.5mm hook just for the joining rounds.
- Try the bodice on before attaching the skirt. It’s much easier to adjust strap length or side seam tightness at this stage than after the full skirt is attached.

Variations
- Pastel Spring Version: Swap black for a soft blush pink and keep white and grey, for a completely different, softer mood.
- Mini Length: Stop the skirt at row 4 (before the half-square flare panels begin) for a flirty mini length instead of a midi.
- Halter Neckline: Instead of two straight straps, join both straps at a single point behind the neck for a halter-style silhouette.
- Ombre Skirt: Grade the skirt from black at the waist to white at the hem, changing one shade of grey per row for a subtle ombre effect.
- Long Sleeve Layer: Add fitted crochet sleeves in solid black to wear the dress as a cooler-weather layering piece.
Save this pattern now so you don’t lose it in your feed later — tag your finished dress with #FoodiePlumCrochet so we can see your version!



