
The Best Fluffy Pancakes recipe you will fall in love with. Full of tips and tricks to help you make the best pancakes.

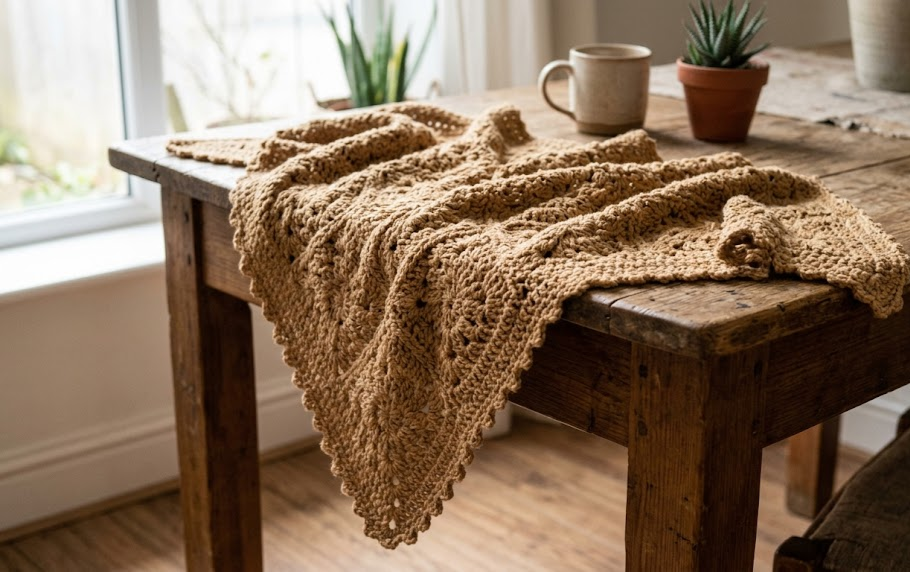
There is something quietly magical about a triangle shawl. It drapes over the shoulders like a soft cloud, it pairs with everything from a linen sundress to a chunky winter coat, and it turns a handful of skeins into an heirloom-quality accessory. This camel lace triangle shawl takes that classic silhouette and elevates it with a center panel of blooming flower motifs, a airy filet mesh body, and a crown of picot-tipped points along the lower edge. Two long ties extend from the top corners so the shawl wraps and knots comfortably around the neck instead of slipping off the shoulders.
This pattern is built for the crocheter who has already made a granny square or two and is ready for something with a bit more texture and storytelling in every round. It is not a beginner pattern, but it is far from intimidating. Every stitch is standard, every round is charted out row by row, and the construction builds logically from the center out. If you can single crochet, double crochet, and chain, you have everything you need to finish this shawl in a warm neutral that will outlast every trend.
The finished piece is generously sized for wrapping twice around the neck or draping loosely over the shoulders like a cape. The camel tan color reads as soft, sophisticated, and endlessly wearable — as comfortable over a cream sweater as it is over a little black dress. Because the shawl grows through motif joining and filet expansion rather than dense solid crochet, it works up lighter and faster than it looks, and it stays breathable enough for three-season wear.
Whether you are making this as a gift, a boutique inventory piece, or a treat for yourself, this pattern gives you everything you need from the first chain to the final picot point.

|
Difficulty
Intermediate
|
Time
18–22 hrs
|
Hook Size
3.0 mm
|
Yarn Weight
Fingering (#2)
|
Finished Size
150 x 75 cm
|
Gauge
Before starting, work a gauge swatch to make sure your finished shawl matches the measurements above.
- Motif gauge: One flower motif (worked through Round 3) measures 10 cm x 10 cm
- Filet mesh gauge: 18 stitches and 8 rows = 10 cm x 10 cm in filet mesh pattern (dc, ch-1 space, dc)
- Hook used: 3.0 mm (US C/2 – D/3)
- Yarn used: Fingering weight (#2 Light), cotton-acrylic blend
Gauge matters more for drape than for exact sizing on a triangle shawl, but if your motif comes out noticeably smaller than 10 cm, move up to a 3.5 mm hook. If it comes out larger, drop to a 2.75 mm hook.
Materials List
- Fingering weight yarn (#2 Light), cotton-acrylic blend, in Camel/Tan — approximately 600–700 meters (656–765 yards) total
- 3.0 mm (US C/2–D/3) crochet hook
- Yarn needle for weaving in ends
- Stitch markers (at least 4)
- Small scissors
- Blocking mats and pins (strongly recommended for opening up the filet mesh and squaring the motifs)
- Measuring tape
Abbreviations
| Abbreviation | Meaning |
|---|---|
| ch | chain |
| sl st | slip stitch |
| sc | single crochet |
| hdc | half double crochet |
| dc | double crochet |
| tr | treble crochet |
| ch-sp | chain space |
| picot | ch 3, sl st into first ch of the 3 to form a small bobble point |
| MR | magic ring — an adjustable loop that starts a round and closes tight before the first round is worked |
| BLO | back loop only — insert hook under only the back strand of the stitch, leaving the front loop unworked |
| sk | skip |
| rep | repeat |
| st(s) | stitch(es) |
| sp(s) | space(s) |
| RS | right side |
Pattern Instructions
Part 1: Center Flower Motif
Make 3 motifs total (they will be joined in Part 2).
Round 1: Using camel yarn, make a magic ring (MR — form a loop with the yarn, chain 1, work your stitches into the loop, then pull the tail to close it snugly before continuing). Ch 1, work 12 sc into the ring, sl st to first sc to join. (12 sts)
Round 2: Ch 3 (counts as first dc), dc in same st, 2 dc in each sc around, sl st to top of ch-3 to join. (24 sts)
Round 3 (Petals): *Ch 4, sk next st, sl st in next st; rep from * around (12 petal loops formed), sl st to base of first ch-4. (12 ch-4 loops)
Round 4: Working into each ch-4 loop from Round 3: (sc, hdc, 3 dc, hdc, sc) in each loop around to form 12 petals. Sl st to join. (12 petals)
Round 5 (Corners and Joining Points): Ch 5, sl st into tip of next petal to form a corner loop; rep around, working 4 corner loops evenly spaced (this creates the square base needed to join motifs edge to edge). Fasten off, weave in ends.
Part 2: Joining the Motifs
Lay your 3 motifs in a vertical column (this becomes the spine of the triangle, with the flowers visible along the center third of the shawl as shown in the reference photo).
- With RS facing, join a new strand of yarn to the corner ch-5 loop of Motif 1.
- Ch 2, sl st into the corresponding corner loop of Motif 2, ch 2, sl st back into Motif 1’s loop to lock the join.
- Repeat along the adjoining edge until the two motifs are joined edge to edge with no gaps.
- Join Motif 3 to Motif 2 the same way.
Part 3: Filet Mesh Expansion (Triangle Body)
This section builds the open mesh triangle around the motif spine.
Row 1: With RS facing, join yarn at the top corner of the joined motif column. Ch 3 (counts as dc), dc in same st, *ch 1, sk 1 st, dc in next st; rep from * across the row, ending with 2 dc in last st. Turn. (Count all dc and ch-1 spaces — number will vary by row as the triangle widens)
Row 2: Ch 3, dc in first ch-1 sp, ch 1, dc in next dc; rep across, increasing 1 filet block at the start and end of the row by working (dc, ch 1, dc) into the first and last stitch. Turn.
Rows 3–24: Continue in filet mesh pattern (dc, ch-1 sp, dc), increasing one filet block at each end of every row, until the triangle measures 68 cm from the top edge to the point tip. Each row should end with a stitch count noted in your row tracker; a well-blocked triangle mesh will show an even, evenly increasing count of dc + ch-1 sps per row (Row 1: 3 blocks, Row 2: 5 blocks, Row 3: 7 blocks, increasing by 2 blocks every row).
Fasten off after the final row, weave in ends.
Part 4: Picot Point Edging
Worked along the two slanted sides of the triangle (not across the top straight edge).
Row 1: Join yarn at one top corner. *Ch 5, sl st into edge 3 sts down; rep from * evenly along the slanted edge, spacing loops about 2.5 cm apart. (Number of loops will depend on your row count — space evenly rather than counting exactly)
Row 2 (Picot Points): In each ch-5 loop from Row 1, work (sc, hdc, dc, tr, dc, hdc, sc, picot) — the picot (ch 3, sl st in first ch) sits at the tip of each point, creating the dangling triangle points seen in the reference photo. Fasten off after completing both slanted edges.
Part 5: Neck Ties
Tie 1: Attach yarn at the top left corner. Ch 140 (or until tie measures 55 cm). Sl st back down the chain into every 3rd chain to create a corded texture, ending at the starting point. Fasten off, add a small picot tassel loop at the tip (ch 3, sl st to close).
Tie 2: Repeat at the top right corner.
Assembly Steps
- Block all 3 flower motifs individually before joining — pin to 10 cm x 10 cm squares and steam lightly. Let dry fully.
- Join motifs into a vertical spine as described in Part 2, keeping tension even so the spine lies flat.
- Work the filet mesh triangle outward from the spine as in Part 3, checking every 4 rows that the triangle is growing symmetrically on both sides.
- Once the mesh triangle reaches 68 cm from top to point, add the picot edging along both slanted sides only — leave the top (neck) edge unedged since the ties attach there.
- Attach the two neck ties at the top corners, positioning each tie 2–3 cm in from the outer corner point so it sits naturally against the neckline when worn.
- Wet block the entire finished shawl: pin the top edge straight, pull the point tip down to the full 75 cm depth, and pin each picot point outward to open the mesh fully. Let air dry flat for 24 hours before unpinning.

Beginner/Intermediate Tips
- When working the magic ring for each flower motif, keep the tail long enough to give yourself slack to snug the ring tight — a loose center ring is the most common flower motif flaw.
- Count your filet blocks every single row before turning. It is very easy to lose an increase somewhere in a large triangle, and fixing it three rows later means frogging back.
- Use stitch markers on the first and last stitch of every filet mesh row so you always know exactly where your edge increases go.
- Block the motifs before joining, not after. Trying to square an unblocked motif once it is attached to the mesh body is far harder.
- If your picot points curl instead of lying flat, your tension on the ch-5 loops in Part 4 Row 1 is likely too tight — loosen up by half a hook size for that row only.
Variations
- Two-Tone Version: Work the flower motifs in a contrasting cream or blush color while keeping the mesh body and edging in camel for a two-tone ombre effect.
- Mini Wrap: Reduce the filet mesh rows by half and use only 1 flower motif for a smaller shoulder-width scarf instead of a full shawl.
- Metallic Accent: Hold a fine metallic thread together with the main yarn only in the picot edging round for a subtle sparkle along the shawl’s points.
- Chunky Statement Version: Reknit the same pattern in a worsted weight yarn with a 5.0 mm hook for a bold, oversized version worn as a wearable throw blanket.
- Jewel Tone Rework: Swap the camel yarn for a deep emerald or burgundy for a dramatic evening-wear version of the same construction.
Save this pattern now so you don’t lose it in your feed — pin it to your crochet board and come back anytime you’re ready to start your own version. #FoodiePlumCrochet



