
The Best Fluffy Pancakes recipe you will fall in love with. Full of tips and tricks to help you make the best pancakes.

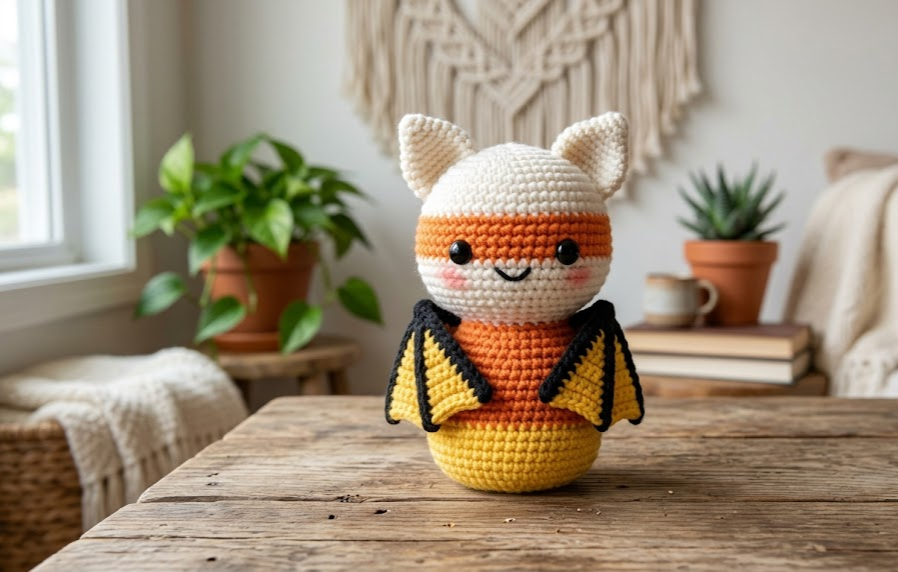
There’s something irresistible about a crochet creature that shows up right when the leaves start turning — and this candy corn bat is exactly that. Part Halloween decoration, part cuddly plush, it takes the classic orange-yellow-white stripes of a candy corn candy and wraps them around the sweetest little bat body you’ve ever seen. Small ears, soft folded wings, and a rounded belly make this design feel more “cute companion” than “spooky decor,” which is exactly why it works so well on a shelf, in a trick-or-treat bowl, or tucked into a kid’s backpack all October long.
This pattern is written for crocheters who already feel comfortable with basic amigurumi shaping — single crochet, increases, decreases, and simple color changes. If you’ve made one or two amigurumi animals before, you’ll move through this smoothly. If this is your very first amigurumi, don’t worry: every technique that isn’t beginner-standard is explained the first time it shows up, so you can follow along without needing to look anything up elsewhere.
By the end, you’ll have a finished bat measuring roughly 13 cm (5 inches) tall with a wingspan of about 20 cm (8 inches) — a perfect desk-shelf size that doesn’t eat through a whole skein of yarn.
|
Difficulty
Intermediate
|
Time
4–5 Hours
|
Hook Size
4.0mm (G/6)
|
Yarn Weight
Worsted (4)
|
Finished Size
13cm Tall
|
Gauge
Gauge in amigurumi doesn’t need to be perfect, but it matters for getting the right finished size and a fabric tight enough that stuffing doesn’t peek through.
- Gauge: 18 stitches x 20 rows = 10cm x 10cm square, worked in single crochet
- Hook used for gauge swatch: 4.0mm (US G/6)
- Yarn weight used: Worsted weight (Category 4) acrylic or cotton-acrylic blend
If your swatch comes out bigger than 10cm, go down a hook size. If it’s smaller, go up half a size. Tighter tension is actually preferred in amigurumi so stuffing doesn’t show through the stitches.
Materials List
- Worsted weight yarn in white — approx. 15g
- Worsted weight yarn in orange — approx. 20g
- Worsted weight yarn in yellow — approx. 15g
- Small scrap of black yarn (for embroidered mouth)
- Small scrap of pink yarn (for cheek blush, optional embroidery method)
- 4.0mm (US G/6) crochet hook
- Two 8mm safety eyes (black)
- Polyester fiberfill stuffing
- Yarn needle (blunt tip, for sewing and weaving ends)
- Stitch marker (or scrap yarn loop)
- Scissors
- Small amount of craft wire, 18-gauge, optional (for wing shaping only)
Abbreviations Table
| Abbreviation | Meaning |
|---|---|
| MR | Magic Ring |
| ch | Chain |
| sc | Single Crochet |
| inc | Increase (2 sc in same stitch) |
| dec | Invisible Decrease |
| st(s) | Stitch(es) |
| rnd | Round |
| row | Row |
| BLO | Back Loop Only |
| sl st | Slip Stitch |
| ( ) | Stitch count at end of round/row |
Technique notes for first-time use:
- Magic Ring (MR): A adjustable loop of yarn that lets you start a round tightly with no visible hole in the center. Wrap yarn around two fingers, pull a loop through, and single crochet your first round of stitches into that loop before pulling the tail to close it.
- Invisible Decrease (dec): Insert your hook into the front loop only of the next two stitches, then pull up a loop through both and complete as a single crochet. This keeps decreases smooth and hides the join better than a standard decrease.
- Back Loop Only (BLO): Instead of inserting your hook under both loops of the stitch, you insert it only under the back loop, leaving the front loop free. This is used here to create a visible ridge line where color changes occur, giving the candy corn stripes a crisp separation.
Pattern Instructions
Part 1: Body (worked bottom-up, one continuous piece)
Work in continuous rounds (do not join unless noted). Place a stitch marker at the start of each round and move it up as you go.
Starting color: Orange
- Rnd 1: 6 sc in MR (6)
- Rnd 2: inc around (12)
- Rnd 3: (sc, inc) x 6 (18)
- Rnd 4: (2 sc, inc) x 6 (24)
- Rnd 5: (3 sc, inc) x 6 (30)
- Rnd 6–9: sc around, 4 rounds even (30)
Switch to Yellow (work the color change in BLO on Rnd 10 to create the stripe ridge — see technique note above)
- Rnd 10: sc around in BLO, changing color to yellow at the start of the round (30)
- Rnd 11–14: sc around, 4 rounds even (30)
Switch to White (again using BLO for a clean stripe line)
- Rnd 15: sc around in BLO, changing color to white (30)
- Rnd 16: sc around (30)
- Rnd 17: (3 sc, dec) x 6 (24)
- Rnd 18: (2 sc, dec) x 6 (18)
Stuff the body firmly now, adding more as you close the top.
- Rnd 19: (sc, dec) x 6 (12)
- Rnd 20: dec around (6)
Fasten off, leaving a 15cm tail. Weave the tail through the front loops of the last round and pull tight to close the top of the head.

Part 2: Ears (Make 2)
Color: White with Orange tips
- Rnd 1: 6 sc in MR (6)
- Rnd 2: inc around (12)
- Rnd 3: sc around (12)
Switch to orange for the last round to create the ear tip:
- Rnd 4: sc around in orange (12)
Fasten off, leaving a long tail for sewing. Flatten the ear and sew it to the head with the orange tip pointing outward and slightly forward, about 2cm apart at the base.
Part 3: Wings (Make 2, worked flat in rows)
Wings are worked flat, starting from a chain, then increasing along one edge to create the fan shape, and worked in three color bands to mimic the candy corn stripes.
Color: White
- Row 1: ch 13, sc in 2nd ch from hook and each ch across (12)
Technique note: “2nd chain from hook” means you skip the very first chain closest to your hook and begin single crocheting into the next one — this keeps your foundation edge from curling.
- Row 2: ch 1, turn, 2 sc in first st, sc across to last st, 2 sc in last st (14)
- Row 3: ch 1, turn, sc across (14)
Switch to Yellow
- Row 4: ch 1, turn, 2 sc in first st, sc across to last st, 2 sc in last st (16)
- Row 5: ch 1, turn, sc across (16)
Switch to Orange
- Row 6: ch 1, turn, 2 sc in first st, sc across to last st, 2 sc in last st (18)
- Row 7: ch 1, turn, sc across (18)
- Row 8: ch 1, turn, sc around the entire outer edge of the wing (working evenly along the row-ends and final row) to smooth the border, sl st to first st to close (do not stuff)
Fasten off, leaving a long tail for sewing.
Optional wire insertion: cut an 8cm piece of 18-gauge craft wire, bend the ends under with pliers so no sharp tips are exposed, and lay it along the top straight edge of the wing before sewing that edge to the body. This lets you pose the wings slightly open or folded. This step is optional — the wings will still hold a nice fan shape without wire.
Part 4: Tail Stub
Color: Orange
- Rnd 1: 6 sc in MR (6)
- Rnd 2: sc around (6)
- Rnd 3: sc around (6)
Fasten off, leaving a tail for sewing. Stuff very lightly, just enough to round it out.
Part 5: Feet (Make 2)
Color: White
- Rnd 1: 6 sc in MR (6)
- Rnd 2: sc around (6)
Fasten off, leaving a tail for sewing. No stuffing needed — these are flattened when sewn on.

Assembly Steps
- Before closing the head opening, insert the two 8mm safety eyes between rounds 8–9 of the head (counting down from the top), spacing them about 2cm apart. Push the backing washers on firmly from the inside.
- Using black yarn and a yarn needle, embroider a small “w” shaped smile centered just below the eyes, about 0.5cm below eye level.
- Using pink yarn (or a small amount of blush makeup applied with a dry brush, if preferred), add a soft circular blush mark on each cheek, about 1cm below and slightly outside each eye.
- Finish stuffing the body firmly before fully closing round 20, making sure the shape stays rounded and doesn’t look lumpy.
- Sew the ears to the top of the head, angled slightly outward, spaced about 2cm apart at the base.
- Position the wings against the upper sides of the body, roughly at the widest point of the body (around round 8–9 from the bottom). Pin in place first to check symmetry, then sew along the top straight edge of each wing, leaving the rest of the wing unattached so it can flare outward naturally.
- Sew the tail stub to the back bottom of the body, centered, about 1cm above the base.
- Sew the feet to the bottom front of the body, spaced about 1.5cm apart, flattened slightly against the base so the bat can stand upright.
- Weave in all remaining ends and give the finished bat a gentle fluff/shape check before displaying.
Beginner/Intermediate Tips
- When switching colors on the BLO rounds, always change color on the last yarn-over of the previous stitch so the new color is ready to go at the start of the next round — this keeps your stripe line crisp instead of jagged.
- Stuff the body in small pinches as you go rather than all at once at the end. This prevents lumps and keeps the round shape even.
- If your wings look too curly or won’t lie flat, block them: pin the finished wing flat on a towel, mist lightly with water, and let dry fully before sewing to the body.
- Use a stitch marker religiously on the body rounds — it’s very easy to lose your place in a solid-color round like Rnd 6–9, and an off-by-one round will throw off your stripe spacing.
- When sewing the wings on, use a whip stitch through both wing layers and the body fabric for extra hold, since wings get handled a lot on a plush toy.
Variations
- Reverse Candy Corn: Flip the stripe order so white is at the bottom, yellow in the middle, and orange at the top, for a completely different visual read.
- Mini Ornament Version: Use a 3.5mm hook and DK weight yarn to shrink the whole pattern down to about 8cm tall, perfect for a Halloween tree ornament — just add a small loop of yarn at the top of the head before closing it.
- Pastel Halloween Bat: Swap orange for a soft peach and yellow for a pale butter tone, keeping white the same, for a muted “pastel Halloween” aesthetic that fits a boho fall display.
- Standing Bat with Pumpkin: Add a tiny separate crochet pumpkin (6-round sphere in orange with a small green stem) to sit beside the bat for a fun paired display piece.
- Glow Version: Use a white glow-in-the-dark yarn for the white sections only, so the bat glows softly along its belly stripe in the dark — a fun nightlight-adjacent variation for kids’ rooms.
Save this pattern now so you don’t lose it in your Halloween crochet queue — tag your finished bat and share it using #FoodiePlumCrochet, we’d love to see your version!



