
The Best Fluffy Pancakes recipe you will fall in love with. Full of tips and tricks to help you make the best pancakes.

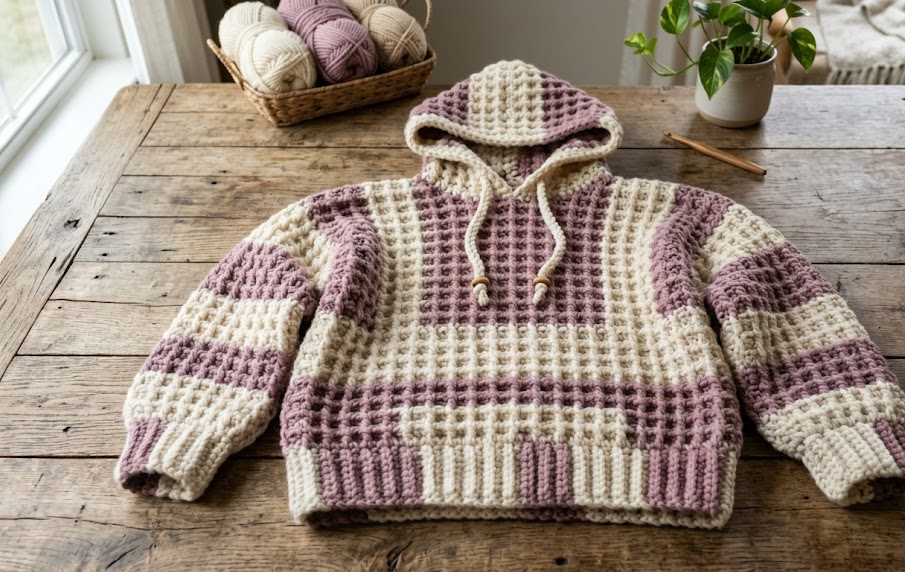
There’s something deeply satisfying about wrapping yourself in a hoodie you made with your own hands, especially when it’s this chunky, this cozy, and this effortlessly stylish. The Chunky Colorblock Crochet Hoodie combines a soft ivory upper body with a rich dusty mauve lower half and sleeves, creating a two-tone silhouette that feels equal parts boho and modern streetwear. Worked in a thick waffle-textured stitch with super bulky yarn, this hoodie grows quickly on the hook, making it a satisfying weekend-to-week project rather than a months-long commitment.
This pattern is perfect for anyone who loves an oversized, slouchy fit — think dropped shoulders, roomy sleeves, and a deep relaxed hood with a soft drawstring tie. It’s warm enough for crisp autumn walks, cozy enough for lounging at home, and stylish enough to wear out with leggings or jeans. If you’ve made a few garments before and are comfortable with basic increases, seaming, and following stitch counts, this hoodie will feel like a natural next step in your crochet journey.
Let’s get into the details so you can start crocheting your own version today.
|
Difficulty
Intermediate
|
Time
18–22 Hours
|
Hook Size
9mm (N/13)
|
Yarn Weight
Super Bulky (6)
|
Finished Size
Oversized Adult
|
Gauge
- 8 stitches x 6 rows = 10cm x 10cm (4in x 4in) in waffle stitch
- Hook used for gauge swatch: 9mm (N/13)
- Yarn weight used: Super Bulky (Weight 6)
Always crochet a gauge swatch before starting. Because this hoodie is oversized and forgiving, small gauge differences won’t ruin the fit, but they will affect your final yarn quantities and finished measurements.
Materials List
- Ivory/Cream super bulky yarn — approximately 600g (for hood, upper body, and yoke)
- Dusty Mauve/Rose super bulky yarn — approximately 500g (for lower body and sleeves)
- 9mm (N/13) crochet hook
- 10mm crochet hook (for looser drawstring cord if desired)
- Yarn needle (large eye, for weaving ends and seaming)
- Stitch markers (at least 6)
- Scissors
- Measuring tape
Abbreviations Table
| Abbreviation | Meaning |
|---|---|
| ch | chain |
| sc | single crochet |
| hdc | half double crochet |
| dc | double crochet |
| sl st | slip stitch |
| st(s) | stitch(es) |
| rep | repeat |
| BLO | back loop only |
| FLO | front loop only |
| inc | increase (2 sts in same st) |
| dec | decrease (work 2 sts together as 1) |
| sk | skip |
| rnd(s) | round(s) |
| row(s) | row(s) |
| yo | yarn over |
| RS | right side |
| WS | wrong side |
Pattern Instructions
Special Stitch – Waffle Stitch: This stitch alternates hdc worked in the front loop only (FLO) and back loop only (BLO) across rows, creating a textured, quilted look. Working in one loop only leaves the opposite loop free, which is what creates the raised waffle texture.
Technique Note – Working in BLO/FLO: Instead of inserting your hook under both loops of the stitch as usual, insert it under only the loop indicated. This is what gives the waffle stitch its ridged texture.
Part 1: Lower Body (Mauve Yarn)
Worked flat in one piece from the bottom hem up to the underarm, then split for front and back.
Using mauve yarn and 9mm hook, ch 62.
Row 1 (RS): Sc in 2nd ch from hook and each ch across. (61 sts)
Row 2: Ch 1, turn. Hdc BLO in each st across. (61 sts)
Row 3: Ch 1, turn. Hdc FLO in each st across. (61 sts)
Rows 4–30: Repeat Rows 2–3, alternating BLO and FLO rows, until piece measures 38cm from the starting chain. (61 sts at end of every row)
Divide for Front and Back:
Row 31: Ch 1, turn. Hdc BLO in first 30 sts (Back), ch 1, turn, leave remaining 31 sts unworked for now. (30 sts)
Continue Back panel:
Rows 32–36: Continue alternating BLO/FLO rows across 30 sts. (30 sts each row)
Fasten off.
Rejoin mauve yarn to remaining 31 sts for Front panel.
Rows 32–36: Continue alternating BLO/FLO rows across 31 sts. (31 sts each row)
Fasten off.
Part 2: Upper Body & Yoke (Ivory Yarn)
Join ivory yarn at the top of the Back panel.
Row 1: Ch 1, hdc BLO across Back (30 sts) and Front (31 sts) with ch 4 at each shoulder gap for underarm, joining into one piece. (65 sts total, including underarm chains)
Rows 2–14: Continue alternating BLO/FLO hdc rows across all 65 sts, until yoke measures 20cm. (65 sts each row)
Fasten off, leaving a long tail for seaming shoulders.
Part 3: Sleeves (Mauve Yarn) — Make 2
Sleeves are worked flat and seamed, then set into the armhole.
Using mauve yarn and 9mm hook, ch 24.
Row 1: Sc in 2nd ch from hook and each ch across. (23 sts)
Row 2: Ch 1, turn. Hdc BLO across. (23 sts)
Row 3: Ch 1, turn. Hdc FLO across. (23 sts)
Rows 4–20: Continue alternating BLO/FLO rows, increasing 1 st at each end every 4th row (inc = 2 hdc in same st) until you reach 33 sts, then continue even until sleeve measures 45cm. (33 sts)
Fasten off, leaving a long tail for seaming.

Part 4: Hood (Ivory Yarn)
Worked in two mirrored halves, then seamed at the back.
Ch 20.
Row 1: Hdc in 3rd ch from hook and each ch across. (18 sts)
Rows 2–22: Ch 2, turn. Hdc BLO/FLO alternating rows, keeping 18 sts constant, until hood half measures 30cm. (18 sts)
Fasten off. Repeat for second hood half.
Assembly of Hood: With RS together, sl st or whip stitch the two hood halves together along the top curved edge (the 30cm edge), leaving the straight edge open to attach to the neckline.
Part 5: Drawstring Cord
Using 10mm hook and ivory yarn, ch 120. Sl st in 2nd ch from hook and each ch across to create a firm cord. Fasten off, leaving 5cm tails at each end. Attach a small pom-pom or tassel to each end if desired.
Assembly Steps
- Lay Front and Back body panels flat with RS facing. Whip stitch shoulder seams closed, leaving the center 20cm open for the neckline.
- Fold sleeves in half lengthwise (RS together) and whip stitch the long edge closed to form a tube. Do not turn right side out yet.
- Pin sleeve into armhole opening, matching the sleeve seam to the underarm chain gap. Whip stitch sleeve to armhole all the way around.
- Repeat for second sleeve.
- Sew side seams of the body from the hem up to the underarm, and sleeve seams from cuff to underarm, in one continuous seam on each side.
- Pin the straight edge of the seamed hood around the neckline opening, centering the back seam of the hood at the center back of the neckline.
- Whip stitch the hood securely to the neckline, easing in any fullness evenly.
- Weave the drawstring cord through the hood opening, spacing entry and exit points about 6cm apart at the front center of the hood.
- Weave in all loose ends using a yarn needle.
- Block the finished hoodie by lightly steaming or spritzing with water and laying flat to dry, gently shaping the hem and cuffs.
Beginner/Intermediate Tips
- Waffle stitch can be tricky to track at first — use a stitch marker in the first stitch of every row to avoid miscounting.
- Because super bulky yarn splits easily, crochet with a firm, even tension and avoid pulling too tight, which can distort the BLO/FLO texture.
- When seaming sleeves to the armhole, pin generously before sewing; bulky yarn hides small errors, but even spacing prevents puckering.
- If your gauge runs looser or tighter than the pattern, measure your body/bust and add or subtract rows in multiples of 2 (to keep the BLO/FLO sequence correct) rather than adjusting stitch count mid-row.
- Save the softest, least-splitty yarn for the hood and cuffs, since these areas get the most contact with skin.

Variations
- Monochrome Version: Skip the colorblocking and work the entire hoodie in one shade of oatmeal or charcoal for a minimalist look.
- Cropped Fit: Shorten the body rows by 10cm and the sleeve length by 8cm for a cropped, cardigan-style silhouette.
- Striped Sleeves: Alternate 4-row stripes of ivory and mauve on the sleeves only, keeping the body solid, for a playful twist.
- Zip-Up Cardigan Style: Instead of seaming the front closed, leave it open and add a row of sc trim plus button loops or a sewn-in zipper for a cardigan version.
- Kids’ Size: Reduce starting chain to 44 sts and shorten all row counts proportionally (roughly 70% of adult measurements) for a child-sized version.
Save this pattern now so it doesn’t disappear into your feed — pin it, bookmark it, and get your yarn ready for your next cozy project. #FoodiePlumCrochet



