
The Best Fluffy Pancakes recipe you will fall in love with. Full of tips and tricks to help you make the best pancakes.

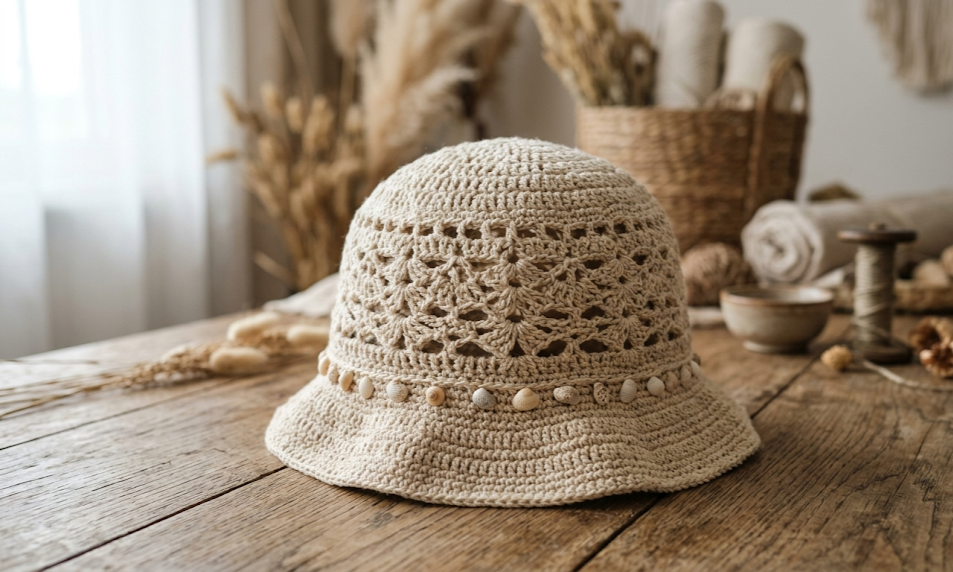
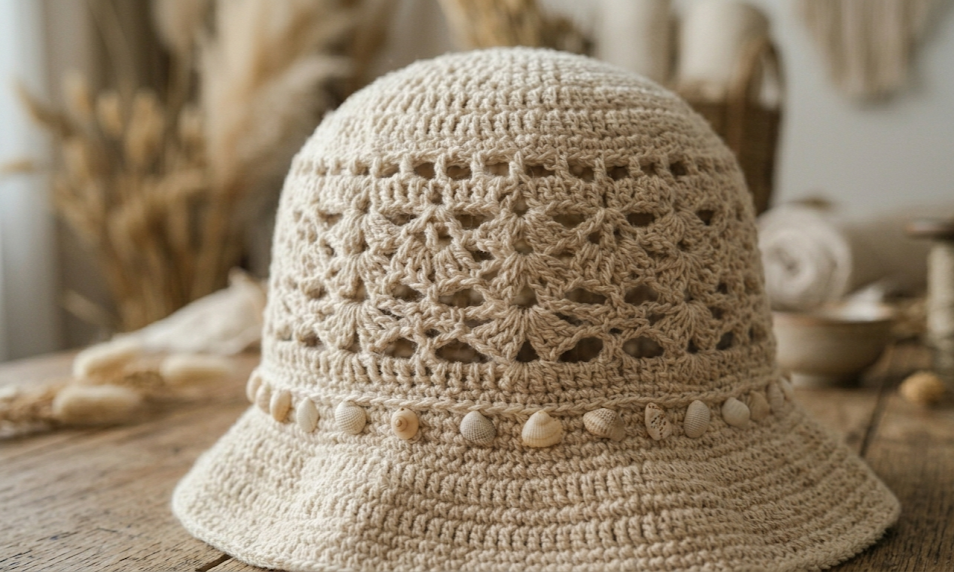
There’s something about a handmade bucket hat that instantly transports you to a beach boardwalk, even if you’re nowhere near the ocean. This Coastal Lace Bucket Hat brings together two of the most beloved trends in modern crochet — airy lace texture and boho shell details — into one wearable accessory that’s as practical as it is pretty. The crown opens up into a delicate filet lace pattern that lets your scalp breathe on hot days, while the solid brim keeps the sun out of your eyes. Tiny shells stitched along the base of the crown add a tactile, beachy charm that makes this piece feel collected rather than crafted.
This hat is perfect for anyone who loves a relaxed, textured accessory for summer festivals, beach days, garden parties, or just running errands in style. It works up in worked cotton yarn, which gives it the structure to hold its shape on your head while staying soft and breathable against skin. If you’ve made a few amigurumi pieces or basic granny squares before, you have the skills to tackle this project. The increases are simple, the lace round is just a repeated chain-and-skip pattern, and the brim is worked in straightforward half double crochet. Grab a cup of tea, your favorite cotton yarn, and let’s make something you’ll actually reach for all summer long.
|
Difficulty
Intermediate
|
Time
5-6 Hours
|
Hook Size
4.0mm
|
Yarn Weight
Worsted (Cotton)
|
Finished Size
~22-24cm Diameter
|
Gauge
- 16 sc x 16 rows = 10cm x 10cm square, using a 4.0mm hook with worsted weight cotton yarn
- Gauge swatch recommended before starting — work a small flat circle or square and measure after blocking, since gauge affects how the brim sits on your head
- If your hat is coming out too large, drop to a 3.5mm hook; if too tight, size up to 4.5mm
Materials List
- Worsted weight cotton yarn (approx. 120g) in natural beige or cream
- Small amount of contrast cotton yarn if you want a two-tone brim (optional)
- 4.0mm crochet hook
- Tapestry needle
- Scissors
- 10–14 small decorative shells with pre-drilled holes or shank backs
- Stitch markers (optional but helpful for tracking round starts)
- Sewing thread or thin cotton yarn for attaching shells
Abbreviations Table
| Abbreviation | Meaning |
|---|---|
| mr | Magic ring |
| ch | Chain |
| sl st | Slip stitch |
| sc | Single crochet |
| hdc | Half double crochet |
| dc | Double crochet |
| tr | Treble crochet |
| inc | Increase (2 stitches in the same stitch) |
| st(s) | Stitch(es) |
Pattern Instructions
Part 1: Crown
Setup — Magic Ring
Make a magic ring. Technique note: a magic ring is an adjustable loop that lets you crochet your first round of stitches into it, then pull the tail to close the center hole tightly — this avoids the small gap left by a standard chain-and-join start.
Round 1: Ch 2 (does not count as a stitch), work 12 hdc into the ring. Pull tail to close. (12 sts)
Round 2: Inc in each st around. (24 sts)
Round 3: *(Hdc in next st, inc) repeat around. (36 sts)
Round 4: *(Hdc in next 2 sts, inc) repeat around. (48 sts)
Round 5: *(Hdc in next 3 sts, inc) repeat around. (60 sts)
Round 6: *(Hdc in next 4 sts, inc) repeat around. (72 sts)
Round 7: *(Hdc in next 5 sts, inc) repeat around. (84 sts)
Round 8: Work 1 round of hdc in each st around, no increases. (84 sts)
Round 9 — Lace Pattern Begins: Dc in next st, ch 1, skip 1 st repeat around. (84 sts total stitch count, counting each dc and each ch-1 space as a stitch position)
Technique note: this round creates the open lace mesh. Each chain-1 space sits directly above a skipped stitch from the previous round, which is what creates the airy look.
Round 10: Sc in each st and ch-1 space around. (84 sts)
Round 11 — Shell Lace Row: (Dc, ch 2, dc) in next ch-1 space, sc in next st repeat around. (84 sts)
Technique note: this “shell” cluster — two dc stitches with a ch-2 gap between them — adds a scalloped texture and is what gives the lace its decorative bump.
Round 12: Sc in each st and ch-2 space around. (84 sts)
Part 2: Brim
Rounds 13–16 — Brim: Work 4 rounds of hdc in each st around, no increases or decreases. (84 sts each round)
Adjust the total number of brim rounds up or down depending on how wide you want the brim to sit — each additional round adds roughly 1cm of brim width.
Finishing Round: Sl st into the first st of the final round, fasten off, and weave in the tail using your tapestry needle. Weave the end through several stitches on the wrong side, going in different directions, then trim close to the fabric so it stays secure without a knot.

Part 3: Shell Embellishments
Adding the Shells: Using a strand of sewing thread or thin cotton yarn doubled for strength, sew each shell evenly around the base of the crown — right where Round 12 meets Round 13. Space shells roughly 5–6cm apart for a balanced, not-too-busy look (10–14 shells total depending on hat circumference). Knot securely on the wrong side of the fabric after each shell to prevent shifting.
Assembly Steps
- Block your finished crown and brim piece by lightly dampening it with water and laying it over a bowl roughly 22–24cm in diameter (matching your head size) to shape the crown dome while it dries — this takes 4–6 hours.
- Once dry, lay the hat flat and fold the brim outward to your preferred angle. Steam lightly with an iron held a few inches away to set the fold.
- Mark the placement points for your shells around the base of the crown using removable stitch markers, spacing them 5–6cm apart.
- Thread your needle and attach each shell one at a time, securing both ends of the thread with a double knot on the inside of the hat.
- Try the hat on and adjust the brim shape by hand if it needs reshaping — cotton holds its blocked shape well but responds nicely to a quick steam touch-up.
- Weave in any remaining loose ends and trim.
Beginner/Intermediate Tips
- Use a stitch marker at the start of every round on the crown — with continuous rounds (not joined), it’s very easy to lose track of where you started, especially through the increase rounds.
- Count your stitches after every increase round before moving on. A single missed increase early in the crown will throw off your lace pattern symmetry later.
- Cotton yarn has very little stretch or “give” compared to acrylic, so if your hdc rounds feel tight on the hook, switch to a slightly larger hook for those rounds only.
- When working Round 9’s chain-1 lace spaces, keep your tension even — pulling the chains too tight will make the next round’s stitches hard to find.
- Test your shell attachment points before sewing permanently; lay the shells around the brim edge first to make sure spacing looks even.
Variations
- Sunset Stripe: Work the brim rounds in alternating bands of terracotta and cream for a retro beach-towel look.
- Mini Sun Hat: Reduce to 6 increase rounds instead of 7 for a smaller, child-sized version.
- Wide Festival Brim: Add 2–3 extra brim rounds for a dramatic, sun-shading silhouette perfect for festivals.
- Pearl & Shell Mix: Swap half the shells for small freshwater pearl beads for a dressier coastal-meets-elegant finish.
- Two-Tone Lace: Crochet the lace rounds (9–12) in a contrasting color from the solid crown and brim for a color-blocked effect.
Save This Pattern
If you loved this breezy little hat, save this pin so you can come back to it before your next beach trip! Tag your finished hats and share your makes using #FoodiePlumCrochet — I’d love to see your version.



