
The Best Fluffy Pancakes recipe you will fall in love with. Full of tips and tricks to help you make the best pancakes.

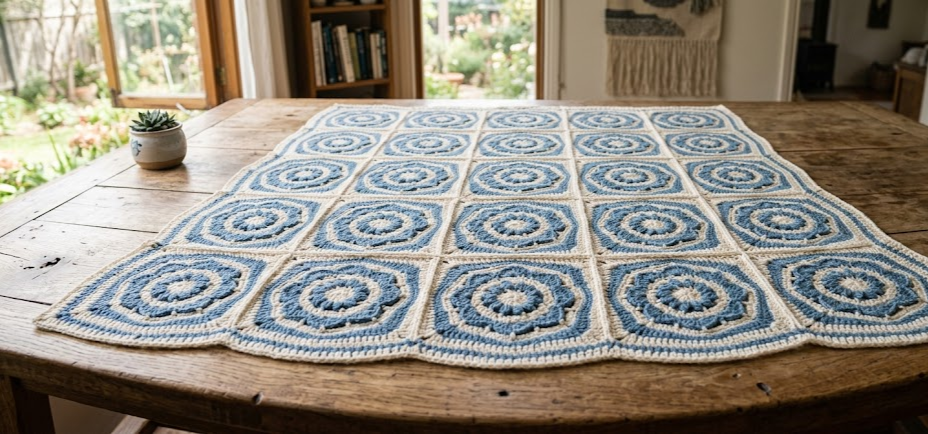
There’s something deeply satisfying about a handmade bedspread — the kind of piece that turns an ordinary bedroom into a cozy, storybook retreat. This Countryside Blue Mandala Granny Square Bedspread combines soft dusty blues with warm ivory in a series of mandala-style granny squares, each one worked individually and then joined into a stunning textured coverlet. It’s the kind of project that rewards patience: worked one block at a time, it becomes a relaxing weekly ritual rather than an overwhelming task.
This pattern is perfect for the crocheter who already knows their way around a granny square but is ready for something with a little more texture and detail — think popcorn stitch flower centers, lacy joining rounds, and a timeless color palette that works with almost any home decor style, from farmhouse to cottagecore to classic country blue and white. Matching pillow shams are included in the variations section, so you can extend the look across your whole bedroom.
Grab your hook, pick your favorite blues, and let’s get started.
|
Difficulty
Intermediate/Advanced
|
Time
10–14 Weeks
|
Hook Size
4mm (G/6)
|
Yarn Weight
DK (8-ply)
|
Finished Size
220 x 240cm
|
Gauge
- One finished mandala square = 20cm x 20cm (8″ x 8″)
- 20 sts x 22 rows = 10cm x 10cm (4″ x 4″) in double crochet
- Hook used: 4mm (US G/6)
- Yarn weight used: DK (8-ply / Light Worsted)
- Always make a gauge swatch before starting — squares that run even slightly large or small will compound significantly across a full bedspread.
Materials List
- DK weight yarn in Cream/Ivory (Color A) — approximately 1800g / 63oz total
- DK weight yarn in Powder Blue (Color B) — approximately 600g / 21oz total
- DK weight yarn in Dusty Blue (Color C) — approximately 500g / 17oz total
- DK weight yarn in Navy or Slate Blue (Color D, for accents) — approximately 300g / 10oz total
- 4mm (US G/6) crochet hook
- Tapestry/yarn needle for weaving in ends
- Scissors
- Stitch markers
- Measuring tape
Abbreviations Table
| Abbreviation | Meaning |
|---|---|
| ch | chain |
| sl st | slip stitch |
| sc | single crochet |
| dc | double crochet |
| tr | treble crochet |
| sp | space |
| st(s) | stitch(es) |
| rnd | round |
| MR | magic ring |
| pc | popcorn stitch |
| picot | small decorative loop (ch3, sl st into first ch of the 3) |
| BLO | back loop only |
| ( ) | stitch count at end of round/row |
| * … * | repeat instructions between asterisks |
Technique note — Magic Ring (MR): Wrap yarn around your finger to form a loop, insert hook, pull up a loop, then work your first round of stitches into the loop before pulling the tail to close it snugly. This avoids the small hole a standard chain-ring start leaves at the center.
Technique note — Popcorn Stitch (pc): Work 4 dc into the same stitch, remove your hook from the last loop, insert it into the top of the first dc of the group, then pull that loop through to close the group into a raised “bubble.”
Pattern Instructions
Part A: Mandala Flower Square (make 60)
Round 1 (Color C — Dusty Blue): MR, ch3 (counts as first dc), 2dc into ring, ch2, [3dc into ring, ch2] 3 times, sl st to top of ch3 to join. (12 dc, 4 ch-2 sps)
Round 2 (Color B — Powder Blue): Join in any ch-2 sp. Ch1, (pc, ch2, pc) in ch-2 sp [corner], ch1, pc in next dc, ch1, pc in next dc, ch1; repeat from * around, sl st to first pc to join. (8 pc along sides, 4 corner pc-pairs, 4 ch-2 corner sps)
Round 3 (Color A — Cream): Join in any corner ch-2 sp. Ch3 (counts as dc), (dc, ch2, 2dc) in same sp, dc in each pc and each ch-1 sp along side, (2dc, ch2, 2dc) in next corner sp; repeat around, sl st to join. (52 dc, 4 ch-2 corner sps)
Round 4 (Color A — Cream): Ch3, dc in each dc along side, (2dc, ch2, 2dc) in each corner sp, sl st to join. (68 dc, 4 ch-2 corner sps)
Round 5 (Color D — Navy/Slate accent): Join in a corner sp. Ch1, sc evenly around, working 3sc in each corner sp, sl st to join. (84 sc)
Round 6 (Color A — Cream, lace round): Join in any st. Ch3, skip 1 st, sc in next st; repeat around, ending with sl st to first ch of round. (42 ch-3 loops)
Round 7 (Color B — Powder Blue, picot trim): Sl st into first loop, ch1, sc in loop, picot (ch3, sl st in first ch to close), sc in next loop; repeat around, sl st to join, fasten off. (42 sc, 42 picots)

Part B: Lace Trellis Square — alternate square for visual variety (make 60)
Round 1 (Color A — Cream): MR, ch3, 2dc into ring, ch2, [3dc, ch2] 3 times, join. (12 dc, 4 ch-2 sps)
Round 2 (Color C — Dusty Blue): Join in corner sp, ch3, (dc, ch2, 2dc) in same sp, ch1, skip next dc, dc in next dc, ch1, skip next dc, (2dc, ch2, 2dc) in corner sp; repeat around, join. (28 dc, 4 ch-2 sps, 8 ch-1 sps)
Round 3 (Color A — Cream): Ch3, dc in every st and dc2tog over each ch-1 sp, (2dc, ch2, 2dc) in each corner, join. (44 dc, 4 ch-2 sps)
Round 4 (Color D — Navy accent): Ch1, sc evenly around with 3sc in each corner sp, join. (60 sc)
Round 5 (Color B — Powder Blue, picot trim): As Round 7 of Part A. (30 sc, 30 picots)
Repeat Parts A and B until you have 60 of each (120 squares total), or adjust the count to match your mattress size (see Assembly).
Assembly Steps
- Block every square before joining: pin each square right-side up to measurements of 20cm x 20cm on a blocking mat, lightly steam or mist, and let dry fully. This step is essential for a bedspread to lie flat.
- Arrange your squares in alternating checkerboard fashion (Mandala, Trellis, Mandala, Trellis) in an 11-column x 11-row layout, adding a half-row/column of extra Mandala squares along one edge if you want a pillow-top overhang of about 20–30cm.
- Join squares using a flat slip-stitch seam through the back loops only (BLO) with Color A, working in horizontal rows first, then joining the rows together vertically. This keeps the join nearly invisible on the front side.
- Once fully joined, work one final border round in Color D: sc evenly around the entire outer edge, working 3sc into each outer corner to keep the piece flat, then finish with a picot round matching Round 7 of Part A.
- Weave in all ends securely using a tapestry needle, running each tail through at least 5cm of stitching on the wrong side.
- Give the finished bedspread a final full block: dampen thoroughly, pin to finished dimensions (220cm x 240cm), and allow to dry completely before use.
Beginner/Intermediate Tips
- Keep a small notebook or app log of which color you used for which round on which square — with two alternating motifs, it’s easy to lose track after week six.
- When working the popcorn stitches in Round 2 of Part A, keep tension slightly loose on the 4 dc so it’s easier to insert your hook and close the group cleanly.
- Use stitch markers on the corner ch-2 spaces of every round — corners are the easiest place to lose your place in a large motif.
- Join new colors with a “spit splice” (for wool-blend yarns) or a needle-woven join instead of a knot, to keep the back of your bedspread flat and knot-free.
- Wash and block a single test square first to confirm your finished size before committing to 120 squares.

Variations
- Coastal Palette: Swap the blues for seafoam green, sandy beige, and white for a beach-house look.
- Baby Blanket Size: Reduce to a 5×6 grid of squares (30 total) for a cot-sized throw, roughly 100cm x 120cm.
- Matching Pillow Shams: Use 4 Mandala squares joined in a 2×2 grid, backed with plain cream fabric or crochet, to create coordinating throw pillows exactly like the ones shown in the bedroom set.
- Monochrome Modern: Work every square in a single charcoal grey with white accent rounds for a more contemporary, minimalist take on the same construction.
- Sunset Version: Replace the blue tones with terracotta, blush, and cream for a warm, autumnal bedspread.
Save This Pattern
If you love this cozy, textured look for your bedroom, save this pattern to your crochet board so you can find it again when you’re ready to start your first square. Share your progress and tag your finished bedspread with #FoodiePlumCrochet — I’d love to see your color choices!



