
The Best Fluffy Pancakes recipe you will fall in love with. Full of tips and tricks to help you make the best pancakes.

If you’ve ever wanted a piece of jewelry that feels like it grew straight out of a forest, this little crochet tree sprout bracelet is it. A delicate woven branch wraps around the wrist, dotted with tiny leaves and acorns, and right in the center sits the star of the show: a sweet, wide-eyed baby sprout with a fuzzy green tuft on top. It’s whimsical, a little nostalgic (hello, tiny tree friend energy), and completely huggable even though it’s only a few centimeters tall.
This pattern is perfect for crocheters who love micro amigurumi and want to combine sculpting skills with jewelry-making. It works beautifully as a gift for plant lovers, nature-inspired stocking stuffers, or a fun addition to a handmade markets table. Because everything is worked in fine cotton thread with a small hook, the finished piece is lightweight, durable, and comfortable enough to wear every day.
Whether you’re already comfortable with amigurumi shaping or you’re stepping up from beginner crochet into smaller-scale work, this project will teach you several useful skills: working in continuous rounds, shaping a face with surface details, building dimensional leaves, and assembling multiple small pieces into one cohesive design. Grab your hook and a few mini skeins of cotton thread, and let’s grow this little sprout together.
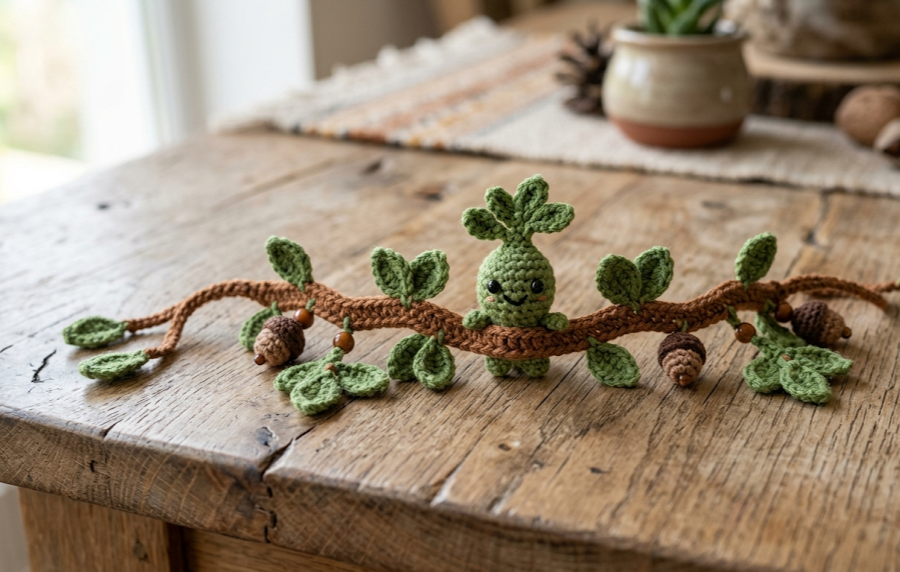
|
Difficulty
Intermediate
|
Time
4–5 Hours
|
Hook Size
2.0mm
|
Yarn Weight
Lace (Size 10)
|
Finished Size
18–20cm
|
Gauge
- 12 sts x 14 rows = 10cm x 10cm square, worked in single crochet (sc)
- Hook used: 2.0mm steel/micro crochet hook
- Yarn weight used: Lace weight (Size 10) cotton crochet thread
Gauge is not critical for this project since it’s a small charm rather than a wearable garment that needs to fit precisely, but matching gauge will help your sprout and leaves come out close to the size shown, and will keep your stitches tight enough to hide the stuffing.
Materials List
- Lace weight (Size 10) cotton crochet thread:
- Light brown — approx. 15g (branch and sprout body)
- Medium brown — approx. 5g (branch shading/wrapping)
- Green (two shades if desired: olive and moss) — approx. 10g total (leaves)
- Cream or tan — approx. 5g (acorn caps)
- Small amount of dark brown — approx. 2g (acorn bodies)
- 2.0mm crochet hook (steel or micro hook)
- Stitch marker
- Yarn needle for weaving in ends and sewing pieces together
- Small amount of polyester fiberfill (for sprout head and acorns)
- Two 3–4mm black safety eyes or black seed beads (for the sprout’s face)
- Sewing needle and matching thread (if using beads instead of safety eyes)
- 18-gauge craft wire (floral wire), approx. 25–30cm length, for the branch armature
- Wire cutters
- Lobster clasp and jump rings (for bracelet closure)
- Optional: clear-drying fabric glue for extra security at wire ends
Abbreviations Table
| Abbreviation | Meaning |
|---|---|
| ch | chain |
| sl st | slip stitch |
| sc | single crochet |
| inc | increase (2 sc in same stitch) |
| dec | invisible decrease (see technique note below) |
| sc2tog | single crochet 2 together (standard decrease) |
| BLO | back loop only |
| FLO | front loop only |
| st(s) | stitch(es) |
| rnd(s) | round(s) |
| MR | magic ring |
| rep | repeat |
| ( ) | stitch count at end of round/row |
Pattern Instructions
Part 1: Branch (Base/Armature)
The branch is the foundation that holds everything together and forms the bracelet band.
Technique note — wire armature: Cut a piece of 18-gauge wire about 25–30cm long (adjust for wrist size). Bend the ends inward slightly so no sharp tips poke through the finished crochet. This wire will sit inside the crocheted branch tube to let it hold its curved bracelet shape.
Row 1: Using light brown thread, ch 31 (or length to fit wrist plus 2cm for closure overlap). (31 ch)
Row 2: Sc in 2nd ch from hook and in each ch across. (30 sc)
Technique note — working a tube: Rather than working flat rows, continue around the chain’s starting edge (the “second side of the chain,” meaning the unused loops on the bottom of your starting chain) to form a tube. This encases the wire and gives the branch its rounded, 3-dimensional look.
Row 3: Turn the piece over and sc into each of the bottom loops of the starting chain across. (30 sc)
Row 4: Sl st to join the two short ends together, forming a long thin tube. Before closing the final 2–3 stitches, insert your prepared wire into the tube so it runs the full length. Finish closing the tube with sl st and fasten off, weaving in the end. (30 sts, tube closed)
Technique note — closing the tube: Once the wire is fully inserted, pinch the open end flat and work sl st through both layers to seal it, just as you would close the toe of a sock. This keeps the wire from sliding out and gives a clean, rounded tip.
With the brown thread still attached at a few points, take medium brown thread and wrap it diagonally around the tube every 1.5cm to mimic bark texture, securing each wrap with a small stitch through the tube. This step is decorative and optional but adds a lovely “branch” look.
Part 2: Sprout Head
Rnd 1: With light brown thread, MR, sc 6 into ring. (6 sc)
Technique note — magic ring: A magic ring (MR) is an adjustable loop that lets you start a round shape with no visible hole in the center; pull the tail to tighten it closed after your first round of stitches.
Rnd 2: (Inc) around. (12 sc)
Rnd 3: (Sc 1, inc) around. (18 sc)
Rnd 4: (Sc 2, inc) around. (24 sc)
Rnd 5: (Sc 3, inc) around. (30 sc)
Rnds 6–8: Sc around, no increases. (30 sc) — work 3 rounds even
At the end of Rnd 6, place safety eyes (or mark positions for beaded eyes) 5 stitches apart in the center-front area of the head, about 2 rounds back from the front opening.
Rnd 9: (Sc 3, dec) around. (24 sc)
Technique note — invisible decrease: Insert your hook into the front loop only of the next stitch, then the front loop only of the following stitch, and pull the thread through all three loops at once. This creates a smoother decrease than standard sc2tog.
Rnd 10: (Sc 2, dec) around. (18 sc)
Stuff the head firmly with fiberfill at this point, adding a small amount more as you continue decreasing.
Rnd 11: (Sc 1, dec) around. (12 sc)
Rnd 12: (Dec) around. (6 sc)
Fasten off, leaving a long tail. Use the tail and yarn needle to close the remaining 6 stitches (the classic amigurumi closure: weave through front loops of remaining stitches, pull tight, and secure on the inside).

Part 3: Sprout Hair Tuft
Rnd 1: With green thread, MR, sc 5 into ring. (5 sc)
Rnd 2: (Inc) around. (10 sc)
Rnd 3: Sc in BLO around. (10 sc)
Technique note — BLO: Working in the back loop only (BLO) instead of both loops creates a visible ridge, which helps the tuft flare outward like a tuft of leaves rather than curling under.
Rnd 4: (Sc 1, inc) around. (15 sc)
Fasten off leaving a long tail for sewing. Flatten the tuft slightly and sew it to the top-back of the sprout’s head, allowing the BLO ridge edge to flare outward like leafy hair.
Part 4: Leaves (make 6)
Row 1: With green thread, ch 6.
Row 2: Sl st in 2nd ch from hook, sc in next ch, hdc in next 2 ch, 3 dc in last ch (this is the leaf tip).
Row 3: Continue down the other side of the chain (working into the unused loops on the underside): hdc in next 2 ch, sc in next ch, sl st in last ch. Fasten off, leaving a tail for attaching.
Repeat to make 6 leaves total — vary slightly in size by adding or removing 1 chain if you’d like a more organic, natural look.
Part 5: Acorns (make 3)
Acorn Body (dark brown):
Rnd 1: MR, sc 5 into ring. (5 sc)
Rnd 2: (Inc) around. (10 sc)
Rnds 3–4: Sc around. (10 sc)
Rnd 5: (Sc 3, dec) around. (8 sc)
Stuff lightly with fiberfill.
Rnd 6: (Dec) around. (4 sc)
Fasten off, weave tail through remaining stitches to close.
Acorn Cap (cream/tan):
Rnd 1: MR, sc 5 into ring. (5 sc)
Rnd 2: (Inc) around. (10 sc)
Rnd 3: Sc in BLO around, creating a slight bowl shape that will sit over the top of the acorn body. (10 sc)
Fasten off, leaving a tail. Sew the cap over the top third of the acorn body, slightly overlapping, so it looks like a textured acorn top.
Assembly Steps
- Lay the finished branch tube flat on your work surface and decide on the sprout’s placement — typically just off-center, roughly 7–8cm from one end.
- Pin the sprout head in place, then sew it securely to the branch using the head’s bottom opening edge, stitching all the way around so no gaps show. The head should sit with about 1cm of its base overlapping the branch for stability.
- Sew the hair tuft to the top of the sprout’s head if not already attached, centering it about 0.5cm back from the face.
- Attach the 2 eyes (safety eyes or beads) to the face, spaced about 0.8cm apart, positioned in the upper-middle third of the face for a wide-eyed, friendly expression.
- Arrange the 6 leaves along the branch in small clusters of 2–3, spacing each cluster about 3–4cm apart from the sprout. Sew each leaf at its base only, letting the tips fan outward freely for movement.
- Position the 3 acorns at intervals along the remaining length of branch, roughly 4–5cm apart, alternating sides for visual balance. Sew through the base of each acorn into the branch tube, making 4–5 secure stitches per acorn.
- Check that the wire armature inside the branch still allows the bracelet to curve gently around a wrist; reshape by hand if needed (it will hold its new shape since it’s wire-reinforced).
- Attach a jump ring to each end of the branch tube, then attach the lobster clasp to one jump ring so the bracelet can open and close.
- Try the bracelet on and adjust the wire curve slightly for comfort, then set it gently to hold its final shape.

Beginner/Intermediate Tips
- When wrapping the medium brown bark texture thread around the tube, keep tension loose — pulling too tight will warp the wire’s straight shape before you’ve curved it.
- Stuff the sprout’s head a little at a time as you decrease, rather than all at once at the end; this prevents lumps and keeps the shaping smooth.
- If your acorn caps look too loose, work Rnd 3 one stitch fewer than instructed; cap tightness varies slightly with thread tension.
- Use a stitch marker on Rnd 1 of every round-based piece (head, tuft, acorns) so you never lose track of where your round begins, which is easy to do with such small stitch counts.
- When bending the wire armature, always test the curve gently around your own wrist before sewing any pieces onto the branch — it’s much easier to adjust the shape on a bare tube than after decoration is attached.
Variations
- Autumn Edition: Swap the green leaves for deep red, orange, and golden-yellow thread for a fall-themed bracelet.
- Necklace Version: Skip the clasp hardware and instead attach the finished branch to a thin cord or chain to wear as a pendant necklace.
- Pastel Spring Sprout: Use a soft mint body and pale pink leaf accents for a gentler, spring-inspired colorway.
- Mini Brooch: Omit the wire bracelet band entirely and sew a pin backing to the sprout-and-leaf cluster for a wearable brooch instead.
- Twin Sprouts: Make two smaller sprout heads (reduce Rnds 1–5 by one round each) and place them side by side along the branch for a “sprout family” look.
Save This Pattern!
Loved this little tree sprout bracelet? Save this pin so you can find your way back to the pattern whenever you’re ready to crochet your own. Tag your finished piece and share it with the community using #FoodiePlumCrochet — I’d love to see your sprout come to life!



