
The Best Fluffy Pancakes recipe you will fall in love with. Full of tips and tricks to help you make the best pancakes.

Introduction
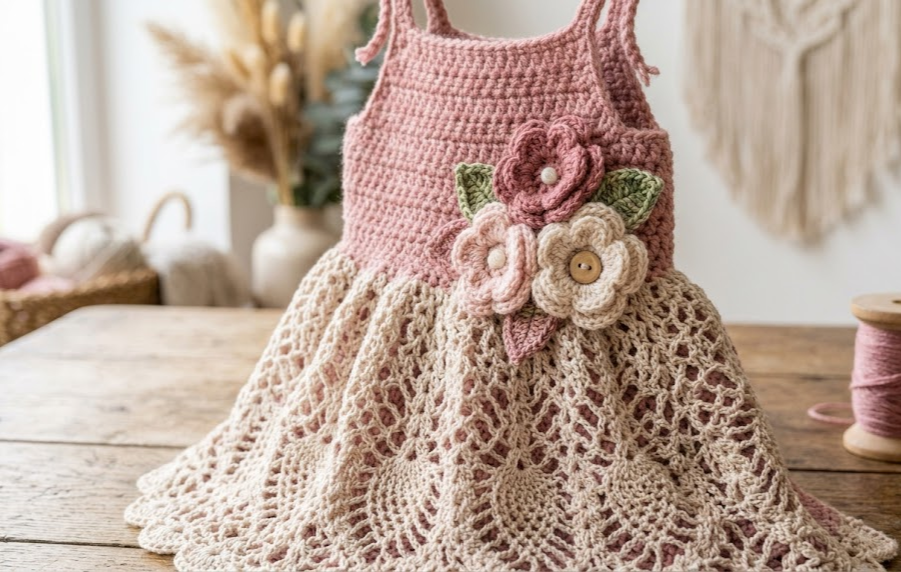
There’s something undeniably enchanting about a tiny crocheted dress, and this dusty rose baby frock is the kind of project that turns heads the moment it comes off the hook. With its delicate braided shoulder ties, airy lace skirt, and a cluster of hand-crafted rosebuds and leaves nestled at the bodice, this frock looks like it belongs in a boutique window — but it’s entirely handmade, stitch by stitch, with simple techniques you already know. This pattern is perfect for crocheters who want to make a special outfit for a baby shower gift, a first birthday photoshoot, a flower girl dress, or just a sweet everyday piece for a little one. The fitted yoke contrasts beautifully with the flowing, lacy skirt, and the floral appliqué adds a romantic, garden-inspired finishing touch. If you’ve made a few garments before and are comfortable with basic shaping, increases, and simple lace stitch patterns, you’ll find this project both relaxing and rewarding. Grab your hook and a few skeins of soft DK-weight yarn, and let’s get started on a dress that’s destined to become a treasured keepsake.

|
Difficulty
Intermediate
|
Time
8–10 Hours
|
Hook Size
3.0mm–3.5mm
|
Yarn Weight
DK (Light Worsted)
|
Finished Size
6–12 Months
|
Gauge
18 stitches x 9 rows = 10cm x 10cm (4in x 4in) in double crochet (dc), using a 3.5mm (E) hook and DK weight yarn.
Always make a gauge swatch before starting. Chain 22, work 9 rows of dc, and measure your swatch. If it’s smaller than 10cm, go up a hook size. If it’s larger, go down a hook size. Getting gauge right ensures your frock fits true to size.
Materials List
- DK weight yarn (light worsted, #3), approximately 250g in Dusty Rose / Mauve Pink (main color)
- Small amounts of DK yarn in Cream/Ivory, Soft Blush Pink, and Sage Green (for flower and leaf appliqués)
- 3.5mm (E) crochet hook for the dress body
- 3.0mm (D) crochet hook for the flowers and leaves (smaller hook gives tighter, neater appliqué stitches)
- Yarn needle for weaving in ends and sewing on appliqués
- Stitch markers (at least 4)
- Scissors
- Measuring tape
Abbreviations Table
| Abbreviation | Meaning |
|---|---|
| ch | chain |
| sl st | slip stitch |
| sc | single crochet |
| hdc | half double crochet |
| dc | double crochet |
| tr | treble crochet |
| st(s) | stitch(es) |
| sp | space |
| rnd(s) | round(s) |
| row(s) | row(s) |
| inc | increase (2 sc/dc in same stitch) |
| dec | decrease (work 2 sts together as one) |
| BLO | back loop only |
| MR | magic ring |
| yo | yarn over |
| rep | repeat |
| ( ) | total stitch count at end of round/row |
| [ ] | repeat instructions inside brackets the stated number of times |
Technique Notes (used throughout pattern):
- Magic Ring (MR): Make a loop with your yarn, leaving a tail, then work your first round of stitches into the loop before pulling the tail to close it tightly — this avoids the hole you’d get from chaining and joining instead.
- BLO (Back Loop Only): Insert your hook only under the back loop of the stitch (the loop farthest from you), leaving the front loop unworked — this creates a ribbed, textured line and is used here to define the waistline.
- Working into starting chain, second side: After completing one side of a foundation chain, you rotate your work and continue stitching into the unused loops along the bottom of the same chain.
PART 1: Bodice/Yoke
Worked top-down in rounds. Use 3.5mm hook and Dusty Rose yarn.
Rnd 1: MR, ch 1 (does not count as st), 12 sc into ring, pull tail to close, sl st to join. (12 sc)
Rnd 2: Ch 1, [2 sc in next st, sc in next st] rep around, sl st to join. (18 sc)
Rnd 3: Ch 1, [2 sc in next st, sc in next 2 sts] rep around, sl st to join. (24 sc)
Rnd 4: Ch 1, [2 sc in next st, sc in next 3 sts] rep around, sl st to join. (30 sc)
Rnd 5: Ch 1, [2 sc in next st, sc in next 4 sts] rep around, sl st to join. (36 sc)
Rnd 6: Ch 1, [2 sc in next st, sc in next 5 sts] rep around, sl st to join. (42 sc)
Divide for armholes:
Row 7 (back/front split): Ch 1, sc in next 21 sts (this is the front panel), turn, leaving remaining 21 sts unworked for the back — you will return to them after completing the front. (21 sc)
Note: For a sleeveless sundress style as shown, instead of splitting into front/back panels, you may continue working in the round through Rnd 8, then divide for armhole openings by chaining 3 (for underarm gap) and skipping 6 sts at each side before continuing — this matches the photo’s continuous-yoke construction:
Rnd 7: Ch 1, sc in next 15 sts, ch 3 (armhole gap), skip next 6 sts, sc in next 15 sts, ch 3 (armhole gap), skip next 6 sts, sl st to join. (36 sts total: 30 sc + 6 ch-sts)
Rnd 8: Ch 1, sc in each st and each ch around (work 3 sc across each ch-3 sp), sl st to join. (36 sc)
Rnd 9: Working in BLO this round only (creates the waistline ridge), sc in BLO of each st around, sl st to join. (36 sc)
Rnd 10: Ch 1, sc in each st around (back to working both loops), sl st to join. (36 sc)
PART 2: Skirt
Continue directly from Rnd 10 of bodice with 3.5mm hook.
Rnd 11 (skirt foundation): Ch 1, [2 dc in next st, sc in next st] rep around, sl st to join at top of first dc. (54 sts)
Rnd 12: Ch 3 (counts as first dc), dc in same st, [skip 1 st, 3 dc in next st] rep around, sl st to join in top of ch-3. (18 shells of 3 dc = 54 dc)
Rnd 13: Ch 3, dc in next 2 sts of shell, ch 1, [3 dc in sp between shells, ch 1] rep around, sl st to join. (18 shells, 18 ch-1 sps)
Rnds 14–20: Repeat Rnd 13 seven more times, working 3 dc in each ch-1 sp from the previous round and chaining 1 between shells. (18 shells, 18 ch-1 sps each round)
Rnd 21 (hem scallop): Ch 1, [sc in first dc of shell, hdc in next dc, 3 dc in next dc (shell point), hdc in next dc, sc in last dc of shell, sl st in ch-1 sp] rep around, sl st to join. (Scallop count = 18; finished as a wavy lace edge)
Fasten off and weave in ends.
PART 3: Shoulder Ties (make 2)
With 3.5mm hook and Dusty Rose yarn, ch 40 (adjust length to desired tie length, approx 25–28cm).
Row 1: Starting in 2nd ch from hook, sl st in each ch across to form a twisted cord look, fasten off leaving a 15cm tail for attaching. (39 sl st)
Sew one tie securely to the front and back of each side of the bodice at the top edge, spaced about 4cm apart, then tie into a bow at the shoulder.

PART 4: Rosebud Appliqué (make 3 — 1 cream, 1 blush, 1 dusty rose)
With 3.0mm hook.
Row 1: Ch 16.
Row 2: Starting in 2nd ch from hook, [sc, hdc, 2 dc, hdc, sc] in same ch, sl st in next ch; rep this pattern across the chain to create a row of small petal scallops. (5 petal scallops)
Roll the strip starting from the chain end, coiling it into a spiral rose shape, and stitch through the base layers with a yarn needle to secure the coil. Fasten off, leaving a tail for sewing onto the bodice.
PART 5: Leaves (make 5 — Sage Green)
With 3.0mm hook.
Row 1: Ch 8.
Row 2: Sl st in 2nd ch from hook, hdc in next ch, dc in next 2 ch, hdc in next ch, 3 sc in last ch (this is the leaf tip), then working into the second side of the starting chain — rotate your work and continue stitching into the unused loops along the bottom of the same chain — hdc in next ch, dc in next 2 ch, hdc in last ch, sl st to join at base. (12 sts total around leaf)
Fasten off, leaving a tail for sewing.
Assembly Steps
- Lay the finished bodice flat and arrange the 3 rosebuds in a small cluster slightly off-center on the front of the bodice, just below the BLO waistline ridge.
- Tuck 2–3 leaves between and behind the roses so their tips peek out around the edges; pin in place before sewing.
- Using a yarn needle and matching thread, sew through the base of each rose and leaf, securing firmly to the bodice fabric — sew through at least 3 points per flower for stability.
- Attach shoulder ties to the top edge of the bodice front and back at each side, spacing the two attachment points about 4cm apart so the tie sits flat on the shoulder when bowed.
- Weave in all remaining loose ends on the inside of the garment.
- Lightly steam-block the skirt by pinning out the scalloped hem points to even out the lace pattern; let cool completely before unpinning.
- Try on baby (or lay against a similar-sized garment) to confirm the bodice sits comfortably and ties are even before final wear.
Beginner/Intermediate Tips
- When working the shell stitch skirt (Rnd 12 onward), always count your shells before moving to the next round — losing a shell early on throws off the whole scalloped hem.
- Keep tension looser through the lace skirt rounds than you would for the bodice; a tight lace pattern won’t drape as nicely.
- When rolling the rosebud strip into a spiral, hold it firmly as you stitch — the coil wants to unravel until the base stitches are locked in.
- BLO rounds can feel awkward at first; turn your work slightly toward you so you can see the back loop clearly before inserting your hook.
- Block your skirt panel before attaching ties or flowers — it’s much easier to shape the lace evenly without bulky appliqués in the way.
Variations
- Color Swap: Make this in sage green with cream flowers for a botanical, garden-party look instead of the romantic rose palette.
- Size Up: Add 6 extra repeats to the bodice increase rounds and lengthen the skirt by 4–5 extra shell rounds to size up to 18–24 months.
- Display Piece: Mount the finished frock on a small wooden dress form or hanger as a nursery decor accent rather than a wearable piece.
- Sleeve Variation: Instead of leaving armhole gaps, work a few rounds of sc directly onto the armhole edge to create short puff sleeves for cooler weather.
- Monochrome Minimalist: Skip the floral appliqué entirely and instead work a single BLO rib detail band at the waist for a clean, modern silhouette.
Save this pattern for later! Pin it now so you don’t lose it — tag your finished frock with #FoodiePlumCrochet so we can see your beautiful creation!



