
The Best Fluffy Pancakes recipe you will fall in love with. Full of tips and tricks to help you make the best pancakes.

There’s something irresistibly charming about a fluffy white goose wearing a tiny frog hat. This crochet Goose Frog amigurumi combines two of the most beloved amigurumi trends — animal-shaped plushies and playful costume hats — into one adorable centerpiece. Standing at just under six inches tall, this little goose has a soft, cloud-like bouclé body, a bright orange beak and webbed feet, and a googly-eyed frog cap that instantly turns it into a conversation piece.
This pattern is perfect for anyone who has already made a few amigurumi basics — beginner-friendly enough to follow, but with enough shaping and finishing touches to keep intermediate crocheters engaged. It makes a wonderful shelf decoration, a nursery accent, a quirky gift, or a fun addition to any collection of crochet animals. Grab your hook, a fluffy white yarn, and a few contrast colors, and let’s make this goose come to life.
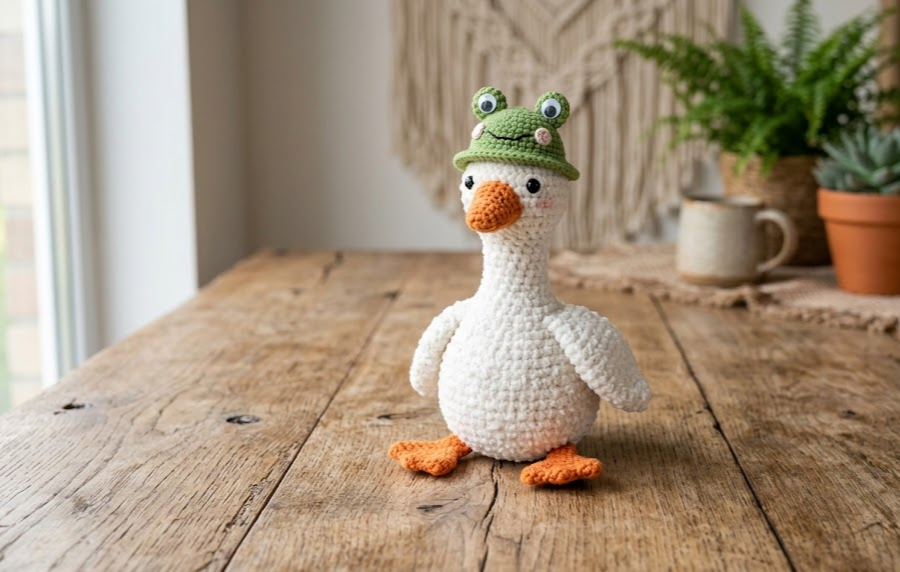
|
Difficulty
Intermediate
|
Time
4–5 Hours
|
Hook Size
3.5mm
|
Yarn Weight
Bulky / Worsted
|
Finished Size
14cm (5.5in)
|
Gauge
- 14 sts x 16 rows = 10cm x 10cm (4in x 4in) in single crochet, worked in continuous spiral rounds
- Hook used: 3.5mm crochet hook
- Yarn weight used: Bulky weight bouclé or chenille-style yarn for the body; worsted weight smooth yarn for the hat, beak, and feet
Gauge is not critical for amigurumi since it’s a stuffed toy rather than a wearable item, but matching gauge closely will help you achieve the finished size listed below and will keep stitches tight enough that stuffing doesn’t peek through.
Materials List
- Bulky weight white bouclé or chenille yarn (approx. 60g) — main body
- Worsted weight orange yarn (approx. 10g) — beak and feet
- Worsted weight green yarn (approx. 15g) — frog hat (or blue/yellow for variations)
- Small amount of black yarn or black felt — hat eye pupils and nostril details
- 3.5mm crochet hook
- 3.0mm crochet hook (for smaller hat and detail pieces)
- Polyester fiberfill stuffing
- Yarn needle
- Stitch markers
- Small amount of craft wire (optional, for neck support)
- Two 10mm safety eyes (for the frog hat) or googly eyes with felt backing
- Scissors
Abbreviations Table
| Abbreviation | Meaning |
|---|---|
| ch | chain |
| sc | single crochet |
| inc | increase (2 sc in same stitch) |
| dec | invisible decrease (see technique note) |
| sl st | slip stitch |
| st(s) | stitch(es) |
| rnd | round |
| BLO | back loop only |
| MR | magic ring |
| rep | repeat |
| [ ] | repeat instructions inside brackets the stated number of times |
Pattern Instructions
Part 1: Goose Body
Technique Note — Magic Ring (MR): Wrap yarn around your finger to form a loop, insert hook and pull up a loop, then work your first round of stitches into the loop before pulling the tail to close it tightly. This avoids a hole at the center of your work.
Using white bouclé yarn and 3.5mm hook:
- Rnd 1: MR, 6 sc into ring (6)
- Rnd 2: [inc] x6 (12)
- Rnd 3: [sc, inc] x6 (18)
- Rnd 4: [sc2, inc] x6 (24)
- Rnd 5: [sc3, inc] x6 (30)
- Rnds 6–14: sc around (30) — repeat 9 times
- Rnd 15: [sc3, dec] x6 (24)
Technique Note — Invisible Decrease (dec): Insert hook through the front loops of the next two stitches only, yarn over, and pull through both loops at once, then complete as a normal single crochet. This keeps decreases smooth and nearly invisible.
- Rnd 16: [sc2, dec] x6 (18)
- Rnd 17: sc around (18)
- Begin stuffing firmly here and continue stuffing as you close the body.
- Rnd 18: [sc1, dec] x6 (12)
- Rnd 19: [dec] x6 (6)
- Fasten off, weave tail through remaining 6 stitches, pull tight, and secure.

Part 2: Neck and Head
Using white bouclé yarn:
- Rnd 1: MR, 6 sc into ring (6)
- Rnd 2: [inc] x6 (12)
- Rnd 3: [sc1, inc] x6 (18)
- Rnds 4–10: sc around (18) — repeat 7 times
- Rnd 11: [sc1, dec] x6 (12)
Stuff the head and upper neck firmly before continuing.
- Rnd 12: [dec] x6 (6)
- Fasten off, leaving a long tail for attaching to the body.
Optional wire support: Cut a piece of craft wire slightly shorter than the combined length of the neck and body. Bend both ends into small loops so no sharp edges are exposed. Insert the wire down through the center of the neck piece before stuffing, and let the bottom end rest inside the body cavity for stability. This allows the finished goose to hold a gentle curved neck pose.
Part 3: Beak
Using orange yarn and 3.0mm hook:
- Rnd 1: MR, 5 sc into ring (5)
- Rnd 2: sc around (5)
- Rnd 3: [sc1, dec] x2 (3, adjust last stitch as sc)
- Stuff lightly and fasten off, leaving a tail for sewing.
Part 4: Feet (make 2)
Using orange yarn and 3.0mm hook:
- Rnd 1: MR, 6 sc into ring (6)
- Rnd 2: [inc] x6 (12)
- Rnd 3: sc around (12)
- Fasten off leaving a long tail.
Flatten the circle and use the tail to whip stitch three small notches around the edge to create webbed toe shapes, then secure.
Part 5: Frog Hat
Using green yarn (or blue/yellow) and 3.0mm hook:
- Rnd 1: MR, 6 sc into ring (6)
- Rnd 2: [inc] x6 (12)
- Rnd 3: [sc1, inc] x6 (18)
- Rnd 4: [sc2, inc] x6 (24)
- Rnd 5: [sc3, inc] x6 (30)
- Rnds 6–8: sc around (30)
- Rnd 9: BLO sc around (30)
Technique Note — BLO: Working in the back loop only leaves the front loop exposed as a decorative ridge, which forms the visible brim edge of the hat.
Fasten off.
Part 6: Frog Eye Bumps (make 2)
Using green yarn and 3.0mm hook:
- Rnd 1: MR, 6 sc into ring (6)
- Rnd 2: [inc] x6 (12)
- Rnds 3–4: sc around (12)
- Stuff lightly, fasten off leaving a tail.
Attach a 10mm safety eye or googly eye to the front of each bump before sewing it to the top of the hat, spaced about 2cm apart.
Assembly Steps
- Sew the head/neck piece to the top of the body, aligning the neck seam so the head tilts slightly forward. Use a whip stitch and go around twice for durability.
- Attach the beak to the front of the head, positioning it 1.5cm below where the eyes will go. Stuff lightly through the opening if needed before closing.
- Sew small black safety eyes or embroidered eyes onto the goose’s face, spaced about 1.5cm apart above the beak.
- Attach the two feet to the bottom of the body, spacing them about 2cm apart so the goose can stand upright. Angle the toes slightly outward for stability.
- Position the frog hat on top of the goose’s head so it covers about a third of the head, then pin before sewing around the entire brim with a whip stitch.
- Sew the two frog eye bumps to the top of the hat, centered and 2cm apart, angling them slightly forward.
- Weave in all loose ends and give the finished goose a light fluff with a pin brush if using bouclé yarn, to enhance the soft, feathery texture.

Beginner/Intermediate Tips
- Bouclé and chenille yarns can be hard to see stitch definition in — use a stitch marker on the first stitch of every round without fail, since it’s easy to lose your place in fuzzy yarn.
- Stuff the neck first while it’s still flat before curving it, so the fiberfill distributes evenly rather than bunching at the top.
- If your bouclé yarn is slippery, switch to a smooth cotton yarn for the beak and feet — the contrast in texture also makes those details pop visually.
- When attaching the hat, sew from the inside of the brim outward so your stitches stay hidden in the ridge created by the BLO round.
- Test the goose’s balance before fully closing the bottom of the body; add a flat cardboard or felt disc for extra stability if it wobbles.
Variations
- Color Swap: Make the hat in blue or yellow instead of green for a fun three-goose family display, just like the trio shown in the original inspiration photo.
- Mini Size: Use a fingering weight yarn and 2.5mm hook to create a miniature 8cm version, perfect for keychains or ornaments.
- Seasonal Hat: Swap the frog hat for a tiny santa hat, pumpkin hat, or flower crown to create a holiday or seasonal collection.
- Duck Instead of Goose: Shorten the neck by 4 rounds and widen the beak slightly to transform this pattern into a matching duck amigurumi.
- Keychain or Bag Charm: Add a small metal clasp to the top of the hat instead of sewing it flat, turning your goose into a wearable accessory.
Save This Pattern
If you love whimsical amigurumi mashups like this Goose Frog, save this pattern to your crochet board so you can come back to it anytime you’re ready to stitch one up. Tag your finished goose and share your version with the community using #FoodiePlumCrochet!



