
The Best Fluffy Pancakes recipe you will fall in love with. Full of tips and tricks to help you make the best pancakes.

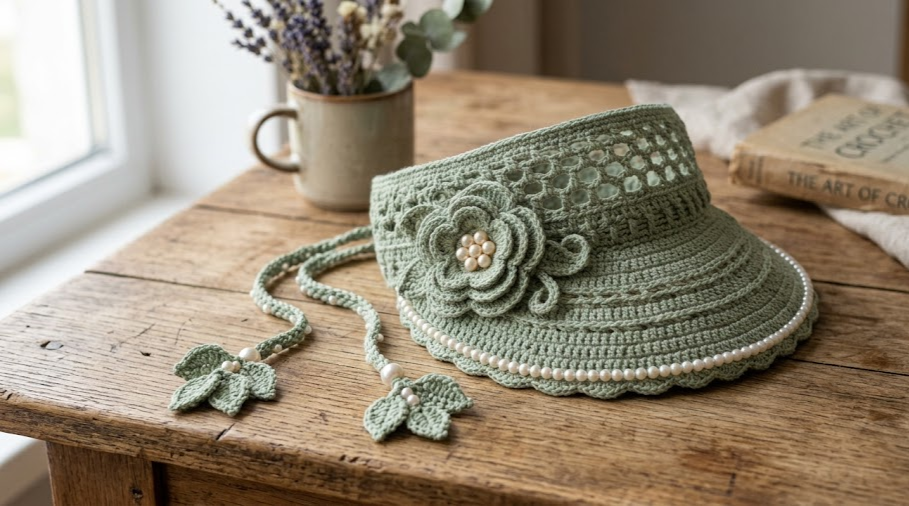
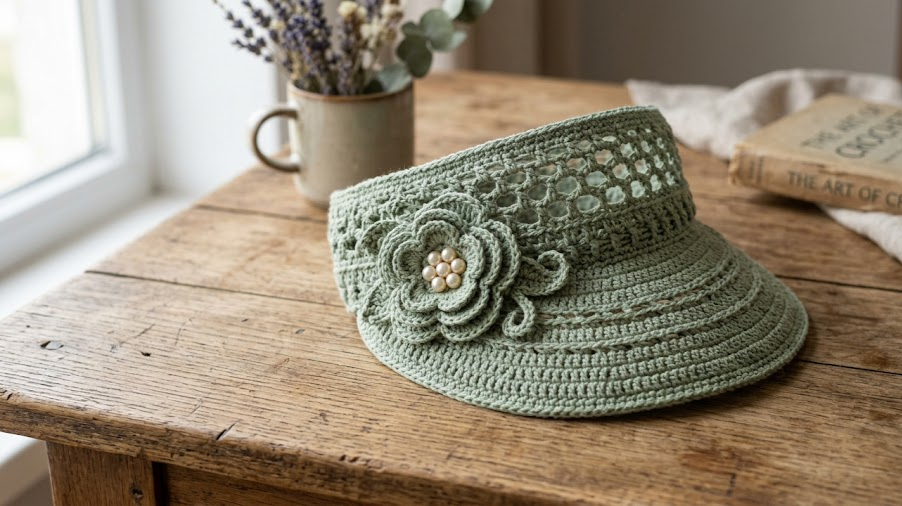
Summer calls for handmade accessories that feel as good as they look, and this crochet lace sun visor delivers exactly that. Combining an airy mesh crown, a scalloped brim, and a romantic flower appliqué dotted with pearl beads, this visor is the kind of piece that turns heads at garden parties, beach days, and outdoor weddings alike. The soft sage green colorway gives it a botanical, effortless feel, while the trailing leaf-and-pearl tassels at the back add a delicate, boho-luxe finishing touch. Whether you’re an intermediate crocheter looking for a fresh summer project or someone who wants a one-of-a-kind accessory no store shelf can offer, this pattern walks you through every stitch needed to bring it to life. It’s lightweight, breathable, and fully adjustable thanks to the tie-back closure, making it a flattering fit for nearly any head size.
This visor isn’t just decorative — it’s genuinely functional. The solid brim shields your face from the sun while the open crown keeps your head cool, making it perfect for those who want sun protection without sacrificing style. Pair it with a linen sundress or a swimsuit cover-up, and you’ve got a look that feels curated, not costume-y.
|
Difficulty
Intermediate
|
Time
8–10 Hours
|
Hook Size
2.5mm
|
Yarn Weight
Fingering / Sport
|
Finished Size
55–58cm Circumference
|
Gauge
- 20 stitches x 10 rows = 10cm x 10cm in mesh pattern (dc, ch-1, skip 1)
- Hook used: 2.5mm steel/lace hook
- Yarn used: Fingering/sport weight mercerized cotton
Always crochet a gauge swatch before starting. If your swatch is smaller than 10cm, size up your hook by 0.25mm. If it’s larger, size down. Gauge affects both the fit of the headband and how open or tight your mesh crown looks.
Materials List
- 2 balls (approx. 200g total) fingering/sport weight mercerized cotton yarn in sage green
- Small amount of white or ivory fingering weight cotton (for flower center, optional contrast)
- 2.5mm crochet hook
- Tapestry needle for weaving in ends
- 15–20 small pearl beads (4–6mm) with holes large enough for yarn to pass through, or for stringing onto thread
- Sewing needle and thread (for attaching pearls securely)
- Thin floral wire or millinery wire (24–26 gauge), approx. 30cm, for shaping the brim
- Stitch markers
- Scissors
Abbreviations Table
| Abbreviation | Meaning |
|---|---|
| ch | chain |
| sl st | slip stitch |
| sc | single crochet |
| hdc | half double crochet |
| dc | double crochet |
| tr | treble crochet |
| sk | skip |
| st(s) | stitch(es) |
| rnd | round |
| rep | repeat |
| sp | space |
| BLO | back loop only |
| MR | magic ring |
| picot | ch 3, sl st into first ch of the 3 to form a small loop |
| inc | increase |
| dec | decrease |
Pattern Instructions
Technique Notes Before You Begin
- Magic Ring (MR): Wrap yarn into a loop, hold the tail and working yarn together, and crochet your first round of stitches into the loop. Pull the tail to close the ring tightly once the round is complete.
- BLO (Back Loop Only): Insert your hook only under the back loop of the stitch, leaving the front loop unworked. This creates a ridge and is used here to shape the brim’s curve.
PART 1: Crown (Mesh Headband Portion)
Rnd 1: Ch 6, join with sl st to form a ring. Ch 3 (counts as first dc), 11 dc into ring, join with sl st to top of ch-3. (12 dc)
Rnd 2: Ch 3, dc in same st, 2 dc in each st around, join. (24 dc)
Rnd 3: Ch 4 (counts as dc + ch-1), sk 1 st, *dc in next st, ch 1, sk 1 st; rep from * around, join to 3rd ch of beginning ch-4. (12 dc, 12 ch-1 sps)
Rnds 4–9: Ch 4, dc in next ch-1 sp, ch 1, sk next dc; rep from * around, join. (12 dc, 12 ch-1 sps each rnd)
Note: Rounds 4–9 create the open lace mesh seen circling the head. Continue in this dc/ch-1 mesh pattern until the crown depth measures approximately 6cm, adjusting round count as needed for your gauge.
Rnd 10 (Foundation for brim shaping): Work only across the front half of the mesh (approx. 6 sts/ch-sps), turning your work at the end of this round rather than joining. This creates the flat brim base extending forward from the headband. Ch 1, turn.
PART 2: Brim
Row 1: Sc in each dc and ch-1 sp across the front section established in Rnd 10. (approx. 12 sc)
Row 2: Ch 1, turn, 2 sc in first st, sc across to last st, 2 sc in last st. (14 sc)
Rows 3–6: Ch 1, turn, sc in each st across, increasing 1 st at each end every other row to create the curved brim shape. (Row 3: 14 sc, Row 4: 16 sc, Row 5: 16 sc, Row 6: 18 sc)
Row 7 (Scalloped Edge): Ch 1, turn, *sc in next st, ch 2, sk 1 st, sl st in next st, ch 2; rep from * across to last st, sc in last st. (Scallop trim complete, st count varies with scallop pattern — approx. 9 scallops)
Wire Insertion: Before working Row 7, lay your floral wire along the top edge of Row 6 (the brim’s outer curve) and work Row 7 stitches over the wire, encasing it inside the sc stitches. This holds the brim’s curved shape permanently. Bend the wire ends back and tuck them into the stitching so no sharp edges are exposed.
PART 3: Flower Appliqué
Rnd 1 (Center): MR, ch 1, 8 sc into ring, join with sl st. Pull tail to close ring. (8 sc)
Rnd 2: *Ch 3, sl st in next st; rep from * around. (8 petals)
Rnd 3 (Second Layer, worked into BLO of Rnd 1): Join contrast or same-color yarn into BLO of any st from Rnd 1. *Ch 4, sl st in BLO of next st; rep from * around. (8 larger petals)
Rnd 4 (Third Layer, optional for fuller flower): Working behind Rnd 3 petals, join yarn at base of any Rnd 1 stitch, *ch 5, sl st in next skipped st; rep from * around for a third, largest petal layer. (8 petals)
Sew 3–5 pearl beads into the very center of the flower using sewing thread and needle. Set flower aside.
PART 4: Leaf & Pearl Tassels (make 2)
Rnd 1: MR, ch 1, 6 sc into ring, join. (6 sc)
Rnd 2 (Leaf shaping): Ch 4, sl st in 4th ch from hook to form a small loop, ch 3, sl st into same st on ring to anchor; rep around each st to form 6 small leaf points. (6 leaf points)
After completing the leaf motif, chain 15–18 for the hanging cord, then thread on 2–3 pearl beads by passing chain stitches through the bead holes as you go, or by tying pearls onto the cord with sewing thread once the chain is finished. Fasten off and weave in ends.

Assembly Steps
- Weave in all loose ends on the crown, brim, flower, and tassels before assembly.
- Position the flower appliqué on the left side of the brim, roughly 3cm from the outer scalloped edge, and pin in place.
- Sew the flower securely using a whip stitch around its back edge, catching only the backmost layer of petals so the front stays dimensional.
- Locate the two back corners of the headband mesh (where the crown circle meets, opposite the brim). Attach one leaf tassel to each side, sewing the top of the leaf motif directly to the mesh edge.
- Crochet or braid two ties, each 20–25cm long, from the same yarn. Attach one tie to each back corner of the headband, beside the tassels, so the visor can be tied into a bow at the nape of the neck.
- Tie the visor onto a mannequin head or your own head, adjust the bow tension, and trim tie ends evenly if needed.
- Check the wire in the brim is fully encased and bend gently to your preferred curve — a deeper curve blocks more sun.
Beginner/Intermediate Tips
- If working with cotton thread feels tight on your hands, switch to a bamboo or ergonomic-handled 2.5mm hook to reduce fatigue over the many small stitches.
- When encasing the wire in Row 7, work slightly looser stitches than usual — wire adds bulk, and tight stitches will pucker the scallop edge.
- Test your magic ring closure before starting the flower; a loose center hole will show through the pearl beads.
- Block the mesh crown by pinning it to a foam board in a circle shape and steaming lightly — this keeps the ch-1 spaces open and even.
- Count your ch-1 spaces at the end of every mesh round; it’s easy to lose one when working in the round with lace patterns.
Variations
- Beach Sunset Version: Swap sage green for a coral or terracotta cotton, and use gold-tone beads instead of pearls for a warmer palette.
- Bridal Visor: Use ivory or white thread throughout with clear seed beads on the flower for a lightweight bridal shower or “getting ready” accessory.
- Mini Size for Kids: Reduce crown rounds by 2 and brim rows by 1 for a child-sized version, using a smaller 2mm hook for finer proportions.
- No-Tassel Everyday Style: Skip the leaf tassels entirely and finish with a simple crocheted button loop closure for a more casual, everyday sun hat.
Save this pattern now so it’s ready for your next sunny day — pin it, share it, and tag your finished visor with #FoodiePlumCrochet.



