
The Best Fluffy Pancakes recipe you will fall in love with. Full of tips and tricks to help you make the best pancakes.

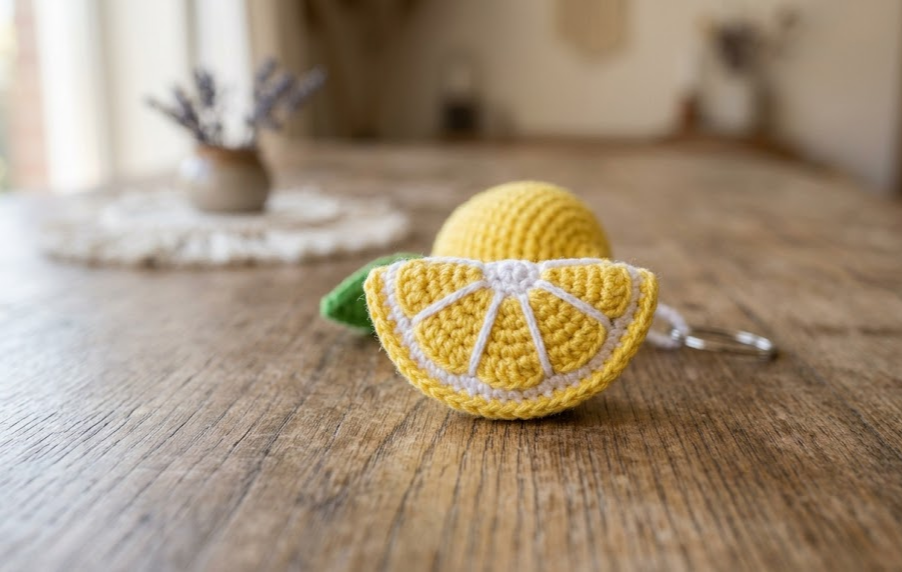
There’s something about a little crocheted lemon that instantly makes a bag, backpack, or keyring feel happier. This crochet lemon keychain is bright, citrusy, and irresistibly cute — a tiny stuffed lemon paired with a scalloped lemon slice charm and a single green leaf, all finished off with a keychain ring. It’s the kind of project that looks like it took hours of skill, but in reality comes together in under two hours, even if you’ve only made a handful of amigurumi pieces before.
This pattern is perfect for beginners who already know the basics of single crochet, increases, and decreases, but haven’t tackled a lot of 3D shaping yet. It’s also a wonderful stash-buster, since it only needs small amounts of yellow, white, and green cotton yarn. Make one for your own keys, whip up a batch as party favors, or turn it into a bag charm, zipper pull, or small gift topper. Once you’ve made one lemon, you’ll want to make an entire fruit bowl of keychains.
Cotton yarn is the star of this pattern because it holds stitch definition beautifully and gives the finished lemon a smooth, slightly matte look that mimics real citrus skin. Because the pieces are small, this also makes a great practice project if you want to get more comfortable with magic rings, invisible decreases, and working straight across a chain to build a flat shape like the lemon slice.
By the end of this pattern, you’ll have a three-part little citrus charm — a round stuffed lemon, a flat lemon slice, and a tiny leaf — all stitched together into one adorable keychain.

|
Difficulty
Beginner
|
Time
1.5–2 Hours
|
Hook Size
2.5mm
|
Yarn Weight
DK Weight Cotton
|
Finished Size
~8cm Charm
|
Gauge
- 20 sts x 22 rows = 10cm x 10cm (4in x 4in) in single crochet
- Hook used: 2.5mm
- Yarn weight used: DK weight (light worsted) cotton yarn
Gauge is not critical for this pattern since it’s a small stuffed charm rather than a wearable item, but working a quick gauge swatch helps you confirm your stitches are tight enough that the fiberfill stuffing won’t peek through. If your stitches look loose or gappy, drop down to a 2mm hook; if your fabric feels stiff and hard to stitch into, go up to a 3mm hook.
Materials List
- Cotton yarn, DK weight, in the following colors:
- Yellow — approx. 10g (main lemon color)
- White — approx. 5g (lemon slice)
- Green — approx. 3g (leaf)
- 2.5mm crochet hook (2.5–3mm range works depending on your tension)
- Fiberfill stuffing (small handful)
- Yarn needle (for weaving in ends and sewing pieces together)
- Scissors
- Keychain ring with jump ring or split ring attachment
- Stitch marker (optional, helpful for tracking rounds)
Abbreviations Table
| Abbreviation | Meaning |
|---|---|
| ch | chain |
| sc | single crochet |
| hdc | half double crochet |
| dc | double crochet |
| inc | increase (2 sc in one stitch) |
| dec | decrease (invisible decrease, or sc2tog) |
| MR | magic ring |
| st(s) | stitch(es) |
| rnd(s) | round(s) |
| ( ) | stitch count at end of round/row |
| sc2 | single crochet in next 2 stitches |
| BLO | back loop only (not used in base pattern, optional for texture variation) |
Pattern Instructions
Part 1: Lemon (Make 1)
Work in continuous rounds (do not join unless noted). Use a stitch marker to track the start of each round.
Technique note — Magic Ring (MR): A magic ring lets you start a round with a fully closed center, so there’s no hole once you tighten the yarn tail. Wrap the yarn around two fingers, insert your hook through the loop, and work your first round of stitches into the ring before pulling the tail to close it snugly.
Technique note — Invisible Decrease (dec): Insert your hook through the front loop of the next stitch only, then through the front loop of the following stitch, and pull up a loop through both before completing as a single crochet. This keeps decreases nearly invisible on the surface of your amigurumi.
Using yellow yarn:
- Rnd 1: MR, 6 sc into ring (6)
- Rnd 2: inc in each st around (12)
- Rnd 3: (sc, inc) x6 (18)
- Rnd 4: (sc 2, inc) x6 (24)
- Rnds 5–10: sc around (24) — work 6 rounds even, no increases or decreases
- Rnd 11: (sc 2, dec) x6 (18)
- Rnd 12: (sc 1, dec) x6 (12)
- Rnd 13: dec x6 (6)
Stuff the lemon lightly and evenly as you work through the last few rounds — don’t overstuff, or the shape will look round instead of oval like a real lemon. Fasten off, leaving a short tail, and close the remaining 6 stitches by weaving your needle through the front loops and pulling tight.

Part 2: Lemon Slice Charm (Make 1)
This flat piece is built by working different stitch heights across a single chain, which naturally curves the fabric into a rounded wedge shape — just like a real citrus slice.
Using white yarn:
- Row 1: Ch 10.
- Row 2: Starting in the 2nd chain from the hook, work: sc, hdc, dc, hdc, sc, hdc, dc, hdc, dc, sc (10 sts)
- Fasten off white.
Technique note — Shaping with mixed stitch heights: Because taller stitches (dc) push the fabric out more than shorter stitches (sc), alternating stitch heights across a straight chain creates a natural curve without any increases or decreases. This is what gives the lemon slice its rounded wedge silhouette.
- Rnd 3 (edging): Join yellow yarn anywhere along the outer edge and work 1 round of sc evenly around the entire piece, working 1 sc into each stitch and 2–3 sc into the pointed tips to keep the edge from puckering. Fasten off and weave in ends.
Part 3: Leaf (Make 1)
Using green yarn:
- Row 1: Ch 6.
- Row 2: Starting in the 2nd chain from the hook, work up one side: sc, hdc, dc, hdc, sc (5 sts). Work 3 sc into the last chain (the tip of the leaf) to turn the corner smoothly, then continue back down the opposite side of the same starting chain, working into the remaining unused loops: sc, hdc, dc, hdc, sc (5 sts).
- Slip stitch to the first stitch to close, fasten off leaving a long tail for sewing.
Technique note — Working down the second side of a starting chain: Once you reach the end of a foundation chain, you can continue crocheting by flipping your work and stitching into the opposite side of the same chain (the “bumps” on the underside). This lets you build a symmetrical, pointed shape like a leaf from a single starting chain instead of two separate pieces.
There is no wire or armature needed for this pattern — all three pieces (lemon, slice, and leaf) are soft and lightweight enough to hold their shape from stitch tension and light stuffing alone.
Assembly Steps
- Weave in all loose ends on the lemon, lemon slice, and leaf before assembling.
- Position the leaf at the very top of the lemon, centered over where the stem would be. Using the long tail left on the leaf, sew it in place with a few small whip stitches, attaching only the base/center of the leaf so the tips stay free and lifted.
- Position the lemon slice against the front side of the lemon, about 1cm below the leaf, so it slightly overlaps the top of the lemon body. Sew it in place along roughly 1cm of the slice’s straight top edge, letting the rest of the slice hang or rest naturally against the lemon.
- Open a small jump ring or split ring and thread it through the top of the leaf (through the same stitches you used to attach it), then attach your keychain ring to the jump ring. If your leaf feels too delicate to hold a ring alone, instead thread the jump ring through a few stitches at the very top of the lemon itself, behind the leaf, for extra strength.
- Give the whole piece a gentle steam or light finger-press if any stitches look uneven, then trim any remaining yarn tails close to the fabric.
Beginner & Intermediate Tips
- Keep your tension tight and consistent throughout the lemon body — looser stitches are the most common reason stuffing peeks through on small amigurumi shapes like this one.
- Stuff a little at a time as you go, rather than all at once at the end. This gives you a smoother, more even oval shape instead of lumpy patches.
- When working the lemon slice, count your 10 chain stitches twice before starting Row 2 — it’s an easy place to accidentally add or skip a stitch, which throws off the curved shape.
- Use a lighter-color yarn (like white or pale yellow) for your first practice swatch of the mixed-stitch-height technique, so you can clearly see how the dc and hdc stitches change the curve.
- If your invisible decreases still look bumpy, try slowing down and making sure you’re only picking up the front loop of each stitch before pulling through.
- Block your lemon slice piece slightly (pin it flat while damp) if the edges curl more than you’d like before sewing it into place.
Variations
- Color Swap: Turn this into a lime keychain using two shades of green instead of yellow, or an orange keychain using orange and white yarn.
- Size Change: Work the same pattern with a bulkier yarn weight and a 4–4.5mm hook for a chunkier, oversized lemon perfect as a bag charm or plant hanger accent instead of a keychain.
- Display Version: Skip the keychain ring entirely and glue a small pin backing to the leaf for a wearable lemon brooch, or attach a loop of embroidery thread to hang it as a mini ornament.
- Style Twist: Add a tiny embroidered smiley face or blush cheeks to the lemon body with contrasting thread for a kawaii-style keychain instead of a realistic fruit look.
- Multi-Fruit Set: Make a matching trio — lemon, lime, and orange — using the same base pattern with different colors, and bundle them as a citrus-themed keychain gift set.
Save This Pattern
Loved this little lemon? Save this pin so you can find it again next time you need a quick, cute crochet gift or keychain idea — and tag us if you make your own version! #FoodiePlumCrochet



