
The Best Fluffy Pancakes recipe you will fall in love with. Full of tips and tricks to help you make the best pancakes.

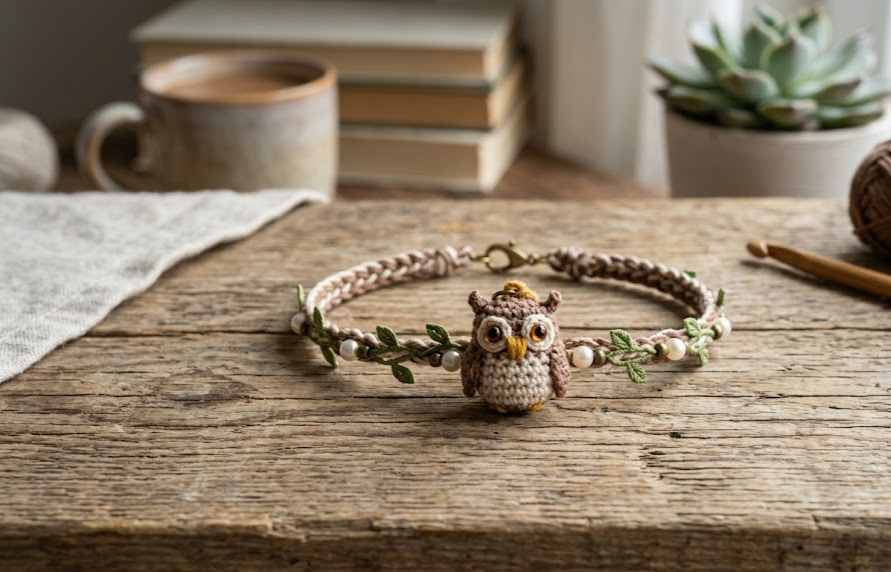
There’s something irresistibly charming about a tiny crocheted owl perched right on your wrist. This crochet owl charm bracelet combines a soft, amigurumi-style owl face with a delicate leaf vine and pearl bead trim, creating a piece that feels equal parts cottagecore and boho. It’s small enough to make in an afternoon, yet detailed enough to look like a handmade treasure you’d find in a specialty craft shop.
This pattern is perfect for crocheters who love amigurumi but want to try something wearable instead of a stuffed toy. It’s also a wonderful gift idea — think birthdays, teacher appreciation, nature-lovers, or stocking stuffers for the animal-obsessed kid (or adult) in your life. Because the charm is worked with fine thread and a small hook, it does require some patience and steady tension, but every stitch is written out fully below so you can follow along with confidence, even if this is your first time working at this scale.
By the end of this tutorial, you’ll have a one-of-a-kind bracelet featuring a tiny owl face, complete with embroidered eyes, a stitched beak, layered ear tufts, and a trailing vine of leaves and pearls that wraps beautifully around the wrist.

|
Difficulty
Intermediate
|
Time
3–4 Hours
|
Hook Size
1.75mm
|
Yarn Weight
Lace / Size 3 Thread
|
Finished Size
16–20cm Bracelet
|
Gauge
Gauge matters more than usual in this pattern because the owl’s face and vine leaves need to stay small and tight so no stuffing or backing shows through.
- Gauge swatch: 20 sts x 22 rows = 10cm x 10cm square in single crochet (sc)
- Hook used: 1.75mm steel or micro crochet hook
- Yarn/thread used: Size 3 lace weight cotton crochet thread (or embroidery floss doubled for extra body)
Always crochet a small gauge swatch before starting. If your owl face comes out larger than 2cm across, go down a hook size; if it’s too tight to stuff smoothly, go up a hook size.
Materials List
- Lace weight cotton crochet thread in the following colors:
- Chocolate brown (owl face outline, ear tufts)
- Cream/ivory (owl face center, chest patch)
- Mustard yellow (beak)
- Black (tiny pupil details)
- Moss green (leaf vine)
- Sand/tan (cord wrap, optional)
- 1.75mm steel crochet hook
- Small amount of polyester fiberfill (a pinch, for the owl head only)
- 8–10 small ivory pearl beads (3mm)
- Sewing needle and matching thread
- Yarn needle (for weaving in ends and sewing pieces together)
- Small pair of sharp embroidery scissors
- Adjustable cord or thin waxed cotton cord (for the bracelet band, approx. 40cm)
- Fabric glue or clear-drying craft glue (optional, for securing knots)
Abbreviations Table
| Abbreviation | Meaning |
|---|---|
| ch | chain |
| sc | single crochet |
| hdc | half double crochet |
| dc | double crochet |
| sl st | slip stitch |
| inc | increase (2 sc in same stitch) |
| dec | invisible decrease (insert hook through front loops of next 2 sts, yarn over, pull through both, complete as sc) |
| BLO | back loop only (insert hook under the back loop only, leaving the front loop free) |
| MR | magic ring (an adjustable loop that starts amigurumi pieces with no visible hole in the center) |
| st(s) | stitch(es) |
| rnd(s) | round(s) |
| ( ) | stitch count at end of round/row |
Pattern Instructions
Part 1: Owl Head (make 1, brown thread)
Start with a magic ring: make an adjustable loop, chain 1, then work your first round of stitches into the loop before pulling the tail to close it tight.
- Rnd 1: MR, 6 sc into ring (6)
- Rnd 2: inc in each st around (12)
- Rnd 3: sc, inc repeat around (18)
- Rnd 4: sc 2, inc repeat around (24)
- Rnd 5: sc around, no increases (24)
- Rnd 6: sc around (24)
- Rnd 7: sc 2, dec repeat around (18)
- Rnd 8: sc, dec repeat around (12)
Stuff lightly with a small pinch of fiberfill before closing.
- Rnd 9: dec around (6)
Fasten off, leaving a long tail. Weave the tail through the front loops of the last round and pull tight to close the opening.
Part 2: Chest Patch (make 1, cream thread)
- Rnd 1: MR, 6 sc into ring (6)
- Rnd 2: inc in each st around (12)
- Rnd 3: sc around (12)
Fasten off, leaving a tail for sewing. Flatten slightly and sew onto the lower front of the owl head, centered.

Part 3: Ear Tufts (make 2, brown thread)
- Row 1: ch 4, sc in 2nd ch from hook (this is the second side of the chain — turn your starting chain so the bumps face up and work back down it), sc 2 (3)
- Row 2: sc 3, do not turn (3)
Fasten off, leaving a small tail. Fold slightly to form a point and sew to the top of the head, about 1.5cm apart, angled outward.
Part 4: Beak (make 1, mustard yellow thread)
- Rnd 1: MR, 5 sc into ring (5)
Pull tightly closed and fasten off, leaving a tail. Sew just below the chest patch, centered.
Part 5: Eyes (make 2, black thread — embroidered, not crocheted)
Using a small length of black thread and a sewing needle, stitch two small French knots or satin-stitch dots above the beak, spaced about 0.8cm apart, for the pupils. Work these directly onto the cream chest patch or head front.
Part 6: Vine Leaves (make 8–10, moss green thread)
Technique note: each leaf is worked flat, starting from a foundation chain, in a single row that goes up one side and back down the other.
- Row 1: ch 6, sl st in 2nd ch from hook, hdc, dc, dc, sl st in last ch (working up one side of the chain) — then rotate and work back down the other side of the same chain: sl st, dc, dc, hdc, sl st (10 sts total along both sides)
Fasten off, leaving a small tail at the base of the leaf for attaching to the cord.
Part 7: Vine Cord Assembly
Cut your bracelet cord to approximately 40cm — long enough to wrap the wrist twice with tie-off length, or use an adjustable slip-knot cord for a one-size-fits-all fit.
Do not use wire in this pattern; the vine “stem” effect is created entirely by wrapping thread around the cord, not with an armature, since the bracelet needs to stay flexible and comfortable on the wrist.
To create the vine look: wrap moss green thread tightly and evenly around a 12–15cm section of the cord, securing both ends with a small dot of glue or a few tight overhand knots underneath.
Assembly Steps
- Sew the finished owl head onto the center point of the wrapped vine cord section, stitching through the base of the head and around the cord several times to secure it firmly.
- Attach leaves along the vine cord, spacing them approximately 1.5–2cm apart, alternating sides for a natural vine look.
- Thread a pearl bead onto a short 2cm tail of thread between select leaves, tying it off with a small knot so it dangles slightly below the vine line.
- Attach 3–4 dangling pearl beads at the two tail ends of the cord, spacing them about 1cm apart, to mirror the tasseled look in the reference photo.
- Tie the two ends of the cord into an adjustable sliding knot, leaving roughly 3cm of tail on each side beyond the knot for the dangling pearls.
- Try the bracelet on and adjust the sliding knot so the finished piece measures approximately 16–20cm around the wrist, with the owl charm centered on top.
- Trim any excess thread tails to about 0.5cm and seal cut ends with a tiny dot of clear glue to prevent fraying.
Beginner/Intermediate Tips
- Work under good lighting with a magnifying clip if needed — at this scale, stitch definition matters more than the size of your hook.
- Keep a loose starting tail on your magic ring; it’s much easier to cinch the ring closed evenly when you have extra length to pull.
- When stuffing the owl head, use only a pinch of fiberfill — overstuffing at this scale will distort the round shape and pop the stitches open.
- If your leaves curl instead of lying flat, block them briefly with a light steam from an iron (holding it a few centimeters away) and press flat under a book while they cool.
- Use stitch markers (or a small scrap of contrasting thread) to mark the start of each round — it’s very easy to lose your place in rounds this small.
Variations
- Color Swap: Make the owl in soft gray and white for a snowy owl look, or rusty orange and cream for an autumn version.
- Multi-Charm Bracelet: Add a second, smaller animal charm (like a mini squirrel or chick) further down the vine for a layered look, just like a charm bracelet stack.
- Necklace Version: Skip the cord wrap and attach the owl and vine to a thin chain instead, turning this into a pendant necklace.
- Keychain Version: Attach a small metal keyring to the vine’s end instead of tying it into a bracelet, turning this into a bag charm or keychain.
- Size Up: Use a fingering weight yarn and a 2.5mm hook instead of thread for a larger, chunkier version that’s easier for first-time amigurumi crocheters to handle.
Save This Pattern
Loved this owl charm bracelet? Save this pin so you can come back to it next time you need a quick, giftable crochet project — and don’t forget to tag your finished owls with #FoodiePlumCrochet!



