
The Best Fluffy Pancakes recipe you will fall in love with. Full of tips and tricks to help you make the best pancakes.

There is something undeniably joyful about a pansy. Its rounded, five-petaled face, bold inner brushstrokes of contrasting color, and cheerful yellow eye make it one of the most recognizable and beloved flowers in any garden — and now, in yarn form, it belongs in yours too. This free crochet pansy appliqué pattern produces a flat, decorative flower approximately 8 cm (3 inches) across, worked in three distinct color sections that mimic the natural beauty of a real pansy bloom.
The finished pansies are as versatile as they are charming. Stitch them onto tote bags, crochet blankets, baby cardigans, or framed hoops for botanical wall art. Arrange a whole collection in different colorways — just like the image that inspired this pattern — and you will have a stunning rainbow display that works as fridge magnets, brooch pins, or handmade greeting card embellishments. Whether you are making a single flower as a quick gift topper or a full field of twenty blooms in varied colors, this pattern gives you exactly the tools to get there.
This pattern is rated intermediate. You should be comfortable working in the round, changing colors mid-round, and working double crochets. No advanced techniques are required, and complete technique notes are included throughout.
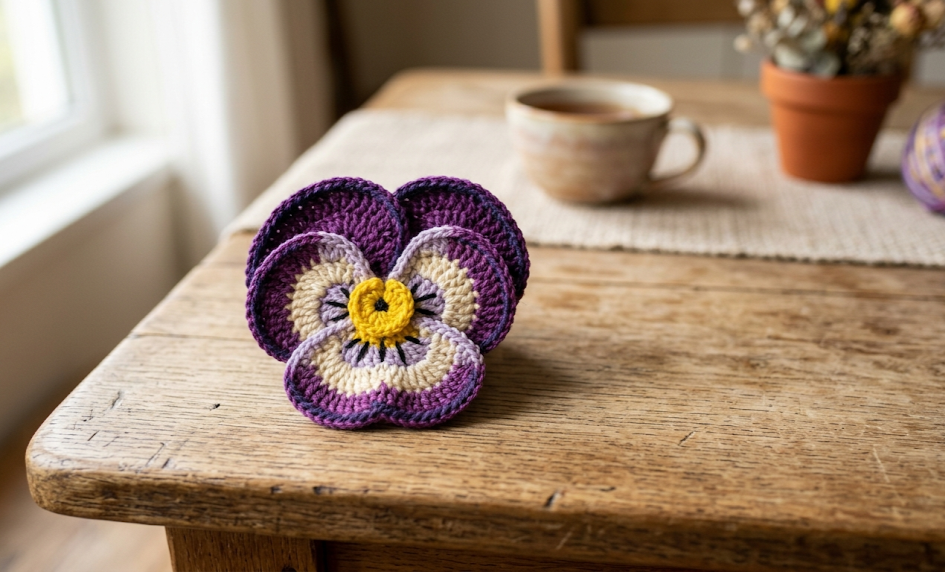
|
Difficulty
Intermediate
|
Time
30–45 min each
|
Hook Size
3.5 mm (E/4)
|
Yarn Weight
DK / Light Worsted
|
Finished Size
~8 cm (3 in) wide
|
Gauge
18 sts × 20 rows = 10 cm (4 in) in single crochet using a 3.5 mm hook and DK weight yarn.
For this appliqué, gauge affects finished size but not wearability, so a precise swatch is optional. However, if you wish to match the approximately 8 cm (3 in) finished width shown in the example photos, test your gauge with a small square before beginning. Using a heavier yarn and larger hook will produce a bigger flower; thinner yarn and a smaller hook will yield a more delicate bloom.
Materials List
Yarn:
- Color A (Outer Petals): DK weight yarn, approximately 8–10 g per flower. Any color: cream, lavender, coral, peach, teal, or bright pink.
- Color B (Inner Petals): DK weight yarn, approximately 5–6 g per flower. A deeper or contrasting shade of the outer petals, or a rich purple, maroon, teal, or dark chocolate.
- Color C (Center): Small amount of yellow DK yarn, less than 1 g per flower.
Notions:
- 3.5 mm (US E/4) crochet hook
- Yarn needle / tapestry needle
- Scissors
- Stitch marker (optional, for marking round beginnings)
- Pins for blocking (optional but recommended)
- Blocking mat and water spray bottle (optional, for a crisp finished shape)
Abbreviations Table
| Abbreviation | Meaning |
|---|---|
| ch | chain |
| sl st | slip stitch |
| sc | single crochet |
| hdc | half double crochet |
| dc | double crochet |
| tr | treble crochet |
| MR | magic ring (adjustable loop) |
| BLO | back loop only |
| FLO | front loop only |
| st(s) | stitch(es) |
| sp | space |
| rep | repeat |
| pm | place marker |
| YO | yarn over |
| [ ] × N | work the stitches in brackets N times |
Pattern Instructions
Special Technique Notes
Magic Ring (MR): Make a loop with the tail end of the yarn behind the working yarn. Insert hook through the loop, pull up a loop of working yarn, and ch 1 to secure. Work stitches into the ring as instructed, then pull the tail to close the center hole.
Back Loop Only (BLO): Insert your hook into only the back loop of the stitch — the loop farthest from you — rather than through both loops as usual. This creates a visible ridge and is used in this pattern to give the inner petals a raised, layered appearance.
Color Change: To change colors, work the last stitch of the old color until the final yarn-over pull-through. On that last pull-through, use the new color. Carry or cut the old color as directed.
Part 1: Center (Color C — Yellow)
Round 1: Using Color C, make a MR. Ch 1. Work 6 sc into the ring. Pull tail to close. Sl st to join to first sc. (6 sts)
Fasten off Color C, leaving a 10 cm (4 in) tail. The tail will be used to pull the center slightly forward during assembly for a dimensional effect.
Part 2: Inner Petals (Color B)
Round 2: Join Color B to any st of Round 1 with a sl st. Ch 1 (does not count as a st throughout).
Work the following sequence around all 6 sts of Round 1:
[sc in next st, ch 2, 2 dc in next st, ch 2, sc in next st] × 3.
Sl st to join. (3 petals formed; 3 sc + 6 dc + 6 ch-2 spaces)
Note: Each petal is formed by the combination of sc–ch2–2dc–ch2–sc. You will work 3 petals in this round, which become the 3 lower and inner petals of the pansy.
Fasten off Color B. Do not cut — leave a 15 cm (6 in) tail for weaving in.
Part 3: Outer Petals (Color A)
Round 3: Join Color A to the BLO of any sc from Round 1 (the same round the center was built on). Working in BLO only for this round adds separation between the inner and outer petal layers.
BLO technique: Before beginning, locate the unworked back loops of Round 1’s 6 sc stitches. These loops are visible on the reverse side of the center. Insert hook into these back loops to begin Round 3.
Work the following sequence around all 6 BLO sts:
[sc in BLO of next st, ch 3, 3 tr in BLO of next st, ch 3, sc in BLO of next st] × 3.
Sl st to join. (3 petals formed; 3 sc + 9 tr + 6 ch-3 spaces)
Note: These 3 larger petals will splay outward and forward over the inner petals. They form the characteristic wider upper and side petals of the pansy.
Do not fasten off. Continue to Round 4.
Round 4 — Petal Edging (Color A, continued):
Without cutting, sl st into the ch-3 space. Ch 1.
Work around the outer edge of each petal as follows:
[sc, hdc, dc, hdc, sc] into each ch-3 space. Sl st into the sc at the base of each petal to join before moving to the next. Repeat for all 3 outer petals. (5 sts per petal × 3 petals = 15 sts total edging)
Sl st to join final st to first sc of the round.
Fasten off Color A. Leave a 20 cm (8 in) tail for attaching to your project.
(Completed outer petal count: 3 rounded petals with scalloped edges)
Assembly Steps
- Block if desired. Lightly mist your finished pansy with water, pin each petal outward to its fullest extent on a blocking mat, and allow to dry completely (approximately 1–2 hours). Blocking gives the petals a flat, crisp shape that photographs well and adheres cleanly to fabric surfaces.
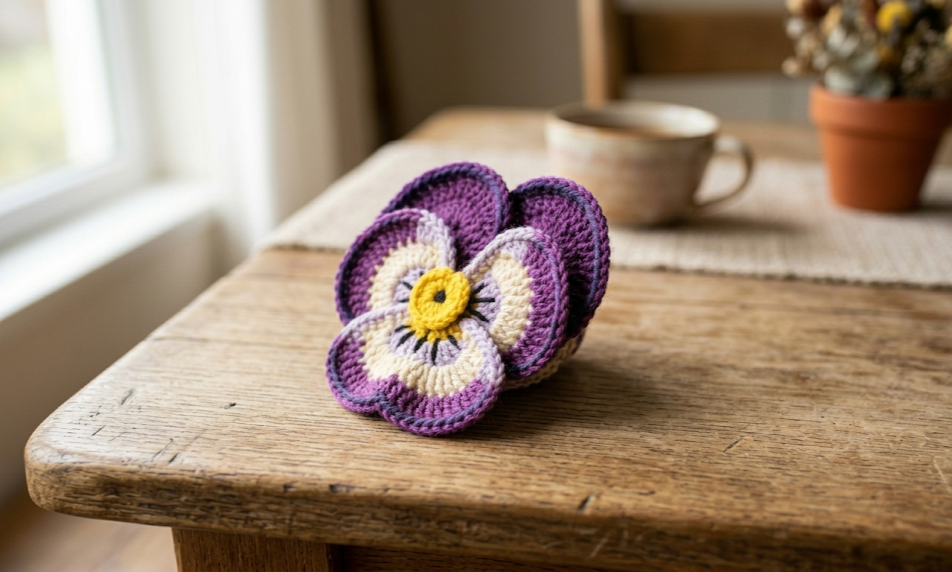
- Layer the petals. When the flower is unblocked and held flat, the 3 inner petals (Color B) should be visible at the center, overlapped by the 3 outer petals (Color A) which fan outward in the gaps between them. Gently arrange so all 5 petal “faces” are visible — 2 upper outer petals, 1 lower outer petal, and 2 inner petals visible to the sides.
- Attach the center. Thread the Color C tail onto a tapestry needle. With the RS of the flower facing up, pull the yellow center slightly forward (toward you) by about 1–2 mm and secure with 2–3 tiny stitches through the back, creating a very slight dimensional dome at the center. Weave in the tail securely.
- Attach to your project. Thread the long Color A tail onto a tapestry needle. Position the pansy on your garment, bag, or surface. Using a whip stitch around the entire outer edge — spacing stitches approximately 3–4 mm apart — sew the pansy flat. Alternatively, sew only around the center circle for a slightly raised, dimensional appliqué effect with petals free at the tips.
- Weave all ends. Use a tapestry needle to weave each remaining tail at least 2–3 cm through the stitches on the WS of the flower. Trim to 3 mm.
- For pin/brooch backing: Cut a small square of felt (approximately 3 × 3 cm). Using matching thread, sew a brooch pin to the felt, then hand-stitch the felt to the WS of the pansy using a blanket stitch around the edges.
Beginner & Intermediate Tips
Tension at the magic ring: Keep your tension consistent as you work into the ring. If your center pops up instead of lying flat, try working with slightly looser tension in Round 1, then pull the ring tight only once all 6 sc are complete.
Keeping your inner and outer petals separated: When joining Color A in Round 3, confirm you are working into the back loops only. Run your fingernail along the back of the center to feel the ridge of unworked loops — they should be clear. If the inner and outer petals seem to merge, you may have accidentally worked through both loops in Round 3.
Petal count: A completed pansy should show 5 visible petals when viewed from the front — this is achieved by 3 inner (Color B) petals sitting in the gaps between the 3 outer (Color A) petals. If your count looks off, check that you started both sets of 3 petals from the same initial 6-stitch center and staggered correctly.
Color matching for realism: For the most lifelike pansies, choose Color B (inner petals) as a much darker or heavily saturated version of Color A. A cream outer/maroon inner, or lavender outer/deep purple inner, most closely mimics real pansy flowers.
Blocking makes a significant difference. Even a 15-minute wet blocking session transforms floppy petals into crisp, picture-perfect appliqués. Do not skip this step if you intend to display or gift the flowers.

Variations
- Rainbow Collection: Make 20 pansies, each in a different color combination, and arrange them in a grid on a framed piece of natural linen — a botanical art piece for any wall. Mix pastels and saturated shades for maximum impact.
- Miniature Pansies: Use fingering weight (sock) yarn with a 2.0 mm hook. The finished flower will measure approximately 4–5 cm (1.5–2 in) and works beautifully as a stitch marker ring, earring base, or hair clip decoration.
- Oversized Garden Pansy: Switch to bulky weight yarn (weight 5) and a 6.0 mm hook for a dramatic 15 cm (6 in) statement bloom. Perfect as a pillow embellishment or the centerpiece of a wreath.
- Pansy Garland: Make 12–15 pansies in varied colorways and join them with a simple chain stitch strand of green yarn, spacing flowers 5 cm (2 in) apart. Hang as a celebratory garland for birthday parties, spring tables, or nurseries.
- Embroidered Center Detail: Instead of a single-color yellow center, work a small French knot cluster using embroidery floss in yellow-gold once the flower is assembled. This adds a more textured, realistic center that catches light beautifully.
Love this pattern? Save it for later and share your blooms — pin it to your crochet board and tag it #FoodiePlumCrochet so the whole community can see your garden growing!



