
The Best Fluffy Pancakes recipe you will fall in love with. Full of tips and tricks to help you make the best pancakes.

Intro
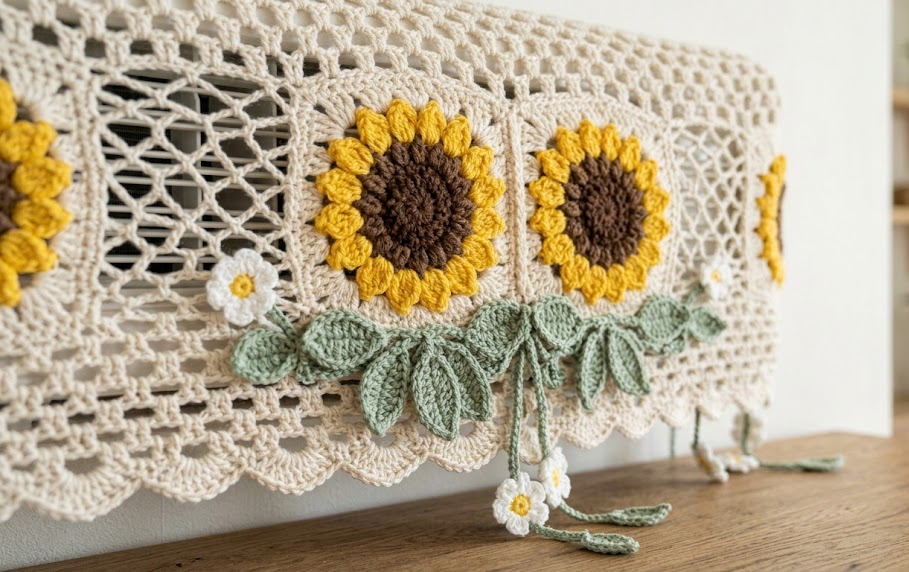
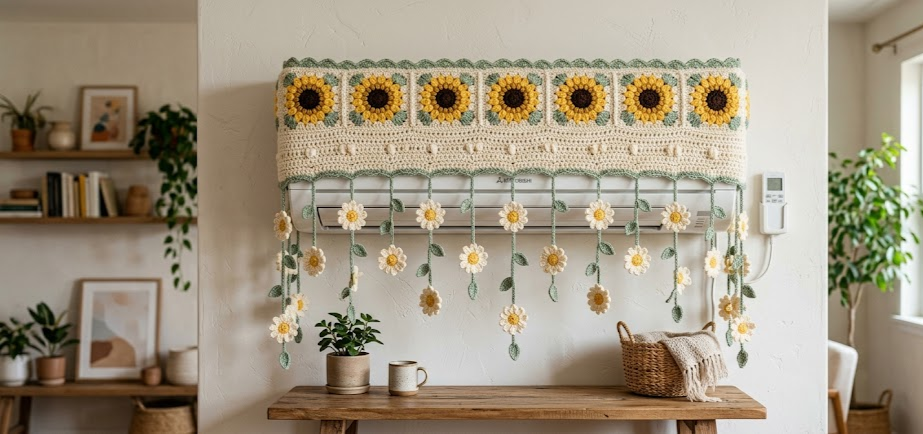
Bring warmth, charm, and handmade beauty into your home with this Crochet Sunflower Air Conditioner Cover with Hanging Flower Curtain. Designed to soften the appearance of a wall-mounted air conditioner, this decorative cover transforms an everyday appliance into a cheerful focal point. Featuring large blooming sunflowers, textured green leaves, a delicate scalloped edging, and cascading floral garlands, this project combines home décor with the timeless appeal of crochet.
Unlike simple appliance covers, this design creates the illusion of a blooming garden draped across your wall. The cream-colored body provides a neutral backdrop while bright sunflower motifs instantly catch the eye. Long hanging flower strands add movement and elegance, making the finished piece suitable for living rooms, bedrooms, craft spaces, reading corners, or cozy cottages.
This pattern has been written for intermediate crocheters who are comfortable reading stitch instructions and assembling multiple crochet motifs. Every section has been broken into manageable pieces so the project can be completed over several relaxing crochet sessions.
The cover is designed to fit most standard wall-mounted split air conditioners measuring approximately 90–95 cm (35–37 in) wide. The measurements can easily be adjusted by adding or removing filet mesh repeats before attaching the decorative edging.
Throughout this pattern, you’ll crochet individual sunflower motifs, textured leaves, an airy mesh fabric, and decorative hanging flower chains that combine into one cohesive design. Each component is worked separately before final assembly, ensuring every section remains portable and enjoyable to crochet.

🌻 Crochet Sunflower Air Conditioner Cover Pattern
Skill Level: Intermediate
Project Type: Home Decor Crochet
Finished Size: Approx. 95 cm × 45 cm cover with 90 cm hanging garlands
Yarn Weight: DK Weight (#3) Cotton Yarn
Hook Size: 3.5 mm (E/4)
Main Techniques: Filet Mesh, Appliqué, Motif Assembly, Decorative Crochet
Time Needed: Approximately 25–35 hours depending on experience
Pattern Features: Sunflowers, Leaves, Hanging Flower Curtain, Scalloped Border
Gauge
Gauge Swatch
Work a 10 cm × 10 cm (4″ × 4″) square in double crochet.
- 22 stitches = 10 cm
- 12 rows = 10 cm
Hook Used
- 3.5 mm (E/4)
Recommended Yarn
- DK Weight (#3) Cotton Yarn
Maintaining gauge is important to ensure the finished cover fits comfortably over the air conditioner. If your swatch measures larger than 10 cm, change to a smaller hook. If it measures smaller, increase one hook size.
Finished Size (Approximate)
- Width: 95 cm (37½”)
- Height of Cover: 45 cm (18″)
- Hanging Garland Length: 90 cm (35″)
Materials List
Yarn
Cream (Main Color)
- Approximately 650 g
Sunflower Yellow
- Approximately 180 g
Dark Brown
- Approximately 80 g
Sage Green
- Approximately 220 g
White (Small Hanging Flowers)
- Approximately 120 g
Hooks
- 3.5 mm crochet hook
Notions
- Stitch markers
- Scissors
- Yarn needle
- Measuring tape
- Blocking mat
- Rust-proof pins
- Steam iron (optional for blocking)
Finished Components
- 1 Mesh Cover Panel
- 5 Large Sunflowers
- 10 Large Leaves
- 1 Decorative Scalloped Border
- 9 Hanging Flower Garlands
- 54 Small Flowers
- 18 Tassels
Crochet Abbreviations
| Abbreviation | Meaning |
|---|---|
| ch | chain |
| sl st | slip stitch |
| st | stitch |
| sts | stitches |
| sc | single crochet |
| hdc | half double crochet |
| dc | double crochet |
| tr | treble crochet |
| dtr | double treble crochet |
| inc | increase |
| dec | decrease |
| sp | space |
| sk | skip |
| rep | repeat |
| RS | right side |
| WS | wrong side |
| BLO | back loop only |
| FLO | front loop only |
| MR | magic ring |
| yo | yarn over |
| picot | chain 3, slip stitch into first chain |
| beg | beginning |
| rem | remaining |
Top Cover Pattern (Main Mesh Panel)
This panel forms the decorative cover that sits over the front of the air conditioner. It is worked from the top downward using an airy filet-style mesh fabric that allows airflow while supporting the appliqué flowers.
Finished Panel Size
Approximately 95 cm × 45 cm before edging.
Foundation
Chain 211.
This foundation chain should measure approximately 95 cm without stretching.
Row 1:
Starting in the sixth chain from the hook, work 1 dc, ch 2, skip 2 chains, 1 dc in next chain; repeat from * across the row. Turn. (69 dc, 68 ch-2 spaces)
Row 2
Ch 5 (counts as dc and ch 2), skip first ch-2 space, dc in next dc, ch 2, dc in next dc across. Turn. (69 dc, 68 spaces)
Row 3
Repeat Row 2. (69 dc, 68 spaces)
Row 4
Repeat Row 2. (69 dc, 68 spaces)
Row 5
Repeat Row 2. (69 dc, 68 spaces)
Row 6
Repeat Row 2. (69 dc, 68 spaces)
Row 7
Repeat Row 2. (69 dc, 68 spaces)
Row 8
Repeat Row 2. (69 dc, 68 spaces)
Row 9
Repeat Row 2. (69 dc, 68 spaces)
Row 10
Repeat Row 2. (69 dc, 68 spaces)
Rows 11–20
Continue repeating Row 2. (69 dc, 68 spaces each row)
Rows 21–30
Repeat Row 2. (69 dc, 68 spaces each row)
Rows 31–40
Repeat Row 2. (69 dc, 68 spaces each row)
Row 41
Repeat Row 2. (69 dc, 68 spaces)
Row 42
Repeat Row 2. (69 dc, 68 spaces)
Row 43
Repeat Row 2. (69 dc, 68 spaces)
Row 44
Repeat Row 2. (69 dc, 68 spaces)
Row 45
Repeat Row 2. (69 dc, 68 spaces)
Border Foundation Round
Do not fasten off.
Work evenly around the entire panel.
- 1 sc in every dc.
- 2 sc around each ch-2 space.
- Work 3 sc in every corner to turn neatly.
Join with a slip stitch to the first sc. (Approximately 320 stitches)
Stabilizing Round
Ch 1.
Work 1 sc in every stitch around.
Join with a slip stitch.
(320 sc)
Blocking
Before attaching the flowers and decorative edging:
- Wet block or steam block the completed panel.
- Pin the panel to exactly 95 × 45 cm.
- Allow it to dry completely before continuing.
- Ensure the mesh squares remain even and the edges are perfectly straight.
Large Sunflower Motif (Make 5)
Finished Diameter: Approximately 14 cm (5½”)
Center – Brown Yarn
Round 1
Using a Magic Ring (MR), work 12 dc into the ring.
Magic Ring Technique: Wrap the yarn around your fingers to form an adjustable loop. Crochet into this loop, then pull the yarn tail firmly to close the center completely.
Join with a sl st to the first dc. (12 dc)
Round 2
Ch 2.
Work 2 dc in every stitch around.
Join with sl st.
(24 dc)
Round 3
Ch 1.
Work 1 sc in each stitch around.
Join.
(24 sc)
Fasten off brown.
Petals – Yellow Yarn
Join yellow into any stitch.
Round 4
Ch 8, beginning in the 2nd chain from hook work:
1 sc
1 hdc
2 dc
2 tr
Skip next stitch on center.
Sl st into following stitch.
Repeat around.
Each repeat forms one sunflower petal.
Join.
(12 petals)
Round 5
Working behind Round 4 petals:
Join yarn into skipped stitch.
Ch 9.
Beginning in second chain:
1 sc
1 hdc
2 dc
3 tr
Skip next stitch.
Sl st.
Repeat around.
(12 large petals)
Round 6 (Petal Shaping)
Work around each petal:
1 sc
1 hdc
2 dc
Picot
2 dc
1 hdc
1 sc
Continue around.
Join.
(12 shaped petals)
Fasten off.
Block lightly.
Finished flower should measure approximately 14 cm across.
Large Leaf (Make 10)
Finished Length: Approximately 11 cm
Using sage green.
Foundation
Chain 16.
Row 1
Beginning in second chain:
1 sc
1 sc
2 hdc
4 dc
2 tr
2 dc
1 hdc
3 sc in final chain.
Continue working on opposite side of chain.
1 hdc
2 dc
2 tr
4 dc
2 hdc
2 sc
Join.
(38 sts)
Working on the second side of the foundation chain means crocheting into the unused loops on the opposite edge so the chain becomes the center of the leaf.
Row 2
Ch 1.
Work evenly:
sc
hdc
dc
tr
dc
hdc
sc
At leaf tip work:
(sc, ch2, sc)
Continue opposite side.
Join.
(40 sts)
Row 3
Work one round of slip stitches through the center to create the leaf vein.
Fasten off leaving a 30 cm tail for sewing.
Decorative Scalloped Border
Join cream yarn to the lower edge of the cover.
Border Round 1
Ch1.
Work 1 sc in every stitch.
Join.
(320 sc)
Border Round 2
Change to green.
Skip 2 sts.
Work:
7 dc in next stitch.
Skip 2 sts.
1 sc.
Repeat around.
At corners add one additional dc inside shell.
Join.
(Approximately 53 shells)
Border Round 3
Cream yarn.
Into each shell:
sc
hdc
dc
tr
dc
hdc
sc
Sc into previous sc.
Repeat around.
Join.
(424 sts approximately)
Fasten off.
Hanging Flower Garlands (Make 9)
Each garland measures approximately 90 cm (35 inches).
Cord
Using green.
Chain 180.
This forms the hanging cord.
Reinforcement
Beginning in second chain,
Work 1 slip stitch in every chain.
Fasten off.
(179 sl sts)
Small Flower Motif (Make 54)
Finished Diameter: Approximately 4 cm
Alternate yellow and white flowers.
Round 1
Magic Ring.
10 sc.
Join.
(10 sc)
Round 2
Ch3.
2 dc.
Ch3.
Sl st into same stitch.
Skip next stitch.
Repeat around.
(5 petals)
Round 3
Work behind petals.
1 sc in each stitch.
Join.
(10 sc)
Fasten off.
Small Leaf Accent (Optional)
Chain 8.
Beginning second chain:
sc
hdc
dc
tr
dc
hdc
sc.
Fasten off.
Make 18.
Tassels (Make 18)
Wrap yarn around a piece of cardboard 10 cm tall 35 times.
Tie securely through one end.
Cut opposite end.
Wrap another strand approximately 2 cm below the top.
Trim evenly.
Finished tassel length:
Approximately 8 cm.
Garland Layout
Each hanging strand contains:
- 1 tassel
- 6 flowers
- 2 leaf accents
Suggested spacing:
- First flower: 10 cm below the cover.
- Space flowers 12–13 cm apart.
- Place leaf accents midway between selected flowers for a balanced look.
- Attach tassel at the bottom using a secure whip stitch.
Positioning on the Cover
Before sewing, block all motifs.
Arrange:
- 5 sunflowers evenly across the top cover, centered approximately 8 cm below the upper edge.
- Place 2 leaves beside each sunflower at a natural outward angle.
- Space flowers approximately 17–18 cm apart.
- Attach the 9 hanging garlands evenly along the lower scalloped edge, leaving about 10 cm between each strand.
Use stitch markers to preview the full arrangement before sewing permanently.
Assembly Instructions
After completing the mesh cover panel, sunflower motifs, leaves, scalloped border, and hanging flower garlands, the final stage is bringing all pieces together into one beautiful decorative air conditioner cover.
Take your time during assembly. The placement of each flower and leaf creates the overall garden effect, so arranging everything before sewing will help achieve a balanced and professional finish.
Step 1: Prepare All Crochet Pieces
Before attaching any motifs:
- Block the mesh panel one final time if needed.
- Lightly steam or wet block all sunflowers, leaves, and small flowers.
- Shape petals with your fingers while they are slightly damp.
- Allow all pieces to dry completely.
Blocking helps:
- Flatten curled edges.
- Define sunflower petals.
- Make leaves look more natural.
- Ensure the hanging garlands fall smoothly.
Step 2: Attach the Large Sunflowers
Arrange the 5 large sunflower motifs across the upper section of the cover.
Recommended placement:
- Leave approximately 8 cm below the top edge.
- Space flowers evenly across the width.
- Keep approximately 17–18 cm between sunflower centers.
Once satisfied with the layout:
Using the yarn tail from each flower or matching cream/yellow yarn:
- Sew through the center brown circle first.
- Secure around the inner edge of the flower.
- Stitch through several petals to prevent lifting.
- Keep stitches hidden between crochet loops.
Do not pull the yarn too tightly. The flowers should maintain their raised, dimensional appearance.
Step 3: Attach the Large Leaves
Each sunflower receives two large green leaves.
Position leaves:
- One leaf angled slightly upward.
- One leaf angled downward or outward.
This creates the appearance of natural sunflower stems spreading across the cover.
Sew each leaf along the center vein first, then secure the outer edges with small stitches.
Allow some edges to remain slightly raised for texture.
Step 4: Attach the Hanging Flower Garlands
The 9 hanging garlands create the cascading curtain effect.
Starting from the lower scalloped border:
Place each garland approximately 10 cm apart.
For each strand:
- Center the green cord beneath the border.
- Sew the top securely through multiple stitches.
- Allow the strand to hang naturally.
- Attach flowers following the planned spacing.
Suggested order from top to bottom:
- Flower
- Small leaf accent
- Flower
- Flower
- Small leaf accent
- Flower
- Flower
- Flower
- Tassel
Adjust spacing slightly depending on how the garland hangs.
The finished strands should create a soft floral curtain without blocking the air conditioner vents.
Step 5: Final Edge Reinforcement
To help the cover maintain its shape:
Work a hidden reinforcement stitch along the top corners and side edges.
Optional:
Add small loops on the back corners using cream yarn.
These loops can help secure the cover gently around the air conditioner if needed.
Do not attach anything that blocks ventilation or interferes with appliance controls.
Finishing Details
Weave in all remaining yarn ends carefully.
For a polished handmade finish:
- Hide tails inside matching colored sections.
- Trim only after knots are secure.
- Steam lightly around sewn areas.
- Check that all flowers are firmly attached.
Your Crochet Sunflower Air Conditioner Cover with Hanging Flower Curtain is now complete.
The finished piece should look like a blooming garden hanging on your wall while keeping the practical function of a lightweight decorative cover.
Helpful Crochet Tips
Choose Cotton Yarn for Best Results
Cotton or cotton-blend DK yarn works especially well because:
- It keeps its shape.
- It blocks beautifully.
- It creates crisp flower details.
- It handles decorative home décor projects well.
Avoid very stretchy acrylic yarn because the mesh panel may lose its shape over time.
Block Before Assembly
Many crochet motifs naturally curl after stitching.
Blocking before assembly helps:
- Sunflower petals lay evenly.
- Leaves become flatter and more realistic.
- Garland flowers hang correctly.
- The final cover looks professionally finished.
Adjusting the Cover Size
To make the cover larger or smaller:
Width Adjustment
Add or remove filet mesh repeats in the foundation chain.
Each repeat changes the width by approximately:
- 1 mesh square = about 1.3 cm
Height Adjustment
Add or remove Row 2 repeats.
Each added row increases the height approximately:
- 1 cm per 1–2 rows depending on tension.
Always adjust before adding the border.
Keeping Airflow Safe
This cover is designed as a decorative front panel.
For safety:
- Do not cover air vents.
- Do not attach heavy decorations directly over airflow openings.
- Remove the cover before cleaning or servicing the air conditioner.
- Ensure the appliance can operate normally.
Pattern Variations
Autumn Harvest Version
Replace the sunflower colors with:
- Orange pumpkins
- Rust leaves
- Brown flower centers
- Deep green vines
Perfect for cozy fall home décor.
Spring Garden Version
Create a softer floral look by using:
- Pink flowers
- Lavender petals
- White blossoms
- Light green leaves
This version creates a cottage-style aesthetic.
Minimal Neutral Version
For modern interiors:
Use:
- Cream mesh
- Beige flowers
- Sage leaves
- Soft brown centers
The design becomes a subtle textured wall decoration.
Boho Style Version
Add:
- Wooden beads between flowers.
- Longer tassels.
- Natural cotton cord.
- Fringe details.
This creates a relaxed handmade bohemian look.
Seasonal Changeable Flowers
Instead of permanently sewing flowers:
Attach motifs using small hidden snaps or removable stitches.
Create different flower sets for:
- Summer sunflowers
- Winter snowflakes
- Spring blossoms
- Holiday decorations
Pinterest Call To Action
Love handmade home décor?
Save this Crochet Sunflower Air Conditioner Cover pattern to your crochet inspiration boards and come back whenever you are ready to create your own blooming wall decoration.
Pin it now so you can easily find this unique crochet home décor project later!



