
The Best Fluffy Pancakes recipe you will fall in love with. Full of tips and tricks to help you make the best pancakes.

There’s something about a tiny crochet sunflower that instantly makes an outfit feel a little warmer, a little more cheerful. This sunflower charm bracelet takes that feeling and turns it into a wearable accessory you can make in under an hour. A single golden bloom with a rich brown center sits on a delicate chain, giving you the look of a fine jewelry piece with the soft, handmade texture only yarn can provide.
This pattern is perfect for crocheters who love quick, satisfying projects with a big payoff. If you’ve ever wanted to try amigurumi-style flower making but didn’t want to commit to a giant blanket or garment, this is the project for you. It works up fast, uses very little yarn, and the finished result looks like something you’d find in a boutique jewelry case. It’s also a wonderful gift idea — stitch one in an afternoon and you have a handmade present ready to wrap.
Because the flower is worked in fine cotton thread rather than bulky yarn, the stitches stay tiny and delicate, which is exactly what gives this charm its polished, realistic sunflower look. Don’t let the small scale intimidate you, though. Every stitch is a basic single crochet or double crochet worked in straightforward rounds, so if you can chain and single crochet, you can make this.
Grab your smallest hook, a little cotton thread in yellow and brown, and let’s get started.
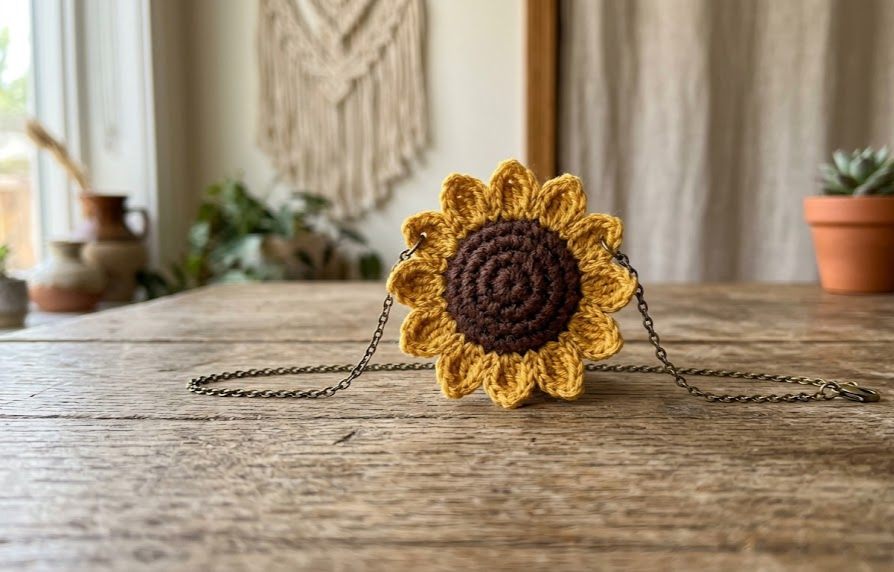
|
Difficulty
Beginner
|
Time
30–45 Minutes
|
Hook Size
2.0mm Steel
|
Yarn Weight
Size 10 Thread
|
Finished Size
3cm Flower
|
Gauge
Gauge is not critical for this project since it’s a small embellishment rather than a fitted garment, but matching it will help you predict the finished flower size accurately.
- 10cm x 10cm swatch: approximately 24 stitches x 26 rows in single crochet
- Hook used for gauge swatch: 2.0mm steel crochet hook
- Yarn weight used: Size 10 crochet cotton thread (lace weight)
If your flower comes out noticeably larger than 3cm across, try a smaller hook. If it comes out smaller, size up slightly.
Materials List
- Yellow cotton crochet thread (size 10 weight) — approximately 5 grams / 15 yards — for the petals
- Brown or rust cotton crochet thread (size 10 weight) — approximately 1 gram / 3 yards — for the flower center
- Steel crochet hook, size 2.0mm (US size 11 steel, or B/1 regular hook if working with slightly thicker thread)
- Thin chain bracelet (silver or gold tone, 6–7 inches, adjustable slider clasp recommended)
- 2 small jump rings (4–5mm)
- Tapestry needle (small-eyed, for fine thread)
- Scissors
- Jewelry pliers (for opening and closing jump rings)
- Stitch marker (optional, to track the start of rounds)
Abbreviations Table
| Abbreviation | Meaning |
|---|---|
| ch | chain |
| sl st | slip stitch |
| sc | single crochet |
| dc | double crochet |
| hdc | half double crochet |
| st(s) | stitch(es) |
| rnd | round |
| inc | increase (work 2 stitches in same stitch) |
| MR | magic ring |
| BLO | back loop only |
| ( ) | stitch count at end of round/row |
| [ ] | repeat instructions inside brackets the stated number of times |
Pattern Instructions
Part 1: Flower Center
Technique note — Magic Ring (MR): A magic ring lets you crochet a tight, closed circle to start round shapes, avoiding the small hole a regular chain-ring leaves at the center. Wrap the thread around your finger to form a loop, insert your hook through the loop, pull up a loop of working thread, then chain 1 to lock it before working your first round of stitches into the loop. Pull the tail to close the ring once the round is complete.
Using brown thread:
Rnd 1: MR, ch 1, work 6 sc into the ring. Pull tail to close ring. (6 sc)
Rnd 2: [inc] around — work 2 sc in each st. (12 sc)
Fasten off, leaving a 6-inch tail for sewing the center to the petals later.
Part 2: Sunflower Petals
Using yellow thread:
Rnd 1: MR, ch 1, work 6 sc into the ring. Pull tail to close ring. (6 sc)
Rnd 2: [inc] around. (12 sc)
Rnd 3: Now we build the individual petals. Ch 4, skip the next st, sl st into the following st. Repeat the instructions between the asterisks around the entire round. You will end with 6 small loops (petal bases) evenly spaced around the circle. (6 petal loops)
Rnd 4: Working into each ch-4 loop from Rnd 3, work the following into each loop to build a pointed petal: 1 sc, 1 hdc, 3 dc, 1 hdc, 1 sc. Slip stitch into the base of the loop to finish that petal, then move to the next loop and repeat. After completing all 6 loops, you will have 6 fully shaped petals. (6 petals)
Fasten off, leaving a 6-inch tail for assembly.
Technique note — working into a chain loop: Instead of working into individual chain stitches, you’re working a cluster of stitches around the open loop itself, which is what creates the smooth, pointed petal shape rather than a flat scalloped edge.
Part 3: Assembly of the Flower
- Lay the petal piece right side up.
- Place the brown center piece directly on top, centering it over the middle hole of the petals.
- Using the brown tail and a tapestry needle, sew the center onto the petals with small whip stitches around the entire outer edge of the brown circle, catching a few strands of the yellow base beneath it to secure it firmly. Weave in all ends through the back of the work.
The finished flower should measure approximately 3cm (1.2 inches) in diameter.

Assembly Steps
- Attach the jump rings to the flower: Using your tapestry needle and a short length of matching yellow thread, take 2–3 small stitches through the outer edge of the flower at the 9 o’clock and 3 o’clock positions (directly opposite each other) to reinforce the spots where the jump rings will attach.
- Open the jump rings using jewelry pliers — twist sideways rather than pulling outward, which keeps the ring round and easier to close again.
- Thread one jump ring through the reinforced stitch point on the left side of the flower, then close it.
- Repeat on the right side with the second jump ring.
- Attach the chain: Open the clasp ends of your chain bracelet and link each end through one of the jump rings on the flower, so the flower hangs centered along the chain.
- Check placement: The flower should sit at the center point of the bracelet when worn, with equal lengths of chain on either side leading to the clasp or slider.
- Weave in any remaining loose ends on the back of the flower so nothing is visible or scratchy against the skin.
Beginner & Intermediate Tips
- Working with size 10 thread and a 2.0mm hook can feel fiddly at first. Crochet under a bright lamp or near a window — visibility matters far more than grip strength here.
- If your petal loops in Rnd 3 come out uneven, count your stitches before starting the round. Six evenly spaced anchor points make for symmetrical petals.
- When working the petal cluster in Rnd 4, keep tension slightly looser than usual. Pulling too tight will curl the petal tips inward instead of letting them lie flat.
- A small dab of fabric stiffener or diluted fabric glue on the back of the finished flower (let it dry completely before wearing) will help it hold its shape over time and resist drooping with handling.
- If you don’t have steel hooks on hand, a standard 2.25mm or 2.5mm hook will still work — your flower will simply be a touch larger, which is a nice option if you want a bolder statement piece.
Variations
- Rainbow Bloom: Swap the yellow for a varying shade in each petal round, working petals 1–3 in coral and 4–6 in peach, for an ombré sunset sunflower.
- Necklace Version: Instead of attaching the flower to a bracelet chain, attach it to a longer 16–18 inch necklace chain for a delicate pendant.
- Daisy Display: Make several flowers in white thread with yellow centers and sew them onto a small embroidery hoop for a framed wall display instead of jewelry.
- Stud Earring Pair: Make two miniature flowers using an even finer thread and a 1.5mm hook, then glue each onto a flat earring post backing for a matching set.
- Layered Petal Look: Work two rounds of petals instead of one — completing Rnd 3 and 4 as written, then adding a second, slightly smaller round of petals layered on top before attaching the center, for extra dimension.

Save This Pattern
If you made it this far, you’re ready to stitch your own sunflower charm bracelet! Save this pin so you can come back to the pattern anytime you want to whip up another one, and tag your finished piece with #FoodiePlumCrochet so we can see your sunshine on a string. 🌻



