
The Best Fluffy Pancakes recipe you will fall in love with. Full of tips and tricks to help you make the best pancakes.

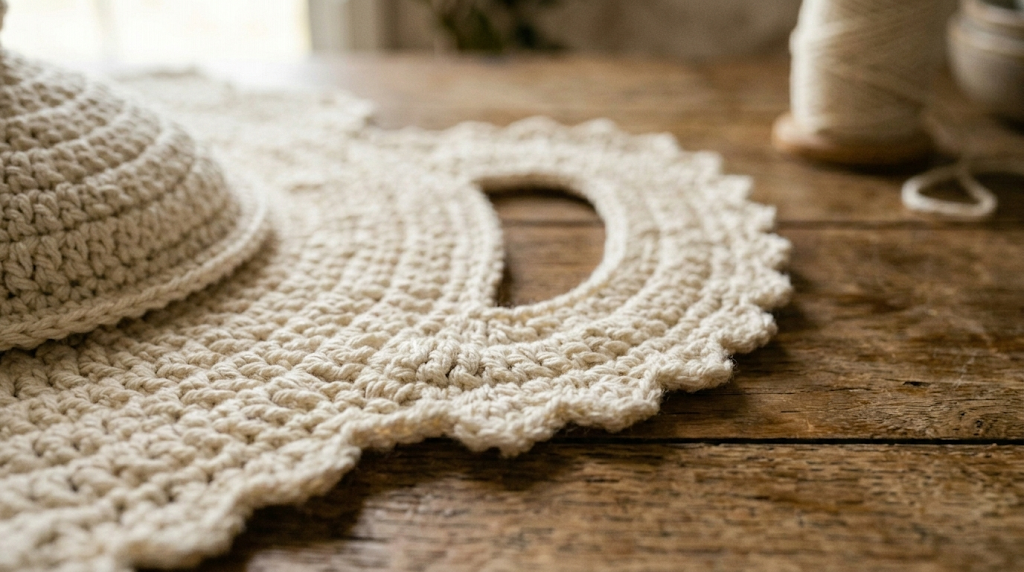
There’s something instantly charming about a rug shaped like a teapot. It’s whimsical without trying too hard, cozy without being fussy, and it turns an ordinary entryway, kitchen floor, or reading nook into a little vignette. This crochet teapot rug works up in soft, sturdy cotton-blend yarn and uses simple circular crochet techniques layered with a playful scalloped picot border, a curved handle, and a tapered spout that gives it real dimension instead of looking like a flat doily.
This pattern is perfect for crocheters who already feel comfortable with basic stitches and want to push into something a little more sculptural. It’s also a wonderful housewarming or kitchen-tea gift — practical enough to use as a bath mat or kitchen rug, decorative enough to hang on a wall as fiber art. The finished piece reads as soft farmhouse or boho kitchen décor, especially in a natural undyed cream colorway, but it adapts beautifully to bolder palettes too.
By the end of this pattern, you’ll have a full-sized statement rug built from five separate crocheted sections — the teapot body, lid, spout, handle, and decorative border — all seamed together into one cohesive piece. Every round is fully written out with stitch counts, so you can follow along without guessing or adjusting on the fly.

|
Difficulty
Intermediate
|
Time
6–8 hours
|
Hook Size
5.5mm (I-9)
|
Yarn Weight
Super Bulky (6)
|
Finished Size
~58cm x 48cm
|
Gauge
Gauge is not critical for this project since it’s a rug and slight size variation won’t affect function, but matching gauge will keep your proportions consistent with the photos.
- 12 stitches x 12 rows = 10cm x 10cm square, working in single crochet
- Hook used: 5.5mm (I-9)
- Yarn used: Super bulky weight (Category 6), cotton cord or T-shirt yarn style cording
Work a quick gauge swatch in single crochet before starting. If your swatch is smaller than 10cm, go up a hook size. If it’s larger, go down a hook size.
Materials List
- Super bulky weight cotton cord yarn (Category 6), approximately 400–450 grams total in natural cream/ecru — this single colorway is used throughout the entire piece
- 5.5mm (I-9) crochet hook
- Yarn needle (large eye, for weaving in ends and seaming)
- Stitch markers (at least 4)
- Scissors
- Optional: fabric glue or a few dots of hot glue to reinforce the handle and spout attachment points for floor-rug durability
Abbreviations Table
| Abbreviation | Meaning |
|---|---|
| ch | chain |
| sc | single crochet |
| hdc | half double crochet |
| dc | double crochet |
| sl st | slip stitch |
| st(s) | stitch(es) |
| rnd(s) | round(s) |
| inc | increase (2 sc in same stitch) |
| dec | decrease (sc2tog, single crochet 2 together) |
| MR | magic ring |
| BLO | back loop only |
| picot | small decorative loop made by chaining and slip stitching back into a stitch |
| ( ) | stitch count at end of round/row |
Pattern Instructions
Part 1: Teapot Body (Main Circle)
The body is worked in continuous spiral rounds from the center out. Use a stitch marker in the first stitch of each round to track your place, since you won’t be joining with a slip stitch.
Magic Ring (MR): Wrap yarn around your fingers to form a loop, insert hook through the loop, pull up a stitch, and crochet your first round of stitches into that loop. Pull the tail to close the ring once the round is complete.
- Rnd 1: 6 sc into MR (6)
- Rnd 2: inc in each st around (12)
- Rnd 3: sc, inc repeat around (18)
- Rnd 4: sc 2, inc repeat around (24)
- Rnd 5: sc 3, inc repeat around (30)
- Rnd 6: sc 4, inc repeat around (36)
- Rnd 7: sc 5, inc repeat around (42)
- Rnd 8: sc 6, inc repeat around (48)
- Rnd 9: sc 7, inc repeat around (54)
- Rnd 10: sc 8, inc repeat around (60)
- Rnd 11: sc 9, inc repeat around (66)
- Rnd 12: sc 10, inc repeat around (72)
- Rnd 13: sc 11, inc repeat around (78)
- Rnd 14: sc 12, inc repeat around (84)
- Rnd 15: sc 13, inc repeat around (90)
- Rnd 16: sc in each st around, no increases (90)
- Rnd 17: sc in each st around (90)
Fasten off, leaving a long tail for seaming. Your body circle should measure approximately 45–48cm across.
Part 2: Lid
The lid is worked the same way as the body, just smaller, then topped with a small round knob.
Lid base:
- Rnd 1: 6 sc into MR (6)
- Rnd 2: inc in each st around (12)
- Rnd 3: sc, inc repeat around (18)
- Rnd 4: sc 2, inc repeat around (24)
- Rnd 5: sc 3, inc repeat around (30)
- Rnd 6: sc 4, inc repeat around (36)
- Rnd 7: sc in each st around (36)
- Rnd 8: sc in each st around (36)
Fasten off, leaving a tail for seaming.
Lid knob:
- Rnd 1: 6 sc into MR (6)
- Rnd 2: inc in each st around (12)
- Rnd 3: sc in each st around (12)
- Rnd 4: sc in each st around (12)
- Rnd 5: sc, dec repeat around (8)
Decrease note: dec (sc2tog) means inserting your hook into the next two stitches, pulling up a loop through both, then pulling yarn through all three loops on your hook to finish as one stitch. This pulls two stitches together into one and shapes the rounded top of the knob.
Stuff the knob lightly with a small ball of leftover yarn scraps or fiberfill before closing. Fasten off and weave the tail through the remaining 8 stitches, pull tight to close, then use the tail to stitch the knob to the center of the lid.
Part 3: Spout
The spout is a tapered tube worked flat in rows, then folded and seamed along one edge to create a cone shape.
- Row 1: ch 14, sc in 2nd ch from hook and each ch across (13)
- Row 2: ch 1, turn, sc across (13)
- Row 3: ch 1, turn, sc 2, dec, sc 7, dec (11)
- Row 4: ch 1, turn, sc across (11)
- Row 5: ch 1, turn, sc 2, dec, sc 5, dec (9)
- Row 6: ch 1, turn, sc across (9)
- Row 7: ch 1, turn, sc, dec, sc 4, dec (7)
- Row 8: ch 1, turn, sc across (7)
Fasten off. Fold the rectangle lengthwise and seam the long open edge using a whip stitch with your tail, forming a tapered tube that’s wider at the base and narrower at the tip. Flatten slightly so it sits naturally against the body when attached.

Part 4: Handle
The handle is a long tube worked in the round, then bent into a curved shape and tacked at both ends.
- Rnd 1: 6 sc into MR (6)
- Rnds 2–22: sc in each st around (6 per round, 21 rounds total)
Stuff the tube lightly as you go for structure, using small pinches of leftover yarn or fiberfill pushed in with your hook handle. Fasten off and close the open end the same way you closed the knob — weave the tail through the last round of stitches and pull tight.
Part 5: Scalloped Picot Border
Attach the border directly to the outer edge of the body (Part 1) once the lid, spout, and handle have been positioned (see Assembly).
- Foundation rnd: join yarn to any st on the outer edge of the body, ch 1, sc in each st around the edge (90)
- Picot rnd: sc in next st, ch 4, sl st into the 1st ch from hook to form a loop, sc in next st, skip 1 st repeat around
Picot note: A picot here means chaining 4 and slip-stitching back into the first chain made, creating a small dangling loop. Repeating this around the edge creates the looped, lace-like scalloped trim seen in the finished piece.
Work this picot rnd twice total, offsetting the second round’s picots to fall between the gaps of the first round, to build up the fuller double-loop scalloped edge shown in the photos. Fasten off and weave in all ends.
Assembly Steps
- Lay the body circle flat. Position the lid section centered along the top edge of the body so it overlaps by about 3cm onto the body and sits like a dome rising off the surface.
- Pin or stitch-tack the lid in place using the leftover tail, sewing only along the back curve so the front of the lid stays slightly raised and dimensional, exactly as shown in the reference photo.
- Position the spout at roughly a 45-degree angle off the left side of the body, with the wide base overlapping the body edge by about 4cm and the tapered tip pointing outward and slightly upward.
- Whip stitch the spout’s base securely around its entire overlapping edge, reinforcing the underside with a few extra stitches or a small dot of fabric glue since this is a high-stress point on a floor rug.
- Curve the handle tube into a rounded loop shape (like a lowercase “e”). Position it on the right side of the body, with both ends overlapping the body edge by about 3cm each, spaced roughly 12cm apart vertically.
- Whip stitch both ends of the handle securely to the body, making sure the curve sits open enough to look like a true handle and doesn’t collapse flat.
- Once the lid, spout, and handle are all attached, work the scalloped picot border (Part 5) around the entire remaining outer edge of the body, crocheting directly into the edge stitches.
- Weave in all remaining ends on the back side of the rug using your yarn needle, trimming tails close to the fabric.
- Lightly steam-block the finished rug face down on a towel to help the border lie flat and even out any puckering from seaming.
Beginner/Intermediate Tips
- When working the spiral rounds for the body, use a stitch marker and move it up to the first stitch of each new round — it’s easy to lose your place in a long continuous spiral without one.
- Keep tension slightly looser than usual on the body rounds; bulky cotton cord crochet tightens up fast and a too-tight gauge will cause the circle to cup instead of lying flat.
- Stuff the handle and knob just lightly. Overstuffing makes them stiff and hard to curve or seam neatly.
- When attaching the spout, sew the underside first where it touches the floor most — that’s the seam that takes the most wear if this is used as an actual rug.
- If your double picot border is curling rather than lying flat, work one more plain sc round before starting the picots to relax the tension.
Variations
- Color Pop Version: Work the body and lid in your main color, but crochet the handle, spout, and picot border in a contrasting accent color like dusty blue or terracotta for a two-tone look.
- Mini Trivet Size: Reduce the body to Rnd 12 instead of Rnd 17, and scale the lid, spout, and handle down proportionally for a smaller trivet or table-centerpiece version instead of a floor rug.
- Wall Art Display: Skip the floor-rug reinforcement steps and instead add a small fabric loop to the back of the lid section so the finished piece can be hung as dimensional fiber wall art above a kitchen counter.
- Pastel Tea Party Set: Make a coordinating set with this teapot rug in pale yellow alongside smaller matching teacup-shaped coasters using the same stitch techniques, for a full tea-party themed kitchen display.
Save This Pattern
If you love how this teapot rug turned out, save this pin so you can come back to it anytime you’re ready to crochet your own! Tag your finished projects and share your version using #FoodiePlumCrochet — I’d love to see your take on it.



