
The Best Fluffy Pancakes recipe you will fall in love with. Full of tips and tricks to help you make the best pancakes.

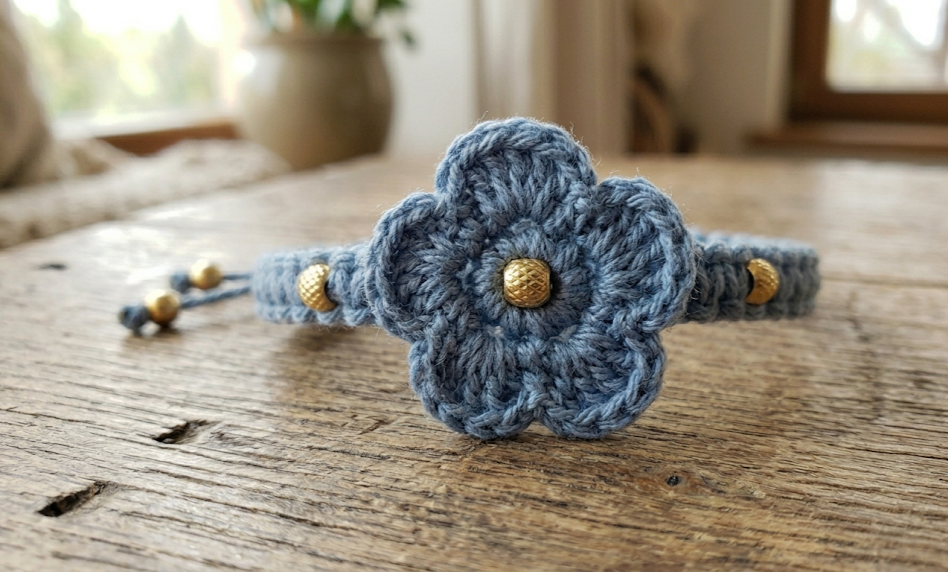
There’s something deeply satisfying about a handmade bracelet that combines two textures in one small piece — the soft, dimensional texture of a crocheted flower against the structured, woven look of macramé cord. This dusty blue crochet flower and macramé bracelet does exactly that, and it’s become one of those projects that looks far more advanced than it actually is. The five-petal flower sits at the center of an adjustable square-knot cord band, finished with small gold accent beads that catch the light without overwhelming the soft, muted blue of the yarn.
This project is ideal for someone who already knows basic crochet stitches and wants to branch into a simple macramé technique, or for a macramé crafter looking to add a soft focal point to their cord work. It works equally well as a gift, a market stall item, or a relaxing weekend project for yourself. The finished bracelet is lightweight, fully adjustable to fit most wrists, and durable enough for everyday wear. Below you’ll find everything you need — gauge, materials, abbreviations, and full step-by-step instructions for both the crocheted flower and the macramé band — so you can make this exact piece from start to finish.

|
Difficulty
Beginner/Intermediate
|
Time
1–1.5 Hours
|
Hook Size
2.5mm
|
Yarn Weight
DK (Light Worsted)
|
Finished Size
16–20cm Wrist
|
Gauge
Gauge for the flower motif: 4 sc and 4 rounds = 2.5cm (1 inch) using a 2.5mm hook with light worsted (DK) weight yarn. Gauge is not critical for this project since the flower is a small embellishment rather than a fitted piece, but working close to this gauge keeps the petals proportionate to the bracelet band. Test your gauge by crocheting a small flat circle of 8–10 stitches and measuring across — petals should sit neatly without curling or flaring.
Materials List
- DK weight (light worsted, yarn weight category 3) cotton or cotton-blend yarn in dusty blue — approximately 5 grams (a small amount is plenty)
- 1.5mm waxed macramé cord or polyester braided cord in matching dusty blue — approximately 2.5 meters (8.2 feet) for a single bracelet
- 2.5mm crochet hook
- 5 gold-tone metal beads, 4mm hole size (1 for the flower center, 4 for the band)
- Tapestry needle for weaving in yarn ends
- Small clipboard, tape, or macramé board to hold cords steady while knotting
- Scissors
- Lighter or clear nail polish (optional, for sealing cord ends)
Abbreviations Table
| Abbreviation | Meaning |
|---|---|
| ch | chain |
| sc | single crochet |
| sl st | slip stitch |
| st(s) | stitch(es) |
| rnd | round |
| MR | magic ring |
| sk | skip |
| rep | repeat |
| ( ) | stitch count at end of round/row |
| SK (macramé) | square knot |
| LHC | left half of square knot |
| RHC | right half of square knot |
Pattern Instructions
Part 1: Crochet Flower
Technique note: A magic ring (MR) lets you crochet your first round of stitches around an adjustable loop, then pull it closed so there’s no hole at the center. This gives a neater finish than chaining and joining.
Round 1: Make a magic ring. Ch 1 (does not count as a stitch), work 10 sc into the ring. Pull the ring closed. Join with a sl st to the first sc. (10 sts)
Round 2: Ch 3 (counts as first petal base), sk next st, sl st into next st. Rep around: ch 3, sk next st, sl st into next st 4 more times. You will have 5 ch-3 loops total. (5 loops)
Technique note: Each ch-3 loop from Round 2 becomes the base for one petal. You’ll work directly into these loops in Round 3, not into the original stitches.
Round 3 (Petals): Working into each ch-3 loop from Round 2: (sl st, ch 1, 3 dc, ch 1, sl st) into the loop. Rep into each of the 5 loops. (5 petals)
Fasten off, leaving a 15cm tail. Weave the tail through to the back and trim, or leave it to stitch the flower onto the band later.
Center embellishment: Thread the gold 4mm bead onto a short piece of matching yarn or cord, knot securely, and stitch or tie it to the center front of the flower so it sits flush against the petals.
Part 2: Macramé Band
Technique note: A square knot (SK) is made of two half-knots — a left half (LHC) and a right half (RHC) — worked over a set of filler cords. Always work LHC then RHC to keep your knots from twisting.
- Cut 2 cords 100cm (39 inches) long to use as the working/knotting cords, and 1 cord 60cm (24 inches) long to use as the filler/center cord.
- Fold the filler cord in half and pin or tape the fold at your starting point. Lay the two 100cm cords on either side of the filler, centered, so you have 4 cord ends hanging down (2 short filler ends, 2 long working ends) plus the loop at top — this loop will become your sliding clasp loop later.
- Square Knot Sequence: Take the left working cord (LHC) over the two filler cords and under the right working cord. Take the right working cord under the two filler cords and up through the loop made by the left cord. Pull both ends to tighten — this completes a half knot. Repeat in mirror (right cord over, left cord under) to complete a full square knot.
- Repeat the square knot 12–14 times to create a band approximately 9cm (3.5 inches) long — enough to wrap roughly half the wrist, since the other half will be the adjustable slider section.
- Stop knotting halfway and set this section aside as Band A. Repeat steps 1–4 to create a second identical section, Band B, for the other half of the bracelet.
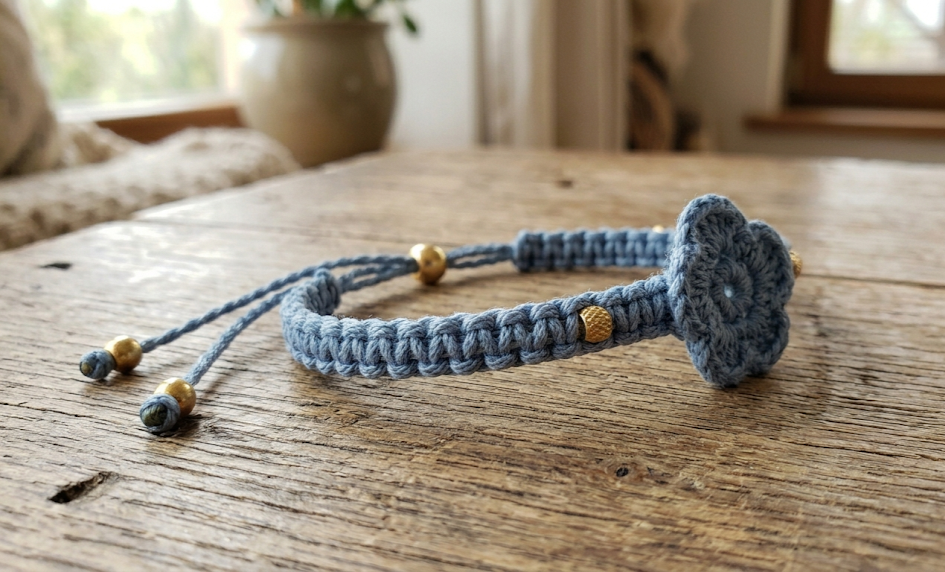
Part 3: Attaching the Flower
- Lay Band A and Band B end to end with a small gap of about 1cm between them — this is where the flower will sit.
- Using the leftover yarn tail from the flower (or a fresh 20cm piece of matching yarn), stitch through the back of the flower and through the adjoining knots of both Band A and Band B, pulling them together so the flower bridges the gap and sits centered.
- Stitch securely with 4–5 small passes, then weave the tail through the back of the work and trim.
Part 4: Adjustable Slider Clasp
Technique note: A sliding knot clasp lets the wearer adjust the bracelet’s circumference by sliding two knotted sections along the two end cords.
- Bring the four loose cord ends from Band A and Band B’s outer edges together in pairs — two from each side.
- On one pair, tie a basic overhand knot, then wrap the working cord around both cords 4–5 times, tucking the tail through the wraps, and pull tight to form a tidy sliding knot. Trim excess and seal the tip with a lighter touch or a drop of clear nail polish if using synthetic cord.
- Repeat on the opposite pair of cords to create the second sliding knot.
- Thread one gold bead onto each of the two outermost cord ends and secure with an overhand knot below the bead so it sits at the very tip of each cord.
Assembly Steps
- Confirm both macramé band sections measure approximately 9cm (3.5 inches) before attaching the flower; adjust knot count up or down by 1–2 knots per side if your wrist is notably smaller or larger than average (average finished circumference is 16–20cm/6.5–8 inches with the slider open).
- Center the crocheted flower in the 1cm gap between Band A and Band B, checking that the flower sits flat with petals facing outward, not twisted.
- Stitch the flower to both bands as described in Part 3, checking tension every 2 stitches so the join doesn’t pucker.
- Thread the 2 accent gold beads onto the cord on each side of the flower (4 total), spacing them about 1.5cm apart from the flower edge and 1.5cm apart from each other, securing each with a small knot on either side so they stay in place but can still slide slightly with wear.
- Tie the sliding clasp knots as described in Part 4, leaving roughly 4cm of cord past each slider knot before adding the final gold end bead.
- Test the slide function by gently pulling the two slider knots apart and together — they should move smoothly without sticking.
- Trim all cord ends to a clean, even 1.5cm tail past each end bead and seal if desired.
Beginner/Intermediate Tips
- If your magic ring feels loose after Round 1, give the tail an extra firm tug before starting Round 2 — a tight center keeps the flower from looking floppy.
- Keep tension even across all five petals by counting your stitches into each loop out loud as you go; uneven petal sizes are the most common flower-motif mistake.
- When knotting the macramé band, keep your filler cords taut with light tension on a clipboard or tape — loose filler cords cause wavy, uneven knots.
- Stitch the flower onto the band before fully tightening your slider knots; it’s much easier to adjust positioning while the bracelet is still loose.
- Use cotton yarn rather than acrylic for the flower — cotton holds its shape better and won’t pill as quickly with wrist movement.
Variations
- Sunset Version: Swap the dusty blue for a warm terracotta or mustard yarn and cord, with brass beads instead of gold for a sun-baked, boho palette.
- Mini Daisy Chain: Make three smaller flowers (reduce Round 3 to 2 dc per petal instead of 3) and space them evenly along the band instead of one center flower.
- Anklet Version: Lengthen each macramé band section to 13cm (5 inches) per side to convert the bracelet into a beachy anklet.
- Monochrome Minimalist: Skip the gold beads entirely and use cord and yarn in the exact same shade for a tonal, all-blue look with texture as the only contrast.
- Layered Stack: Make two bracelets in slightly different blues (one dusty, one deeper denim) to wear stacked together on the same wrist.
Save This Pattern
If you love how this dusty blue crochet flower and macramé bracelet turned out, save this pin so you can come back to it next time you want a quick, pretty handmade accessory. Tag your finished pieces and share your version using #FoodieRippleCrochet — we love seeing your take on it!



