
The Best Fluffy Pancakes recipe you will fall in love with. Full of tips and tricks to help you make the best pancakes.

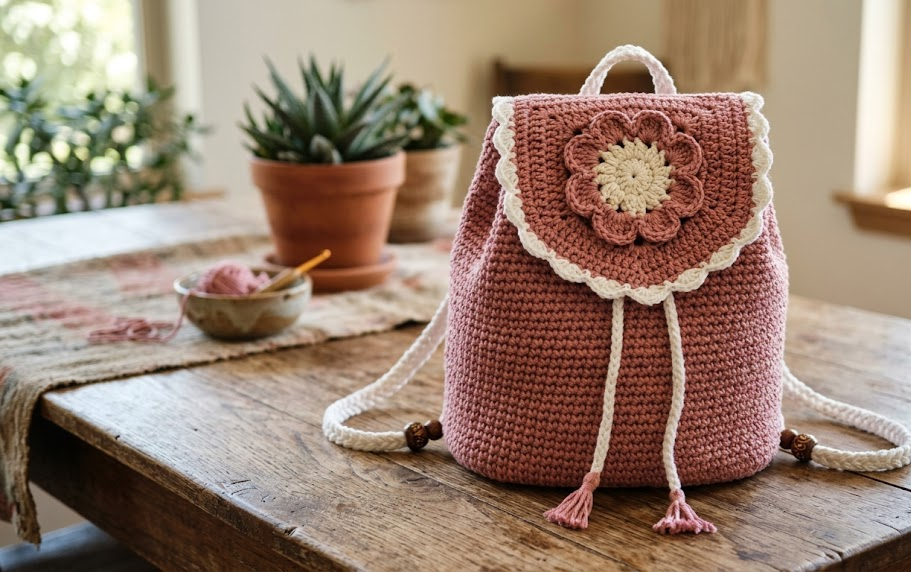
If you’ve been searching for a crochet project that’s equal parts practical and pretty, this dusty rose flower granny square backpack is the one to bookmark. It combines the cozy charm of classic granny square flowers with a fully functional drawstring backpack silhouette, finished off with a crisp white scalloped edge that makes the whole piece look like it walked straight out of a boutique shop window. The blush pink color palette gives it a soft, romantic feel, while the sturdy construction means it can actually carry your everyday essentials — a phone, a wallet, a paperback book, or a festival day’s worth of snacks and sunscreen.
This pattern is designed for the crocheter who already feels comfortable with basic stitches and wants to level up into garment-adjacent construction. You’ll work flower motifs, join panels, build a gusseted body, add structured straps, and finish with a drawstring closure and tassel — all skills that translate beautifully into future bag, purse, and accessory projects. Whether you’re making this for yourself, as a gift, or to sell in your own handmade shop, the finished bag is lightweight enough for everyday wear yet sturdy enough to hold its shape.
Grab your hook and a few skeins of worsted weight yarn, and let’s get started.
|
Difficulty
Intermediate
|
Time
18–20 hours
|
Hook Size
4.5mm (G/7)
|
Yarn Weight
Worsted (#4)
|
Finished Size
28cm x 30cm
|
Gauge
- One sunburst flower motif measures 10cm (4in) in diameter after round 4
- In single crochet: 14 stitches x 16 rows = 10cm x 10cm (4in x 4in) square
- Hook used for gauge swatch: 4.5mm (US G/7)
- Yarn used for gauge swatch: worsted weight (#4 medium)
Always make a small gauge swatch before starting. If your flower motif measures larger than 10cm, go down a hook size; if smaller, go up a hook size. Bag construction is more forgiving than garment construction, but keeping gauge consistent will help all your pieces join together neatly.
Materials List
- Worsted weight yarn (#4 medium), dusty rose/blush pink — approximately 350g (7 skeins of 50g/100m each)
- Worsted weight yarn (#4 medium), white — approximately 100g (2 skeins of 50g/100m each), for trim and straps
- 4.5mm (US G/7) crochet hook
- 3.5mm (US E/4) crochet hook, for tighter edging rows
- Tapestry/yarn needle
- Stitch markers (at least 4)
- Scissors
- Sew-on magnetic clasp or button (optional, for extra security under the flap)
- Measuring tape
Abbreviations
| Abbreviation | Meaning |
|---|---|
| ch | chain |
| sl st | slip stitch |
| sc | single crochet |
| hdc | half double crochet |
| dc | double crochet |
| st(s) | stitch(es) |
| sp | space |
| rnd | round |
| rep | repeat |
| BLO | back loop only |
| MR | magic ring |
| dec | decrease |
| ( ) | stitch count at end of round/row |
| [ ] | instructions to be repeated |
Pattern Instructions
Part 1: Sunburst Flower Motif (make 3 — one for flap, two for front panel pockets)
Technique note: A magic ring (MR) lets you crochet into a loop that you can pull tight afterward, closing the center hole completely. Make it by wrapping yarn around two fingers, then working your first round of stitches into the loop before pulling the tail to close it.
Round 1 (rose): MR, ch 3 (counts as first dc), 2 dc into ring, ch 2, [3 dc into ring, ch 2] 5 times, join with sl st to top of starting ch-3. Pull tail to close ring. (18 dc, 6 ch-2 spaces)
Round 2 (rose): Sl st into next ch-2 space, ch 3 (counts as first dc), 2 dc into same space, ch 1, [3 dc, ch 1, 3 dc into next ch-2 space, ch 1] 5 times, 3 dc into same space as start, ch 1, join to top of starting ch-3. (36 dc, 12 ch-1 spaces)
Round 3 (white): Join white yarn in any ch-1 space. Ch 1, [sc, hdc, 3 dc, hdc, sc into next ch-1 space] 12 times, join with sl st to first sc. (12 petals, 60 sts)
Round 4 (white, scalloped edge): Ch 1, working behind petals into the round 2 stitches, [sc into gap between petals, ch 3] 12 times, join with sl st to first sc. Fasten off, leaving a 20cm tail for sewing. (12 sc, 12 ch-3 loops)
Make 3 flower motifs total using this same 4-round pattern.

Part 2: Flap (uses 1 flower motif)
The largest flower motif becomes the flap. No additional rounds are needed — the flower itself is the flap shape. Set aside once complete.
Part 3: Front Panel
Row 1 (rose): Ch 30, sc in 2nd ch from hook and each ch across, turn. (29 sc)
Technique note: When working into a chain, insert your hook under both top loops of the chain unless otherwise stated — this gives a stable, even edge.
Row 2–20 (rose): Ch 1, sc in each st across, turn. (29 sc)
Fasten off. This becomes the lower front panel. Sew the two smaller flower motifs onto the front panel as decorative pockets/appliqués, positioning them 3cm from the top edge and 2cm apart, using a whip stitch through the back loops.
Part 4: Back Panel
Row 1 (rose): Ch 30, sc in 2nd ch from hook and each ch across, turn. (29 sc)
Row 2–20 (rose): Ch 1, sc in each st across, turn. (29 sc)
Fasten off.
Part 5: Side and Bottom Gusset
Row 1 (rose): Ch 10, sc in 2nd ch from hook and each ch across, turn. (9 sc)
Row 2–80 (rose): Ch 1, sc in each st across, turn. (9 sc)
Fasten off. This long strip will run up one side, across the bottom, and up the other side, joining the front and back panels.
Part 6: Assembly of the Body
- Pin the gusset strip to the front panel, starting at the top right corner, running down the side, across the bottom, and up the left side to the top left corner. Whip stitch in place through both loops.
- Repeat, attaching the same gusset strip to the back panel along its opposite edge.
- The top of the bag (front and back panel top edges) remains open — this is where the drawstring channel will be worked.
Part 7: Drawstring Channel and Top Edging
Round 1 (rose): Join yarn at a top side seam. Ch 1, sc evenly around the entire top opening, working through both the front and back panel top edges. Join with sl st. (approximately 58 sc — adjust to a multiple that divides evenly, it doesn’t need to be exact)
Round 2 (rose, eyelet round): Ch 1, [sc in next 2 sts, ch 2, skip 2 sts] around, join with sl st. (creates eyelets for the drawstring)
Round 3 (white): Join white yarn, ch 1, sc in each st and ch-2 space around, join with sl st.
Round 4 (white, scallop trim): Ch 1, [sc in next st, ch 3, skip 1 st] around, join with sl st. Fasten off.
Part 8: Drawstring Cord
Cut 4 strands of rose yarn, each 150cm long. Braid or twist them together tightly, then knot each end and trim to create a tassel about 6cm long. Thread the cord through the eyelet round, entering and exiting at the front center, so both ends hang at the front.

Part 9: Flap Attachment
Position the flower flap motif so its top edge overlaps the back panel top edge by 4cm. Whip stitch in place through the back loops only (BLO) so the join sits flush and the stitch definition of the flower stays visible from the front.
Part 10: Straps (make 2)
Row 1 (white): Ch 8, sc in 2nd ch from hook and each ch across, turn. (7 sc)
Row 2–130 (white): Ch 1, sc in each st across, turn. (7 sc)
Fasten off. Fold the strap lengthwise and sc the long edges together for extra structure and thickness, or leave flat for a lighter-weight strap.
Attaching straps: Sew one end of each strap to the top corners of the back panel (spaced 8cm apart) and the other end to the bottom corners of the front panel (spaced 8cm apart), creating adjustable, crossable shoulder straps. Adjust strap length to your preference before sewing the second end, checking against your own torso length.
Assembly Steps
- Complete 3 flower motifs, 1 front panel, 1 back panel, 1 long gusset strip, and 2 straps.
- Sew smaller flower motifs onto front panel as decorative pockets, 3cm from top, 2cm apart.
- Attach gusset strip around front panel (sides + bottom), then around back panel (sides + bottom).
- Work drawstring channel and scalloped trim around the top opening.
- Thread braided drawstring cord through eyelets; knot ends into tassels 6cm long.
- Attach flower flap to back panel top edge, overlapping by 4cm, using BLO whip stitch.
- Sew straps to back and front panels, 8cm apart at each end, checking length before final attachment.
- Weave in all ends. Steam block lightly if stitches look uneven.
Beginner/Intermediate Tips
- Keep a stitch marker in the first stitch of every round on the flower motifs — it’s easy to lose track of where round 1 ends when working into a magic ring.
- When joining the white yarn for the petal rounds, leave a slightly longer tail than usual; you’ll use it to close any small gap at the base of the first petal.
- Block your flower motifs before sewing them into the bag — pinning them flat and lightly steaming helps the petals lie evenly, especially where petals overlap.
- If your gusset strip comes out slightly longer or shorter than expected, ease it around the corners rather than ripping back; the seam will still look intentional as long as tension stays even.
- Work the eyelet round loosely — a tight eyelet round makes threading the drawstring cord frustrating later.
Variations
- Two-tone bloom: Work each flower motif’s first two rounds in a contrasting color (like terracotta or sage) before switching to rose for a bolder, layered look.
- Mini version: Reduce the panel chains to 20 and the gusset to 60 rows for a crossbody mini bag sized for a phone and cards.
- All-white bridal style: Make the entire bag in white or ivory yarn with pearl-style buttons instead of a magnetic clasp, for a bridal shower or wedding day accessory.
- Single flower flap: Skip the front panel appliqué flowers and instead make one oversized flower (5 rounds instead of 4) as a statement flap.
- Beach tote conversion: Swap the straps for two short handles instead of long shoulder straps, and skip the drawstring channel for an open-top market tote.
Save this pattern now so you don’t lose it, and tag your finished backpacks — we’d love to see your color combinations! #FoodiePlumCrochet



