The Best Fluffy Pancakes recipe you will fall in love with. Full of tips and tricks to help you make the best pancakes.
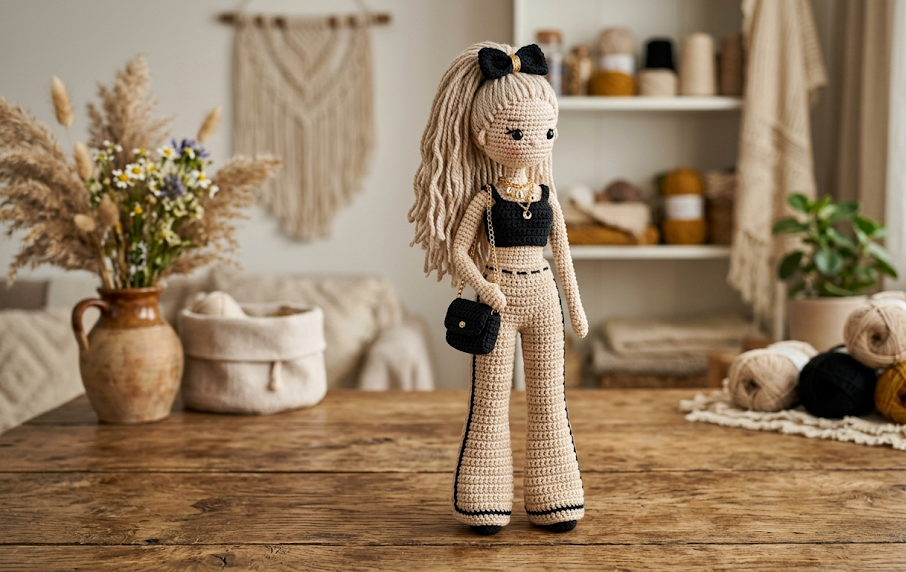
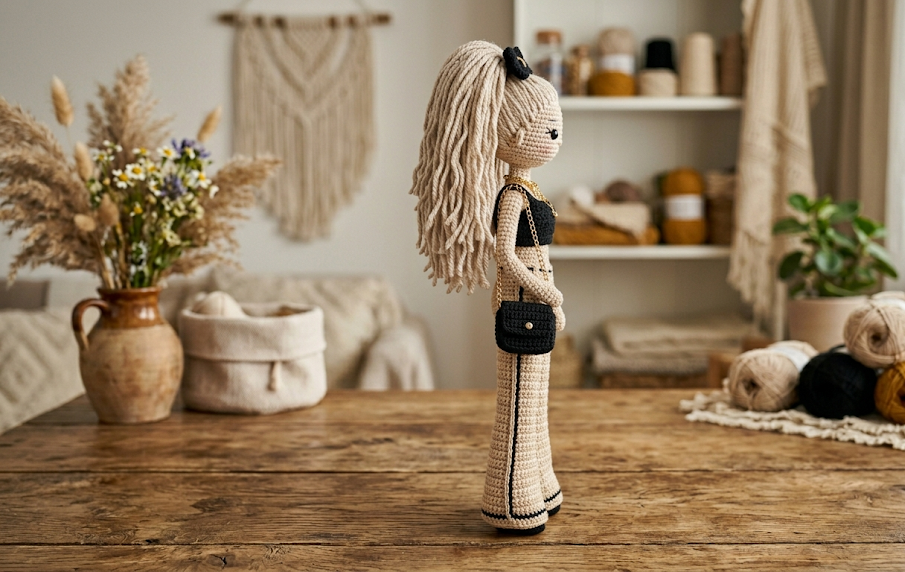
If you have ever wanted to crochet a doll that looks like she just stepped off a runway, this is the pattern for you. This stunning crochet fashion doll stands approximately 28 cm tall and features a cascade of wavy beige yarn hair pulled into a high ponytail, a fitted black crop top, tailored wide-leg flared trousers, a tiny gold chain necklace, and a quilted mini shoulder bag. Every detail — from her delicate embroidered face to the curled tendrils framing her cheeks — is crafted entirely from fingering weight yarn and a fine crochet hook.
This pattern is ideal for intermediate crocheters who are already comfortable working amigurumi in the round and are ready to take on garment-style doll clothes and hair attachment techniques. The finished doll makes a breathtaking handmade gift, a keepsake for a fashion-loving child, or a showpiece for your craft display shelf. She is also a wonderful project to photograph for your crochet portfolio, because her silhouette and styling photograph beautifully against light backgrounds.
| Difficulty Intermediate | Time 10–14 Hours | Hook Size 2.5 mm | Yarn Weight Fingering / #1 | Finished Size ~28 cm Tall |
Gauge
Before beginning this pattern, work a gauge swatch to ensure your tension matches. Accurate gauge is essential for a doll with proper proportions.
Work 10 single crochet stitches and 12 rows using a 2.5 mm hook and fingering weight (#1) yarn, then measure. Your swatch should measure 4 cm wide by 4 cm tall (approximately 25 stitches and 30 rows per 10 cm square). If your swatch is larger, go down a half hook size. If smaller, go up a half hook size. Tight tension is preferred for amigurumi so the stuffing does not show through.
Hook: 2.5 mm
Yarn Weight: Fingering / #1
Materials List
Yarn:
- Beige / skin tone fingering weight yarn — approximately 120 m (for head, neck, arms, and hair)
- Black fingering weight yarn — approximately 90 m (for crop top, trousers, shoes, and bag)
- Warm gold or mustard fingering weight yarn — approximately 5 m (for belt and necklace detail)
Notions:
- 2.5 mm crochet hook
- 6 mm black safety eyes (× 2)
- Polyester fiberfill stuffing
- Stitch markers (× 4)
- Yarn needle (blunt tapestry needle)
- Sharp sewing needle and black embroidery thread (for face detail)
- Pink or peachy embroidery thread (for blush and mouth)
- 28 cm of 2 mm craft wire or floral wire (for poseable arms, optional)
- Black felt scrap (2 × 2 cm, for shoe soles)
- Small gold seed bead or metallic gold thread (for necklace pendant)
- Scissors
Abbreviations Table
| Abbreviation | Meaning |
|---|---|
| ch | chain |
| sc | single crochet |
| inc | increase (2 sc in same stitch) |
| dec | invisible decrease (insert hook under front loops of next 2 stitches, pull up a loop, yarn over and pull through all 3 loops) |
| sl st | slip stitch |
| BLO | back loop only (insert hook under the back loop of the stitch only, leaving the front loop unworked) |
| FLO | front loop only (insert hook under the front loop of the stitch only) |
| MR | magic ring (adjustable loop; pull the tail to close the center hole after working the first round) |
| st(s) | stitch(es) |
| rnd | round |
| rep | repeat |
| ( ) | stitch count at end of round |
| [ ] × n | repeat bracketed instructions n times |
Note on invisible decrease: Unlike a standard sc2tog, the invisible decrease (dec) keeps the front loops available, creating a neater surface on the right side of your work. Always use this method when the instructions say “dec.”
Note on magic ring (MR): Make a loop with your yarn tail crossing over the working yarn, insert your hook into the loop, draw up a loop, and chain 1. Work all stitches of Round 1 into the ring, then pull the tail firmly to close the center hole.
Pattern Instructions
PART 1: HEAD
With beige yarn and 2.5 mm hook.
Rnd 1: MR, 6 sc into ring. (6)
Rnd 2: Inc in each st around. (12)
Rnd 3: [Sc 1, inc] × 6. (18)
Rnd 4: [Sc 2, inc] × 6. (24)
Rnd 5: [Sc 3, inc] × 6. (30)
Rnd 6: [Sc 4, inc] × 6. (36)
Rnd 7: [Sc 5, inc] × 6. (42)
Rnd 8: [Sc 6, inc] × 6. (48)
Rnds 9–16: Sc in each st around. (48) — 8 rounds even
Rnd 17: [Sc 6, dec] × 6. (42)
Rnd 18: [Sc 5, dec] × 6. (36)
Insert safety eyes between Rnds 12 and 13, spaced 8 stitches apart. Embroider lashes above each eye with 2–3 straight stitches of black embroidery thread. Add a soft half-moon blush on each cheek using peachy thread and a satin stitch, and embroider a small curved smile in dark pink below the nose center.
Rnd 19: [Sc 4, dec] × 6. (30)
Begin stuffing firmly. Continue stuffing as you close.
Rnd 20: [Sc 3, dec] × 6. (24)
Rnd 21: [Sc 2, dec] × 6. (18)
Rnd 22: [Sc 1, dec] × 6. (12)
Rnd 23: [Dec] × 6. (6)
Fasten off, leaving a 15 cm tail. Thread tail through front loops of remaining 6 stitches and pull to close. Weave in end.
PART 2: NECK & TORSO
With beige yarn.
Rnd 1: MR, 6 sc into ring. (6)
Rnd 2: [Sc 1, inc] × 3. (9) — neck width
Rnds 3–4: Sc in each st around. (9)
Switch to black yarn for crop top.
Rnd 5: [Sc 2, inc] × 3. (12)
Rnd 6: [Sc 3, inc] × 3. (15)
Rnd 7: [Sc 4, inc] × 3. (18)
Rnd 8: [Sc 5, inc] × 3. (21)
Rnd 9: [Sc 6, inc] × 3. (24)
Rnds 10–16: Sc in each st around. (24) — 7 rounds even for torso body
Rnd 17: Sc in BLO in each st around. (24)
Note on BLO: Working in the back loop only on Rnd 17 creates a horizontal ridge that marks the waistband edge and helps the trousers sit naturally.
Rnds 18–19: Sc in each st around. (24)
Do not fasten off. Lightly stuff torso. Proceed to leg shaping or set aside and join legs first (see Assembly).
PART 3: LEGS & FLARED TROUSERS (Make 2)
With black yarn. The wide flare of the trouser leg is achieved by working increases in the final rounds.
Shoe section:
Rnd 1: MR, 6 sc into ring. (6)
Rnd 2: Inc in each st around. (12)
Rnd 3: [Sc 1, inc] × 6. (18)
Rnds 4–5: Sc in each st around. (18)
Rnd 6: Dec × 3, sc 12. (15)
Rnd 7: Dec × 3, sc 9. (12)
These decreases shape the toe of the shoe.
Leg section:
Rnds 8–28: Sc in each st around. (12) — 21 rounds for leg length
Trouser flare:
Rnd 29: [Sc 1, inc] × 6. (18)
Rnd 30: [Sc 2, inc] × 6. (24)
Rnd 31: [Sc 3, inc] × 6. (30)
Rnd 32: Sc in each st around. (30)
Stuff the shoe lightly with fiberfill. Leave the leg tube unstuffed for a slim silhouette. Fasten off, leaving a 20 cm tail for joining.
PART 4: ARMS (Make 2)
With beige yarn.
Rnd 1: MR, 5 sc into ring. (5) — hand
Rnd 2: Inc in each st around. (10)
Rnds 3–4: Sc in each st around. (10)
Rnd 5: [Sc 3, dec] × 2. (8)
Rnds 6–24: Sc in each st around. (8) — 19 rounds for arm length
Optional wire armature: Cut one 14 cm length of craft wire. Fold 1 cm at each end to form a blunt tip. Insert wire into the arm tube before stuffing. Stuff lightly around the wire. The wire allows gentle posing of the arm without breaking the stitches.
Fasten off, leaving a 20 cm tail for attaching to body.
PART 5: HAIR
The hair is created using long cut strands of beige fingering weight yarn attached to the head.
Step 1 – Base hair: Cut 80 strands of beige yarn, each 45 cm long. Fold each strand in half and attach using a lark’s head knot through the stitches along the top and sides of the head (Rnds 5–10), working from the hairline at the front toward the crown.
Step 2 – Ponytail: Gather all attached yarn strands and pull to the top-back of the head. Secure tightly at the base with a length of black yarn tied in a double knot and then worked into a small bow shape. Trim the tail ends to approximately 16–18 cm below the tie.
Step 3 – Curls: To create the wavy, curly texture, wet the yarn ponytail lightly with water, wrap small sections around a pencil or chopstick, and allow to dry completely before releasing. Alternatively, braid several sections, wet, and unbraid when dry for a looser wave.
Step 4 – Face-framing pieces: Cut 6 additional strands, each 20 cm. Attach at the front hairline on each side of the face. Loosely braid or twist each strand and curl the ends around a pencil. Tuck behind the ears or allow to hang freely.
Step 5 – Hair bow: With black yarn, crochet a small bow: chain 12, join with a sl st to form a ring. Sc 12 around the ring for 3 rnds. Flatten and pinch the center, then wrap tightly with yarn 4–5 times and secure with a knot. Stitch the bow to the ponytail base.

PART 6: MINI SHOULDER BAG
With black yarn.
Bag body:
Rnd 1: Ch 8, sc in 2nd ch from hook and in next 5 ch, 3 sc in last ch; working along the second side of the chain (turn and work back along the opposite side of the foundation chain — insert your hook into the unused loops of the original chain), sc 5, 2 sc in last st. (16)
Note on working the second side of the chain: After reaching the end of your foundation chain, rotate your work 180° and insert your hook under the unused bottom loops of the same chain to work back toward your starting point. This creates an oval base for the bag.
Rnd 2: Inc, sc 5, inc × 3, sc 5, inc × 2. (22)
Rnds 3–7: Sc in each st around. (22) — 5 rounds for bag height
Rnd 8 (flap): Sc 11, ch 1, turn. Work 8 rows of 11 sc for the flap. Fasten off.
With gold yarn, chain 25, sl st back along the chain to form the shoulder strap. Stitch each end to opposite sides of the bag top. Add a small gold seed bead as the clasp detail on the flap center.
PART 7: GOLD NECKLACE
With gold or metallic thread, chain 22. Join the ends with a sl st. Stitch a single gold seed bead to the front center as the pendant. Set aside for assembly.
PART 8: BELT
With gold yarn, chain 26, sl st back along the chain. Fasten off with 10 cm tails for tying around the waist.
Assembly Steps
- Attach legs to torso: With the torso body held upright, position the top opening of each leg flush against the bottom opening of the torso, right sides facing out, each leg approximately 2 cm apart from center. Using the long tail and a yarn needle, whip stitch each leg firmly around the full circumference of the opening. Pull tightly and weave in ends. The flared trouser legs should hang forward naturally.
- Join torso to head: Position the neck section (beige, Rnds 1–4) into the lower opening of the head. Using a yarn needle and beige yarn, stitch around the neck join securely, catching stitches on both pieces. The neck should extend approximately 1.5 cm into the head cavity. Add any remaining stuffing to the head before closing.
- Attach arms: Pin each arm to the side of the torso at Rnd 8 of the black torso section (approximately shoulder height). Using the long yarn tail, sew each arm on with 8–10 reinforcing stitches through the body. The arm should sit at a natural downward angle. Pull the yarn tail through to the opposite side and knot inside the body.
- Add necklace: Place the gold chain loop around the doll’s neck before the head is fully sewn on, or thread it carefully over the head afterward and position it at the base of the neck. Tack down the pendant bead at the center front with a small stitch.
- Tie belt: Wrap the gold chain around the waist at the BLO ridge (Rnd 17 of torso), positioning the join at center back. Tie in a secure double knot and trim tails to 0.5 cm.
- Attach bag: Loop the bag strap over the doll’s left shoulder and under the right arm. Tack the bag body to the left arm with one small stitch to keep it in position for display.
- Final hair check: Arrange the ponytail and face-framing curls. Use a small amount of fabric stiffener or diluted craft glue on the curled sections to help them hold their shape over time.
Beginner / Intermediate Tips
Keep your tension tight throughout. With a 2.5 mm hook and fingering weight yarn, your stitches should be firm and close together. If you can see the fiberfill through the fabric, go down to a 2.0 mm hook or tighten your grip.
Use stitch markers religiously. Place a marker in the first stitch of every round and move it up as you go. Fashion dolls have many parts worked in continuous rounds, and losing your place will throw off the entire piece.
Work the face before assembling. Embroider the eyes, blush, and mouth while the head is a separate piece — it is much easier to hold and rotate. Step back frequently and view the face from arm’s length to check symmetry.
The invisible decrease (dec) is worth learning. For the head and shoe shaping, always use the invisible decrease rather than a standard sc2tog. It eliminates the visible “hole” that regular decreases leave and gives your doll a smooth, professional finish.
Attach hair in sections, not all at once. Divide the head into four quadrants and fill each before moving to the next. This helps you distribute the hair evenly and avoid bald patches.
Test your curling method on scrap yarn first. Different yarn fibers respond differently to wet setting. Cotton and cotton blends hold a curl well when wet-set. Acrylic sometimes needs a light steam with an iron (held 2–3 cm above, not touching) to set the wave. Always test before styling the finished doll.
Variations
1. Summer Boho Version: Replace the black outfit with dusty terracotta and ivory yarn. Crochet a simple halter top (chain 18, join, sc for 6 rows) and a tiered midi skirt in complementary earth tones. Add tiny crochet flowers to the hair.
2. Miniature Size: Use lace weight yarn (#0) and a 1.5 mm hook to create a 14 cm doll — perfect as a bag charm or Christmas ornament. Reduce each part by approximately 40% in round count.
3. Natural Hair Texture: Instead of curling, attach shorter yarn sections (25 cm) in rich brown or dark chocolate tones and separate the strands with a fine-tooth comb for a voluminous, textured afro style. Gather into a puff with a yarn scrunchie.
4. Color Block Pastel: Work the torso and trousers in lilac and blush pink. Use lemon yellow yarn for the hair and add tiny pastel beads along the ponytail tie. Swap the black bag for a mint green version.
5. Winter Coat Variation: Crochet a long open-front coat in oatmeal or camel yarn using half double crochet stitches for a textured weave look. Add tiny button details down the front using small wooden beads. Layer over the black outfit for a seasonal display change.
Loved this free crochet fashion doll pattern? Save it to your Pinterest boards so you can find it again later, and share your finished doll with us! Tag your photos and saves with #FoodiePlumCrochet — we would love to see your version of this stylish amigurumi beauty.