
The Best Fluffy Pancakes recipe you will fall in love with. Full of tips and tricks to help you make the best pancakes.

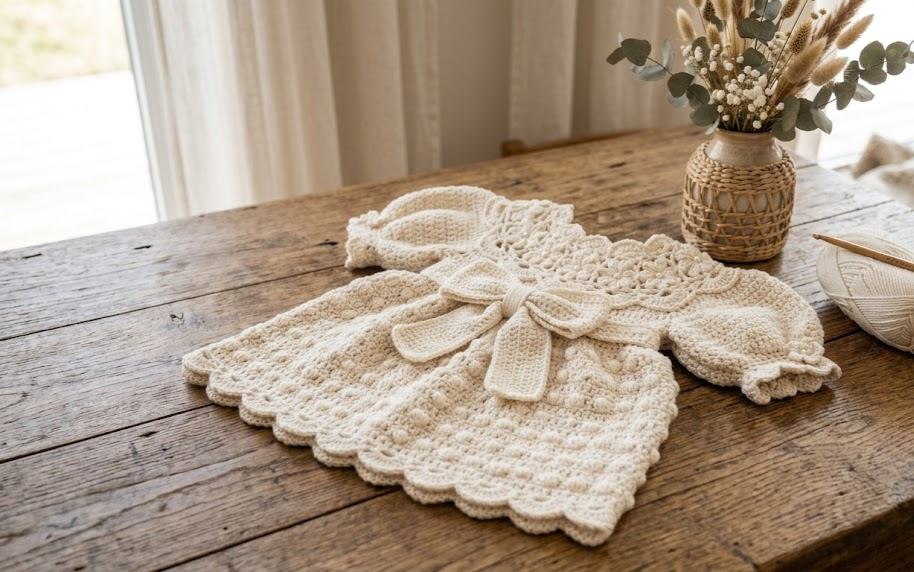
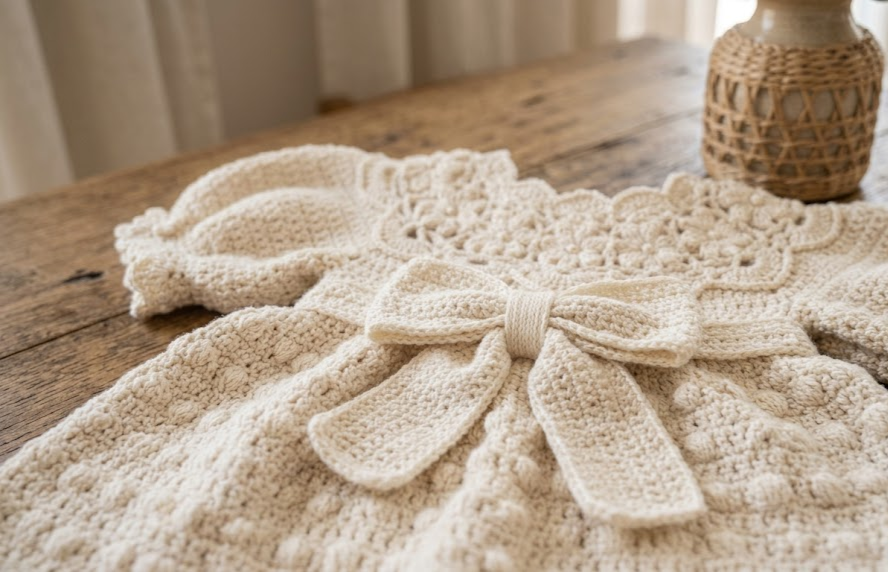
There is something about a handmade baby dress that store-bought clothing simply cannot replicate. This Heirloom Lace Baby Dress captures that old-world, delicate charm with its airy floral yoke, softly puffed sleeves, a scalloped skirt that moves like a flower opening, and a generous bow resting at the waist. Worked in a soft ivory yarn, it has the timeless look of a piece passed down through a family for decades, even though you can make it yourself in a matter of evenings.
This pattern is ideal for baby showers, christenings, birthdays, or that first special family photo. It photographs beautifully against neutral backdrops, works equally well as a keepsake gift, and gives every stitch a purpose: the lace yoke is airy and breathable for warm months, while the fuller skirt and sleeves add just enough structure to hold their shape as baby moves. If you love the look of “grandma-made” crochet but want a pattern that is clearly written and beginner-friendly in its logic, this is the dress for you.
Below you’ll find everything you need: gauge, materials, full written instructions broken into clear sections, assembly notes, tips for getting the lace yoke just right, and creative variations so you can make this dress entirely your own.

|
Difficulty
Intermediate
|
Time
15–20 hrs
|
Hook Size
3mm / 2.75mm
|
Yarn Weight
Sport / DK
|
Finished Size
0–6 months
|
Gauge
Getting gauge right is what makes the difference between a dress that fits and one that doesn’t, so don’t skip your swatch.
- 20 stitches x 22 rows = 10cm x 10cm (4in x 4in) in double crochet (dc), using a 3mm hook
- Lace yoke gauge: one full floral motif repeat measures approximately 6cm (2.4in) wide
- Hook used: 3mm for the body and skirt, 2.75mm for the lace yoke (the smaller hook keeps the lace crisp and prevents sagging)
- Yarn used: Sport/DK weight (light #3) cotton-blend yarn
If your swatch comes out larger than the measurements above, go down a hook size. If it’s smaller, go up. Gauge matters more in garments than almost anywhere else in crochet, since a loose gauge here can mean a dress that stretches out of shape after one wash.
Materials List
- Yarn: Sport/DK weight cotton-blend yarn, approximately 350–400m (380–440yd) in Ivory or Cream
- Hook: 3mm crochet hook (for body, sleeves, and skirt) and 2.75mm crochet hook (for the lace yoke)
- Notions:
- Tapestry needle (for weaving in ends and seaming)
- Stitch markers (at least 4)
- Small button or snap closure (for back opening)
- Measuring tape
- Scissors
- Blocking pins and blocking mat (optional but recommended for the lace yoke)
Abbreviations Table
| Abbreviation | Meaning |
|---|---|
| ch | chain |
| sl st | slip stitch |
| sc | single crochet |
| hdc | half double crochet |
| dc | double crochet |
| tr | treble crochet |
| st(s) | stitch(es) |
| sp | space |
| rnd | round |
| row | row |
| rep | repeat |
| sk | skip |
| BLO | back loop only |
| FLO | front loop only |
| MR | magic ring |
| yo | yarn over |
| dc2tog | double crochet 2 together (decrease) |
| shell | (2 dc, ch 2, 2 dc) or as specified in pattern |
| picot | ch 3, sl st into first ch of the 3 to form a small loop |
Technique note — Magic Ring (MR): Instead of chaining and joining into a circle (which can leave a small hole), wrap the yarn into a loop, chain 1, and work your first round of stitches into the loop. Pull the tail to close the ring tightly once the round is complete. This gives a neat, hole-free center.
Technique note — BLO (Back Loop Only): Instead of inserting your hook under both loops of the stitch below, insert it only under the back loop. This creates a visible ridge and is used here to define the transition between the yoke and the skirt.
Pattern Instructions
Part 1: The Yoke (worked top-down, in the round)
Using the 2.75mm hook and ivory yarn:
Rnd 1: MR, ch 3 (counts as first dc), 11 dc into ring, sl st to join to top of ch-3. (12 sts)
Rnd 2: Ch 3 (counts as first dc), dc in same st, *2 dc in next st; rep from * around, sl st to join. (24 sts)
Rnd 3: Ch 3, dc in same st, dc in next st, *2 dc in next st, dc in next st; rep from * around, sl st to join. (36 sts)
Rnd 4: Ch 4 (counts as dc + ch 1), sk 1 st, dc in next st, *ch 1, sk 1 st, dc in next st; rep from * around, sl st to join to 3rd ch of ch-4. (36 dc, 36 ch-1 sps)
Rnd 5 (floral motif round): *In next ch-1 sp work (sc, ch 3, 3 dc, ch 3, sc) — this forms one flower petal cluster — sk next dc; rep from * around, sl st to join. (12 flower clusters)
Rnd 6: Ch 1, sc in each st and ch-sp around, working 3 sc into each ch-3 loop tip to keep the scalloped edge visible. (approx. 90 sts — exact count will vary slightly based on tension; this is expected in lace rounds and does not need to match exactly)
Rnd 7 (raglan increase round): Ch 3, dc evenly around, increasing 8 sts evenly spaced (roughly one increase every 11–12 sts) to shape the yoke outward over the chest, sl st to join. (98 sts)
Rnd 8: Repeat Rnd 7’s increase pattern, spacing increases evenly. (110 sts)
Rnd 9: Dc even (no increases), sl st to join. (110 sts)
Continue working even in dc for 2 more rounds, checking the yoke depth against baby’s chest measurement — it should sit about 10–11cm (4–4.5in) from the neckline to the underarm split for the 0–6 month size.
Part 2: Dividing for Sleeves and Body
Rnd 12 (divide rnd): Ch 3, dc in next 18 sts (front), ch 4 (underarm), sk next 18 sts (sleeve), dc in next 37 sts (back), ch 4 (underarm), sk next 18 sts (sleeve), dc in remaining 19 sts (front), sl st to join. (74 body sts + 8 underarm chs = 82 sts total)
This separates the two sleeves from the body, joining front and back under each arm with a chain that will later be worked into.
Part 3: The Body and Skirt
Switch to the 3mm hook.
Rnds 13–20: Dc even around, working into the underarm chains as sts. (82 sts, unchanged through these rounds)
Rnd 21 (BLO transition rnd): Working in BLO only, sc in each st around. This creates the visible ridge that marks the yoke-to-skirt transition. (82 sts)
Rnd 22 (flare rnd): Ch 3, *dc in next st, 2 dc in next st; rep from * around. (123 sts)
Rnds 23–28: Dc even around. (123 sts)
Rnd 29 (second flare rnd): Ch 3, *dc in next 2 sts, 2 dc in next st; rep from * around. (164 sts)
Rnds 30–35: Dc even around, working until skirt measures approximately 20cm (8in) from the BLO transition ridge, or desired length. (164 sts)
Part 4: Scalloped Hem
Final rnd: Ch 1, *sk 1 st, 5 dc in next st, sk 1 st, sl st in next st; rep from * around, ending with sl st to first sc. (approx. 27–28 scallops, depending on final st count — adjust the repeat slightly if needed to end evenly)
Part 5: Sleeves (make 2)
Rejoin yarn at underarm chain with 3mm hook.
Rnd 1: Ch 1, sc evenly around sleeve opening, including working 4 sc across the underarm chain. (22 sts)
Rnds 2–6: Dc even around. (22 sts)
Rnd 7 (puff shaping): Ch 3, 2 dc in each st around. (44 sts) This creates the gathered puff look.
Rnd 8: Dc even. (44 sts)
Rnd 9 (cuff decrease): Ch 1, *dc2tog; rep from * around. (22 sts)
Rnd 10 (cuff): Sc evenly around for a snug finish. (22 sts)
Fasten off, weave in ends.
Part 6: The Waist Bow
Bow Band (make 1): Ch 8, dc in 4th ch from hook and each ch across, turn. (5 sts) Work even in dc for 30 rows (this forms the strip that wraps and ties). Fasten off.
Bow Loops (make 2, one for each side): Ch 30, join into a ring with a sl st, being careful not to twist. Work 2 rounds of sc around the ring. (30 sts per round) Flatten the ring into a bow-loop shape and set aside.
Bow Center Wrap: Ch 6, sc in 2nd ch from hook and each ch across. (5 sts) Work even for 6 rows. This small piece wraps around the center of the two bow loops to cinch them together, hiding the seam.
Assembly Steps
- Weave in all ends on the yoke, body, and both sleeves before assembling.
- Sew or crochet a small button or snap closure at the back neckline opening (leave a 5–6cm/2–2.5in gap at the back of Rnd 1–2 of the yoke if you’d like a back-button opening, or work the yoke fully in the round for a pullover-style dress).
- Attach both sleeves at the underarm, sewing the sleeve edge to the underarm chain sts using the tapestry needle and a whip stitch, working from the inside so the seam is hidden.
- Position the two bow loops side by side at the front waist of the dress, roughly centered, with the flattened ring shapes forming the classic bow “wings.”
- Wrap the small Bow Center Wrap piece around the middle of both loops and seam it closed at the back to cinch the bow shape.
- Sew the finished bow to the dress front at the natural waistline (approximately 11–12cm/4.5in below the yoke transition ridge for the 0–6 month size).
- Attach the long Bow Band strip behind the bow so the tails hang down or wrap around to the back, depending on your preferred look.
- Block the finished dress by lightly wetting it and pinning it out flat, paying special attention to opening up the lace yoke petals and the scalloped hem points so they lie flat and even. Allow to dry fully before wearing.
Beginner/Intermediate Tips
- The lace yoke (Part 1) is the most technical section of this pattern. If you’re newer to lace, work a swatch of Rounds 4–6 first so your hands get used to the ch-1 spaces and petal clusters before committing to the full yoke.
- Use stitch markers at the start of every round — with this many increase rounds, it’s easy to lose track of where a round begins, especially in the lace sections where the stitch pattern shifts.
- When working the BLO transition round (Rnd 21), go slowly. It’s easy to accidentally catch both loops out of habit, and that ridge is what gives the dress its structured, “yoke meets skirt” silhouette.
- Cotton-blend yarns can be less stretchy than wool, so don’t skip blocking. Blocking is what opens the lace petals fully and makes the scalloped hem lie flat rather than curling.
- Count your stitches after every increase round. A few stitches off in the yoke will show up as puckering by the time you reach the skirt.
Variations
- Blush Pink Heirloom: Swap the ivory yarn for a soft blush pink for a sweeter, more traditional “baby girl” palette while keeping the same lace and bow details.
- Mini Version (Doll Size): Scale the pattern down using a 2.5mm hook and fingering weight yarn to make a matching doll dress — a lovely add-on gift alongside the baby dress.
- Sleeveless Sundress: Skip Part 5 entirely and instead work a simple sc edging around each armhole for a lighter, warm-weather version of the dress.
- Two-Tone Ribbon Sash: Instead of an all-crochet bow, thread a satin ribbon through the waistline round for a mixed-texture finish that’s quicker to assemble.
- Extended Toddler Length: Add 4–5 extra rounds to Part 3 before the scalloped hem to extend the dress into a 12–18 month toddler length.
Save this pattern so you always have it on hand, and tag your finished dress with #FoodiePlumCrochet — we’d love to see your version!



