
The Best Fluffy Pancakes recipe you will fall in love with. Full of tips and tricks to help you make the best pancakes.

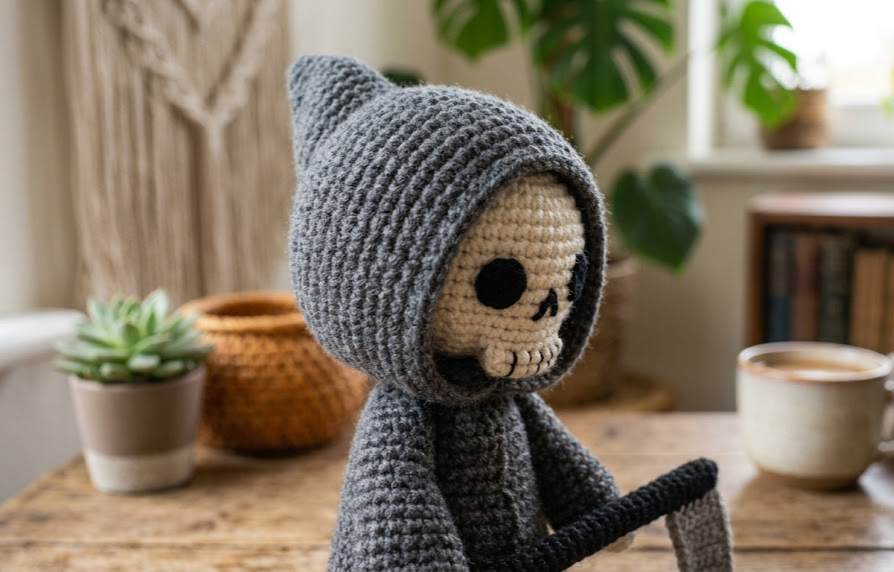
There is something irresistibly charming about a tiny grim reaper with a round white skull face and a stitched-on grin. This crochet grim reaper amigurumi trades every ounce of spookiness for pure cuteness, making it the perfect handmade project for Halloween decor, a quirky desk companion, or a gift for the crochet lover who wants something different from the usual pumpkins and ghosts. Standing at roughly 10cm tall, this little reaper wears a soft charcoal gray hooded robe and carries a miniature scythe crafted from wire and yarn, giving him just enough personality to make everyone smile instead of scream.
This pattern is written for intermediate crocheters who are comfortable working in continuous rounds, shaping amigurumi pieces, and doing simple embroidery for facial features. If you have made a handful of amigurumi before and know your way around a magic ring and an invisible decrease, you will be able to complete this project in an evening. The finished doll is soft, huggable, and sturdy enough to sit on a shelf year-round, not just in October.
Below you will find everything needed to make your own: gauge information, a full materials list, an abbreviations table, complete round-by-round instructions for every piece, assembly steps with measurements, troubleshooting tips, and creative variations to make the pattern your own.

|
Difficulty
Intermediate
|
Time
5–6 Hours
|
Hook Size
2.5mm
|
Yarn Weight
DK (8-ply)
|
Finished Size
~10cm Tall
|
Gauge
Gauge matters for amigurumi because it controls how tightly your stitches sit, which affects both the finished size and how well the stuffing stays hidden. For this pattern:
- 19 stitches x 21 rows = 10cm x 10cm square, worked in single crochet
- Hook used: 2.5mm
- Yarn used: DK (8-ply) weight cotton or cotton-acrylic blend
Because amigurumi is stuffed rather than worn, exact gauge is less critical than in garment crochet — but a tighter gauge is strongly recommended so that stuffing does not peek through the stitches. If your test swatch comes out looser than the gauge above, drop down half a hook size.
Materials List
- Charcoal gray DK weight yarn — approximately 40g (robe, hood, sleeves)
- White or cream DK weight yarn — approximately 10g (skull face)
- Small amount of black DK or sport weight yarn (facial embroidery and scythe handle wrap)
- Small amount of silver or light gray yarn (scythe blade wrap)
- 2.5mm crochet hook
- Polyester fiberfill stuffing
- Yarn needle (blunt tip, for sewing and embroidery)
- Stitch marker (to track the start of rounds)
- 18-gauge floral wire, approximately 15cm, for the scythe armature
- Small wire cutters
- Craft glue or hot glue (optional, to secure wire ends)
- Optional: small cardboard circle, 3cm diameter, for base stability
Abbreviations Table
| Abbreviation | Meaning |
|---|---|
| ch | chain |
| sc | single crochet |
| inc | increase (2 sc in same stitch) |
| dec | invisible decrease (insert hook through front loops of next 2 sts, pull up a loop, yarn over, pull through both loops) |
| MR | magic ring |
| BLO | back loop only |
| sl st | slip stitch |
| st(s) | stitch(es) |
| rnd(s) | round(s) |
| rep | repeat |
| ( ) | stitch count at end of round/row |
Pattern Instructions
All pieces are worked in continuous rounds (do not join unless stated) using a stitch marker to track the beginning of each round.
Part 1: Head (Skull)
Work in white/cream yarn.
- Rnd 1: MR, 6 sc into ring (6)
- Rnd 2: inc in each st around (12)
- Rnd 3: sc 1, inc rep around (18)
- Rnd 4: sc 2, inc rep around (24)
- Rnd 5: sc 3, inc rep around (30)
- Rnds 6–9: sc around, no increases (30) — repeat for 4 rounds total
- Rnd 10: sc 3, dec rep around (24)
- Rnd 11: sc 2, dec rep around (18) — begin stuffing firmly here
- Rnd 12: sc 1, dec rep around (12)
- Rnd 13: dec rep around (6)
Fasten off, leaving a long tail. Weave the tail through the front loops of the last 6 stitches, pull tight to close, and secure. This creates a firm round ball approximately 4cm across.
Technique note — Magic Ring (MR): A magic ring lets you start a round shape with no hole in the center. Wrap yarn around your finger, insert the hook into the loop, pull up a loop, and work your starting stitches into the ring before pulling the tail to close it.

Part 2: Hood
Work in charcoal gray yarn.
- Rnd 1: MR, 6 sc into ring (6)
- Rnd 2: inc in each st around (12)
- Rnd 3: sc 1, inc rep around (18)
- Rnd 4: sc 2, inc rep around (24)
- Rnd 5: sc 3, inc rep around (30)
- Rnds 6–12: sc around, no increases (30) — repeat for 7 rounds total
Now shape the open front of the hood by working in rows instead of rounds for the front half of the piece:
- Row 13: sc in the first 15 sts only, turn (15)
- Row 14: ch 1, sc in each st across, turn (15)
- Row 15: ch 1, sc in each st across, turn (15)
Fasten off, leaving a long tail for sewing.
Technique note: Working the front rows only (instead of continuing all the way around) extends the front edge of the hood forward while the back stays shorter, creating the classic drooping hood silhouette. The back 15 stitches from Rnd 12 remain shorter and will sit against the back of the head.
Part 3: Body / Robe
Work in charcoal gray yarn, worked top-down.
- Rnd 1: MR, 6 sc into ring (6)
- Rnd 2: inc in each st around (12)
- Rnd 3: sc 1, inc rep around (18)
- Rnd 4: sc 2, inc rep around (24)
- Rnd 5: sc 3, inc rep around (30)
- Rnd 6: sc 4, inc rep around (36)
- Rnds 7–14: sc around, no increases (36) — repeat for 8 rounds total
- Rnd 15: sc 5, inc rep around (42)
- Rnd 16: sc around (42)
- Rnd 17: sc 6, inc rep around (48)
- Rnd 18: sc around, then sl st to first st of round to join (48)
Fasten off, leaving a long tail. The gentle flare from Rnd 15–18 creates the bell-shaped hem of the robe so the doll sits flat.
Part 4: Arms (make 2)
Start with white/cream for the hand, then switch to charcoal gray for the sleeve.
- Rnd 1: MR, 5 sc into ring (5)
- Rnds 2–3: sc around (5) — 2 rounds total, this forms the hand
- Change to charcoal gray yarn
- Rnds 4–7: sc around (5) — 4 rounds total, this forms the sleeve
- Rnd 8: sc 1, inc into next 2 sts to widen the cuff slightly (7)
Fasten off, leaving a long tail for sewing to the body.
Part 5: Scythe
- Cut an 15cm length of 18-gauge floral wire.
- Bend one end into a curved hook shape approximately 4cm long, to form the blade silhouette; leave the remaining 11cm straight as the handle.
- Wrap the straight handle section tightly and evenly with black yarn, securing the starting end with a small dab of glue and working down the wire, gluing the tail at the end.
- Wrap the curved blade section with silver or light gray yarn in the same manner, covering the wire completely.
Technique note: Wrapping wire with yarn (rather than crocheting a tube) keeps the scythe thin and lets it hold its curved shape without added bulk.
Assembly Steps
- Stuff the head firmly with fiberfill, making sure it holds a round shape, then set aside.
- Stuff the body firmly, paying extra attention to the base so the doll can stand. If desired, insert the 3cm cardboard circle into the bottom before closing the last round for extra stability.
- Sew the body opening closed using the tail from Rnd 18, weaving through the remaining stitches and cinching gently.
- Place the hood over the head so the face shows through the shorter back opening area; pin in place before sewing.
- Sew the hood to the head along the front edge (the two rows worked in Part 2), using small whip stitches about 3mm apart. Tack the center back of the hood to the top-back of the head with 2–3 stitches to keep it from flopping forward.
- Attach the head-and-hood piece to the top of the body, centering it over the neck opening, and sew around the full circumference using the head’s starting tail, about 1cm deep.
- Embroider the skull face onto the white area visible through the hood: work two small black satin-stitch triangles or ovals for the eye sockets, a small black triangle for the nose, and 4–6 short vertical stitches along a horizontal line for the teeth gaps.
- Sew the arms to the sides of the body approximately 1cm below the neckline, angling each arm slightly forward.
- Position the scythe handle between the two arm/hand tips and tack the hands around the wire with a few small stitches, adding a touch of glue at the contact points for a secure hold.
- Gently bend the arms and scythe into a natural holding pose, and adjust the hood so the face sits centered.
Beginner/Intermediate Tips
- Use a hook one size smaller than you think you need — a tight gauge is what keeps the white stuffing from showing through the pale face yarn.
- When working the hood’s front rows (Part 2), count your stitches after every row; it is easy to accidentally pick up an extra stitch at the turn.
- Pin pieces in place with removable stitch markers or safety pins before sewing so you can check the face position and arm angle before committing to stitches.
- If your invisible decreases look uneven, always insert the hook into the front loops only of both stitches — mixing front and back loops creates visible gaps.
- Wrap the scythe wire slowly and keep tension even; loose wraps will slip and show bare wire underneath.
- Stuff in small pinches rather than one large clump — this avoids lumps and keeps the round shapes symmetrical.
Variations
- Faceless Reaper: Skip the embroidery and leave the hood opening dark by stuffing black yarn or fabric behind the opening instead of a white face, for a more mysterious look.
- Pastel Reaper: Swap the charcoal gray for a soft lavender or dusty rose robe for a “cute Halloween” version that fits pastel-goth decor.
- Mini Keychain Reaper: Work the same pattern with a lighter fingering weight yarn and a 2mm hook, then attach a keyring loop at the top of the hood for a wearable accessory.
- Reaper Family Set: Make three sizes — small, medium, and large — by adding extra increase/plain rounds to the body and head, and display them together as a trio.
- Glow-in-the-Dark Reaper: Use a glow-in-the-dark novelty yarn for the skull face so it lights up in the dark for a fun Halloween display piece.
Save this pattern so you always have it on hand for your next Halloween project, and tag your finished reaper with #FoodiePlumCrochet — we would love to see your version!



