
The Best Fluffy Pancakes recipe you will fall in love with. Full of tips and tricks to help you make the best pancakes.

If you’ve ever wanted to turn a simple strip of stitches into something that looks like it belongs in a bouquet, this pattern is for you. The rolled shell stitch rose is one of the most satisfying tricks in crochet: you make a flat, scalloped strip, then coil it up like a cinnamon roll, and suddenly you’re holding a soft, dimensional rose with ruffled petals and a tidy spiral center. This particular version uses a soft sage green yarn, which gives the finished flower a botanical, slightly muted look — perfect for anyone who wants a rose that feels more “garden” than “greeting card.”
This pattern is ideal for crocheters who already know their basic stitches (single crochet, double crochet, treble crochet) and want to try a new construction technique. It’s also a wonderful stash-buster, since each rose only takes a small amount of yarn. Once you learn the shell strip technique, you can make roses in any color to embellish headbands, brooches, coasters, garlands, gift toppers, bookmarks, or bouquets that never wilt.
The finished rose measures approximately 6 cm (2.4 inches) in diameter, making it a versatile size for both wearable accessories and home décor accents. Let’s get into the details.

|
Difficulty
Intermediate
|
Time
45–60 min
|
Hook Size
3.5 mm
|
Yarn Weight
DK / Light Worsted
|
Finished Size
~6 cm (2.4 in)
|
Gauge
- 14 sc and 8 rows = 10 cm x 10 cm square, worked in single crochet with a 3.5 mm hook and light worsted (DK) weight cotton yarn.
- Gauge is not critical for the shape of the rose itself, but it does affect the finished size. If your strip comes out significantly looser or tighter than the gauge above, your rose may be larger or smaller than 6 cm.
- Always work a small gauge swatch first if you plan to make multiple roses that need to match in size.
Materials List
- Light worsted / DK weight cotton yarn (yarn weight category 3), approximately 15–20 grams (about 35–40 meters) in sage green
- 3.5 mm (US E/4) crochet hook
- Yarn needle (for weaving in ends and stitching the rose together)
- Scissors
- Stitch marker (optional, helpful for marking the start of rows)
- Small amount of craft glue or a brooch pin/hair clip base (optional, for finishing into an accessory)
Abbreviations Table
| Abbreviation | Meaning |
|---|---|
| ch | chain |
| sc | single crochet |
| dc | double crochet |
| tr | treble crochet |
| sl st | slip stitch |
| sk | skip |
| st(s) | stitch(es) |
| rep | repeat |
| RS | right side |
| WS | wrong side |
| BLO | back loop only (crochet only through the back loop of the stitch, leaving the front loop free) |
Pattern Instructions
Part 1: The Petal Strip
This strip is worked flat, starting with a straight foundation row, then building a scalloped fan edge along one long side. That scalloped edge becomes the ruffled outer petals once the strip is rolled up.
Foundation Chain:
Chain 41.
Row 1 (RS): Sc in 2nd ch from hook and in each ch across. (40 sc)
Row 2 (fan/shell row): Ch 1, turn. Sl st in first st. *Sk next st, (dc, tr, dc) in next st — this forms one shell/fan — sk next st, sl st in next st; rep from * across to end. Fasten off, leaving a long tail (at least 40 cm) for sewing.
Technique note: The (dc, tr, dc) worked into a single stitch is called a “shell.” Skipping stitches on either side of the shell lets the extra stitches fan outward, creating the ruffled, petal-like edge you see along the top of the strip.
You should now have a strip with one straight, flat edge (the foundation chain edge) and one ruffled, scalloped edge (the shell row). This strip is the entire rose — no separate petals are crocheted individually.
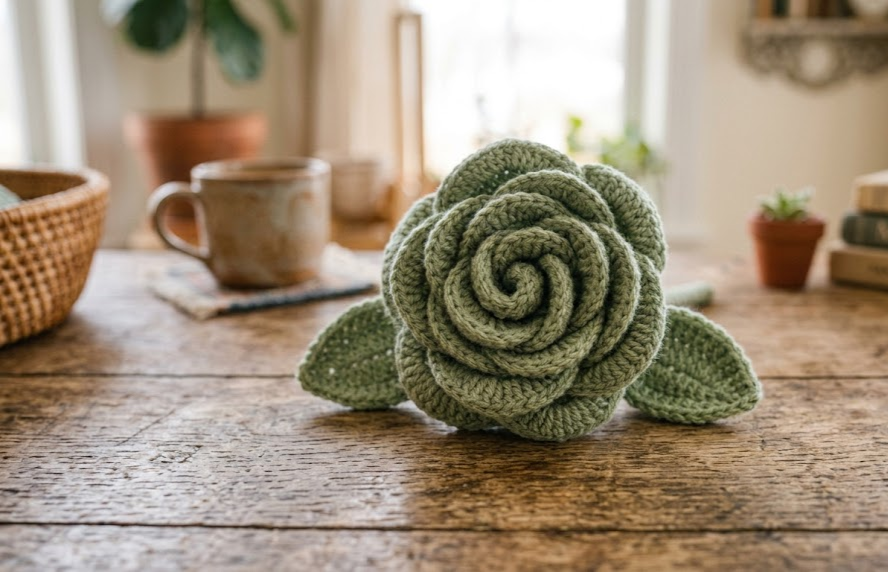
Part 2: Rolling the Rose
Step 1: Thread the long tail from Row 2 onto your yarn needle.
Step 2: Starting at the end of the strip where you fastened off, begin rolling the strip tightly, with the straight (foundation chain) edge at the bottom and the ruffled (shell) edge sticking up and out. The straight edge forms the compact base of the rose; the ruffled edge fans out to look like petals.
Step 3: As you roll, use your threaded needle to take small stitches through the layers at the base every half turn or so, catching the bottom straight edge of each new layer to the coil beneath it. This keeps the rose from unrolling and holds its shape permanently.
Step 4: Continue rolling and stitching until you reach the end of the strip. The last few centimeters of strip should be tucked under and stitched flat against the base so no raw edge is visible.
Step 5: Once fully rolled, take several stitches straight through the entire base of the coil (through all layers) to lock everything in place. Fasten off securely and weave in the end through the base, not through the visible petals.
Technique note: Rolling slightly looser for the first turn and progressively tighter as you go creates a more natural, open-bloom look, similar to how real rose petals curl tighter toward the center.
Part 3: Optional Leaf (for a stem or brooch look)
Foundation Chain: Chain 11.
Row 1: Starting in 2nd ch from hook, sc in next 2 sts, hdc in next 2 sts, dc in next 3 sts, hdc in next 2 sts, sc in last st. (10 sts)
Technique note: Working different stitch heights along the same row (sc, then hdc, then dc, then back down) creates a tapered, pointed leaf shape rather than a straight rectangle.
Row 2: Working back down the other side of the starting chain (this is called “working the second side of the foundation chain” — instead of turning, you rotate the piece 180° and crochet into the unused loops along the bottom of your original chain), repeat Row 1 stitch pattern: sc in first 1 st, hdc in next 2, dc in next 3, hdc in next 2, sc in last 2 sts. (10 sts)
Fasten off, leaving a 15 cm tail. Weave in the starting tail. Use the fastening-off tail to stitch the leaf to the base of the rose.

Assembly Steps
- Complete one rose following Part 1 and Part 2. This should measure approximately 6 cm (2.4 in) across and 3 cm (1.2 in) tall at the base.
- If adding a leaf, position it so the pointed tip extends about 2 cm beyond the base of the rose, angled slightly to one side rather than straight down, for a more natural look.
- Stitch the leaf to the underside of the rose base using the leaf’s tail, taking 4–5 small stitches through both the leaf and the rose base for a secure hold.
- If turning the rose into a brooch: apply a small amount of craft glue to the flat back of a pin base, press the rose base firmly onto it, and let it cure for at least 1 hour before wearing.
- If turning the rose into a hair clip: stitch the rose base directly onto an alligator hair clip using the yarn needle and a few tight whip stitches through the metal openings.
- If using several roses for a garland or bouquet, space individual roses 5–7 cm apart along your chosen backing (ribbon, twine, or floral wire) so the petals don’t overlap and flatten each other.
Beginner/Intermediate Tips
- Keep tension slightly looser than usual on Row 2 (the shell row) — this row needs some give so the shells can fan out properly instead of pulling the strip flat.
- Roll the strip with the right side facing outward at all times; check this every few turns since it’s easy to twist the strip accidentally while stitching.
- Use a stitch marker to mark the start of Row 2 so you always know which end is the “start of the fan” when you begin rolling.
- If your rose looks too flat or open, try rolling it more tightly on the first two turns — a tighter center creates a more classic, closed rosebud look.
- Cotton yarn holds its shape better than acrylic for this pattern because it has less stretch, which keeps the coiled base from loosening over time.
Variations
- Ombre Rose: Use a color-changing or hand-dyed yarn so the petals shift from light to dark as the strip rolls, mimicking a natural sunset rose.
- Mini Rose Set: Chain 21 instead of 41 for a smaller strip, making tiny 3 cm roses perfect for earrings or a charm bracelet.
- Layered Bouquet: Make 5–7 roses in varying shades of one color family (blush, sage, cream, dusty rose) and bundle them with wrapped floral wire stems for a permanent bouquet.
- Napkin Ring Accent: Stitch a finished rose onto a plain crochet or fabric napkin ring band for a boho table setting.
- Two-Tone Rose: Work Row 1 in one color and Row 2 in a contrasting color, so the base of the rose and the ruffled petal edges are two different shades.
Save This Pattern
If you loved this sage green rolled rose, save this pattern to your crochet board so you can come back to it anytime you need a quick, beautiful handmade flower. Tag your finished roses and share your version with the hashtag #FoodiePlumCrochet — we’d love to see your blooms!



