
The Best Fluffy Pancakes recipe you will fall in love with. Full of tips and tricks to help you make the best pancakes.

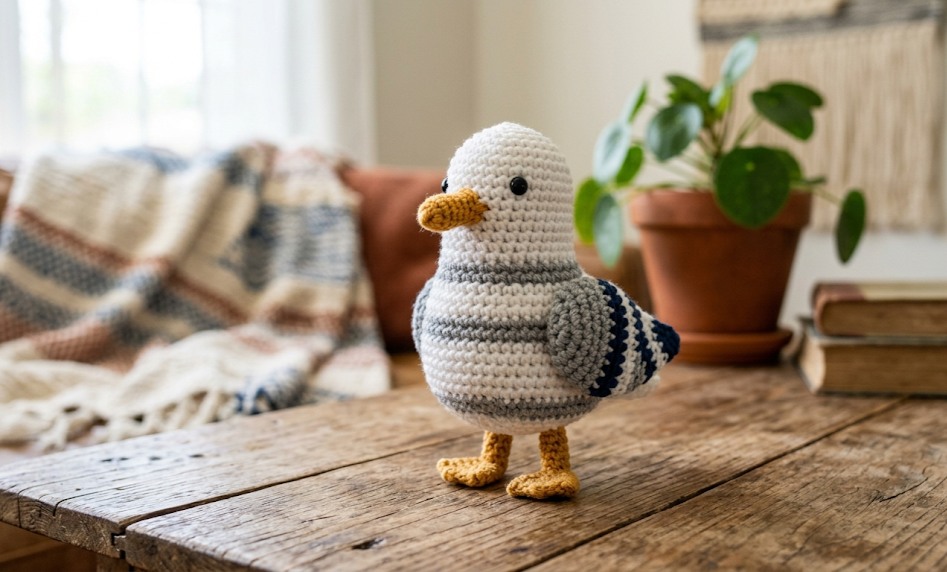
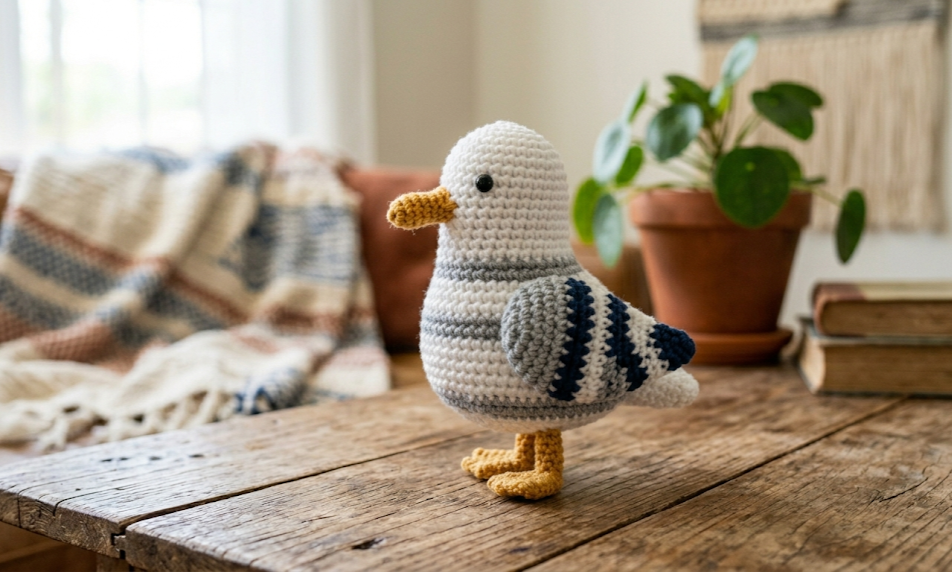
There’s something irresistibly charming about a seagull that doesn’t squawk, steal your fries, or screech at 6am — and that’s exactly what makes this crochet seagull amigurumi such a delightful project. With its plump white body, soft grey wings, a cheerful golden-orange beak, and a navy-and-white patterned “life ring” around its middle, this little seabird captures all the charm of the coast without a single feather of attitude.
This pattern is perfect for crocheters who already have a few amigurumi projects under their belt and are ready to tackle color changes, shaping, and simple limb assembly. It works up in a soft, chunky chenille-style yarn, which gives the finished seagull an irresistibly fluffy, cloud-like texture that begs to be squeezed. Kids will love it as a stuffed companion, beach lovers will want one for the shelf, and nursery decorators will appreciate the soft, neutral coastal palette.
Whether you’re crocheting this as a gift, a nursery accent, or just because you love all things ocean-themed, this pattern will walk you through every stitch — from the rounded head to the textured wings and webbed-style feet — so that by the end, you’ll have your very own huggable seagull ready to perch on a shelf or ride along in a beach bag.
|
Difficulty
Intermediate
|
Time
6-8 Hours
|
Hook Size
4mm (G/6)
|
Yarn Weight
Bulky (5)
|
Finished Size
20cm x 18cm
|
Gauge
- Gauge swatch: 9 sts x 9 rows = 10cm x 10cm square, working in single crochet (sc)
- Hook size used: 4mm (US G/6) crochet hook
- Yarn weight used: Bulky/chenille-style yarn (Yarn Weight 5)
Gauge isn’t critical for amigurumi the way it is for garments, but it matters for stuffing tightness — a tighter gauge means less stuffing shows through and a firmer finished shape. Always crochet a quick swatch before starting so your seagull comes out the size you want.
Materials List
- White chenille-style yarn (bulky weight) – approx. 100g, for the body, head, and belly
- Grey chenille-style yarn (bulky weight) – approx. 50g, for the wings and back accents
- Golden-orange chenille-style yarn (bulky weight) – approx. 20g, for the beak and feet
- Navy blue chenille-style yarn (bulky weight) – approx. 15g, for the wing-band pattern
- 4mm (US G/6) crochet hook
- Pair of 10mm black safety eyes (or black yarn/felt for embroidered eyes)
- Polyester fiberfill stuffing
- Yarn needle (for sewing pieces together and weaving in ends)
- Stitch markers
- Scissors
- Small amount of black yarn (for eye highlights, optional)
Abbreviations Table
| Abbreviation | Meaning |
|---|---|
| ch | chain |
| sc | single crochet |
| inc | increase (2 sc in same stitch) |
| dec | invisible decrease |
| st(s) | stitch(es) |
| rnd | round |
| BLO | back loop only |
| MR | magic ring |
| sl st | slip stitch |
| FO | fasten off |
| rep | repeat |
Technique note – Magic Ring (MR): A magic ring lets you start an amigurumi round with a tight, hole-free center. Wrap the yarn around your fingers into a loop, crochet your starting stitches into that loop, then pull the tail to close it completely.
Technique note – Invisible Decrease (dec): Insert your hook into the front loop only of the next two stitches, then complete a single crochet as normal. This creates a smoother, less visible decrease than a standard sc2tog.
Pattern Instructions
Part 1: Head & Body (worked as one piece, bottom-up)
Using white yarn:
- Rnd 1: MR, 6 sc into ring (6)
- Rnd 2: inc in each st around (12)
- Rnd 3: sc, inc rep around (18)
- Rnd 4: sc 2, inc rep around (24)
- Rnd 5: sc 3, inc rep around (30)
- Rnd 6: sc 4, inc rep around (36)
- Rnd 7-12: sc around, no increases (36) — work 6 rounds even
- Rnd 13: sc 4, dec rep around (30)
- Rnd 14: sc around (30)
Switch to navy blue yarn, work the wing-band pattern in alternating navy/white panels for visual texture (work 4 panels of 3 sts navy, 3 sts white, alternating each round as desired):
- Rnd 15-17: continue pattern panel, sc around (30) — work 3 rounds in alternating color blocks
- Rnd 18: switch back to white, sc 3, dec rep around (24)
- Rnd 19: sc around (24) — begin stuffing body firmly now
- Rnd 20: sc 2, dec rep around (18)
- Rnd 21: sc around (18)
- Rnd 22: sc, dec rep around (12) — add more stuffing, stuff firmly
- Rnd 23: dec around (6)
- Rnd 24: sc around (6) — this forms the neck
Continue directly into the head without fastening off:
- Rnd 25: inc in each st around (12)
- Rnd 26: sc, inc rep around (18)
- Rnd 27: sc 2, inc rep around (24)
- Rnd 28: sc 3, inc rep around (30)
- Rnd 29-34: sc around, no increases (30) — work 6 rounds even, insert safety eyes between rounds 31-32, spaced 5-6 sts apart
- Rnd 35: sc 3, dec rep around (24)
- Rnd 36: sc 2, dec rep around (18) — begin stuffing head firmly
- Rnd 37: sc, dec rep around (12)
- Rnd 38: dec around (6) — stuff fully before closing
- FO, weave tail through remaining 6 sts, pull tight and secure.
Part 2: Beak
Using golden-orange yarn:
- Rnd 1: MR, 5 sc into ring (5)
- Rnd 2: inc twice, sc 3 (7)
- Rnd 3: sc around (7)
- Rnd 4: dec, sc 5 (6)
- Rnd 5: dec, sc 4 (5)
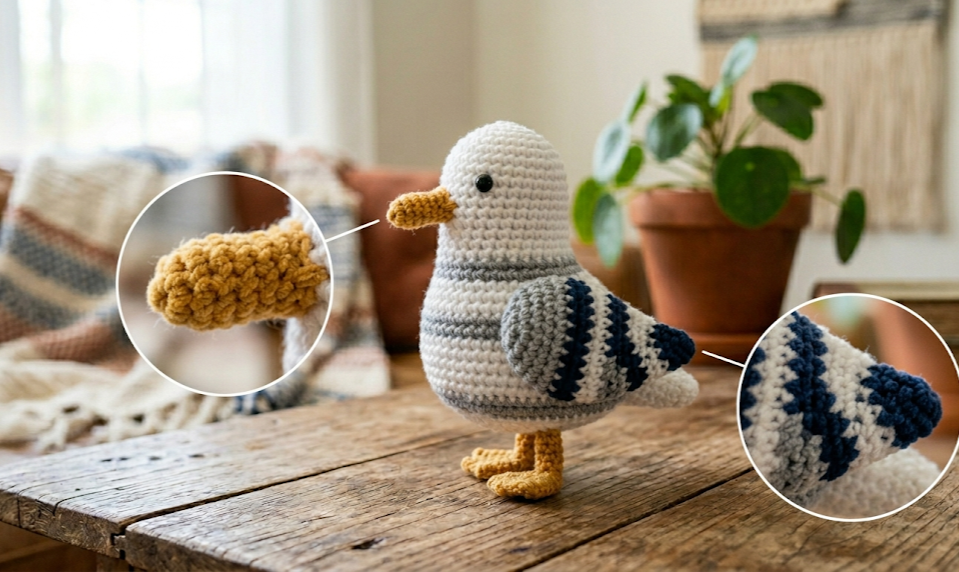
- FO, leave a long tail for sewing. Stuff lightly and sew to the center-front of the head, just below eye level, angled slightly downward.
Part 3: Wings (make 2)
Using grey yarn:
- Rnd 1: MR, 6 sc into ring (6)
- Rnd 2: inc in each st around (12)
- Rnd 3: sc, inc rep around (18)
- Rnd 4: sc 2, inc rep around (24)
- Rnd 5-9: sc around (24) — work 5 rounds even
- Rnd 10: sc 2, dec rep around (18)
- Rnd 11: sc, dec rep around (12)
- FO, leave a long tail. Flatten the wing piece and sew flat to the sides of the body (do not stuff, or stuff very lightly for slight dimension), positioned just above the wing-band stripe.
Part 4: Feet & Legs (make 2)
Using golden-orange yarn:
- Rnd 1: MR, 6 sc into ring (6)
- Rnd 2: inc in each st around (12)
- Rnd 3: sc around (12)
- Rnd 4: sc 4, dec rep around (10) — this shapes the heel
- Rnd 5-7: sc around (10) — work 3 rounds even for the leg portion
- FO, leave a long tail.
To create the webbed toe look: flatten the front of the foot piece and make 3 small surface stitches or sc ridges radiating outward from the front center to mimic webbed toes, securing with a few backstitches in the same yarn.
Stuff each foot/leg firmly and sew to the underside of the body, spaced approximately 4-5cm apart, angled slightly outward so the seagull can stand or sit upright.
Assembly Steps
- Weave in all loose ends on the head/body piece before attaching additional parts.
- Attach the beak to the front of the head, centered below the eyes, using the long tail and a whip stitch around the edge; stuff lightly as you sew for a slightly puffed look.
- Position both wings on either side of the body, just above the navy wing-band stripe, and pin in place before sewing to check symmetry.
- Sew each wing flat using a whip stitch around the entire edge, leaving the top third slightly looser so the wing can angle outward naturally.
- Attach both feet to the base of the body, spacing them 4-5cm apart at the center-bottom, angling them slightly forward and outward for a stable standing pose.
- Check stuffing firmness in the head and body by gently squeezing — add small pinches of stuffing through any gaps before final closure if needed.
- Use black yarn or a small dot of fabric paint to add a tiny highlight to each safety eye if desired, for extra charm.
- Steam the chenille yarn lightly with a handheld steamer (optional) to fluff the texture and even out the surface stitches.
Beginner/Intermediate Tips
- Chenille yarn splits easily — crochet a little looser than usual and use a hook one size smaller than recommended on the yarn label to keep stitches tight enough to hide stuffing.
- When switching colors for the wing-band stripe, carry the unused yarn loosely inside the work rather than cutting and rejoining each round; this keeps the inside neat and avoids extra ends to weave in.
- Stuff the head before fully closing the decrease rounds — it’s much easier to pack stuffing in while there’s still an opening than to push it through a tiny hole.
- Use stitch markers on every round, since chenille yarn’s fuzzy texture makes it easy to lose track of your starting stitch.
- Pin pieces (wings, feet, beak) in place with removable stitch markers before sewing so you can step back and check positioning is symmetrical.
Variations
- Penguin Palette: Swap the grey wings for solid black and keep the white belly for an easy penguin-style variation using the same base pattern.
- Mini Keychain Seagull: Work the same pattern with a 3mm hook and DK-weight yarn for a pocket-sized 8cm version perfect for bag charms.
- Ocean Wave Wing Band: Replace the navy-and-white stripe with a multi-blue ombré yarn for a more painterly “ocean wave” look around the middle.
- Nursery Mobile Seagull: Make 3-4 smaller seagulls (using the scaled-down size above) and hang them from a wooden ring with ribbon for an adorable coastal nursery mobile.
- Sunset Seagull: Use a coral-and-cream color palette instead of grey-and-white for a warm, sunset-inspired beach decor piece.
If you make this little seagull, I’d love to see it! Save this pattern to your Pinterest board so you can come back to it anytime, and don’t forget to tag your finished project with #FoodiePlumCrochet — happy hooking!



