
The Best Fluffy Pancakes recipe you will fall in love with. Full of tips and tricks to help you make the best pancakes.

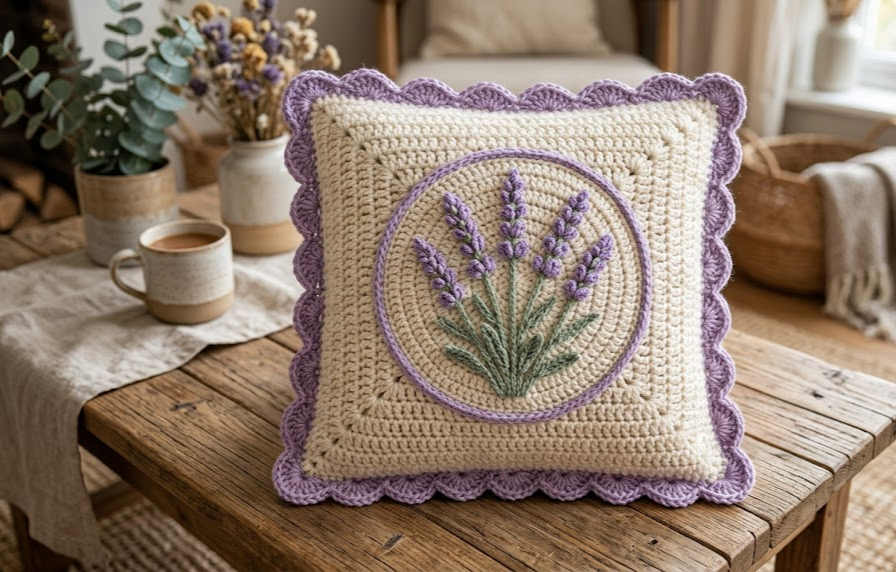
There’s something quietly magical about a cushion that captures a whole season in a single stitch. This Lavender Sprig Crochet Cushion does exactly that — a soft ivory canvas framed in a delicate lilac shell border, with a round medallion at its heart holding a sprig of hand-crafted lavender blooms. It feels like bringing a little piece of a French countryside garden indoors, minus the pollen and the watering can.
This pattern is perfect for crocheters who love texture-rich projects but still want a manageable, satisfying finish. It combines a classic granny-square base, a scalloped lace edging, and a beautiful lavender surface motif worked in loop stitch and bullion-style clusters. The result is a cushion that looks like it belongs in a boutique home shop, but was made by you, one row at a time.
Whether you’re decorating a reading nook, dressing up a window seat, or looking for a thoughtful handmade gift, this cushion strikes the perfect balance between cozy farmhouse charm and romantic cottagecore style. It’s an intermediate-level project, meaning you’ll want some comfort with basic stitches and simple lace patterns, but nothing here is out of reach with a little patience and a cup of tea nearby.
Let’s get into the details so you can start stitching your own lavender garden today.
|
Difficulty
Intermediate
|
Time
12–15 Hours
|
Hook Size
4mm (G/6)
|
Yarn Weight
DK / Light Worsted
|
Finished Size
40cm x 40cm
|
Gauge
- 18 stitches x 20 rows = 10cm x 10cm (4in x 4in) in double crochet (dc), using a 4mm (US G/6) hook
- Yarn used: DK (Light Worsted) weight, Category 3
- Always make a small gauge swatch before starting — cushion covers are forgiving, but an accurate gauge keeps your finished piece close to 40cm x 40cm
Materials List
- Ivory/cream DK weight yarn — approximately 250g (for the front and back panels)
- Lilac/lavender purple DK weight yarn — approximately 90g (for the trim and lace border)
- Sage green DK weight yarn — small amount, approximately 15g (for stems and leaves)
- Deep purple DK weight yarn — small amount, approximately 20g (for lavender flower clusters, slightly darker shade for depth)
- 4mm (US G/6) crochet hook
- 3.5mm (US E/4) crochet hook (for the tighter lace edging rounds, optional but recommended)
- Tapestry/yarn needle
- Stitch markers
- 40cm x 40cm cushion insert (or polyester fiberfill stuffing)
- Sewing pins (to hold layers in place during assembly)
- Scissors
Abbreviations Table
| Abbreviation | Meaning |
|---|---|
| ch | chain |
| sl st | slip stitch |
| sc | single crochet |
| hdc | half double crochet |
| dc | double crochet |
| tr | treble crochet |
| sk | skip |
| st(s) | stitch(es) |
| rep | repeat |
| sp | space |
| rnd(s) | round(s) |
| BLO | back loop only |
| MR | magic ring |
| picot | ch 3, sl st into first ch of the 3 to form a small bump |
| bullion st | wrap yarn around hook 6–8 times before pulling through all loops, creating a raised coiled bud shape |
| shell | (dc, ch 1, dc, ch 1, dc) worked into a single stitch or space, forming a fan shape |
| YO | yarn over |
Pattern Instructions
Part 1: Front Panel Base (Granny Square Foundation)
Technique note: A magic ring (MR) lets you start a round with a tight, adjustable center instead of a chain circle, so there’s no visible hole.
Using ivory yarn and 4mm hook:
Rnd 1: MR, ch 3 (counts as first dc), 2 dc into ring, ch 2, [3 dc into ring, ch 2] 3 times, join with sl st to top of ch 3. (12 dc, 4 ch-2 corner spaces)
Rnd 2: Sl st into next st and into corner ch-2 sp, ch 3, (2 dc, ch 2, 3 dc) into same corner sp, ch 1, [(3 dc, ch 2, 3 dc) into next corner sp, ch 1] 3 times, join. (24 dc, 4 corner spaces, 4 ch-1 spaces)
Rnd 3: Sl st into corner sp, ch 3, (2 dc, ch 2, 3 dc) into corner, ch 1, 3 dc into next ch-1 sp, ch 1, rep around, ending with 3 dc into last ch-1 sp before joining. (36 dc, 4 corners)
Rnds 4–7: Continue in established granny square pattern, adding one more 3-dc group per side each round, always working (3 dc, ch 2, 3 dc) into each corner space and ch 1 between groups. (Each round adds 12 dc total; by Rnd 7 you should have approximately 84 dc)
Work until the panel measures approximately 34cm x 34cm before edging, ending after a completed round with all corners finished. Fasten off ivory.
Part 2: Back Panel
Repeat Part 1 exactly to create a second matching ivory square. Set aside — this will be the back of the cushion.

Part 3: Lace Shell Border
Worked directly onto the front panel only, after the lavender medallion (Part 4) is complete and sewn on.
Attach lilac yarn into any corner ch-2 space of the front panel.
Rnd 1: Ch 3, 2 dc into same sp, ch 1, [sk 2 sts, shell (3 dc, ch 1, 3 dc) into next st, ch 1] around each side, working (3 dc, ch 2, 3 dc) into each corner. Join. (Stitch count will vary by panel size — count shells: approx 9 shells per side plus 4 corner shells)
Rnd 2: Sl st to first ch-1 sp of shell, ch 1, sc into same sp, ch 3, picot, ch 3, sc into next shell’s ch-1 sp, rep around, working an extra (sc, ch 3, picot, ch 3, sc) into each corner ch-2 sp for fullness. Join, fasten off. (Picot count = number of shells + 4 extra corner picots)
Rnd 3 (outer scallop): Attach lilac yarn into any picot loop. Ch 1, [5 tr into next ch-3 sp, sl st into next picot] around entire perimeter, working 7 tr into each corner picot loop for extra fullness at the corners. Join with sl st, fasten off, weave in ends. (Scallop count = total picot loops from Rnd 2)
Part 4: Lavender Medallion Frame
Using lilac yarn and 3.5mm hook:
Rnd 1: MR, ch 1, 12 sc into ring, join with sl st. (12 sc)
Rnd 2: Ch 1, 2 sc into each st around, join. (24 sc)
Rnd 3: Ch 1, [sc into next st, 2 sc into next st] rep around, join. (36 sc)
Rnd 4: Ch 3, dc into same st, [sk 1, (dc, ch 1, dc) into next st] rep around, join. (18 shells)
Rnd 5 (scalloped edge): Sl st into ch-1 sp, ch 1, (sc, hdc, dc, hdc, sc) into each ch-1 sp around, join, fasten off. (18 small scallops)
This medallion ring measures approximately 16cm across and frames the lavender embroidery motif. Set aside.
Part 5: Lavender Flower Clusters (Surface Embroidery Motif)
Technique note: These are worked as small bullion-stitch clusters directly onto scrap fabric-backed ivory crochet, then tacked onto the front panel center before the medallion ring is sewn over the edges. This mimics the raised “French knot” lavender bud texture seen in the photo.
Using deep purple yarn on a tapestry needle (not a hook) with the front panel as your base:
- Mark 5 stem points in a fan shape at the center of the ivory panel, spaced 1.5cm apart, angled slightly outward like a bouquet.
- For each stem, work 8–10 small bullion-stitch “buds” stacked closely along the top two-thirds of the stem line, each bud approximately 0.5cm long, alternating slightly left and right of the stem center to create a fluffy spike shape.
- Repeat for all 5 stems (main sprigs), plus 2 shorter accent sprigs of 5–6 buds each tucked at the base for fullness.

Part 6: Stems and Leaves
Using sage green yarn on a tapestry needle:
- Work a straight or lightly curved stem stitch (backstitch or stem stitch) from the base of each lavender spike down to a shared point about 2cm below, where all stems converge.
- Add 6–8 small lazy-daisy or straight leaf stitches, approximately 1cm long, branching off the lower stem area, angled outward like foliage.
Assembly Steps
- Center the completed lavender medallion frame (Part 4) over the embroidered lavender motif (Parts 5–6) on the front panel, aligning so the flower sprigs sit centered inside the ring, with about 2cm of ivory background visible above and below the motif.
- Pin the medallion in place, then sew around the inner edge (Rnd 1 of the medallion) using a whip stitch and ivory yarn, keeping stitches invisible in the seam.
- With lilac yarn, work the shell lace border (Part 3) around the entire outer edge of the front panel, as described above.
- Place the front and back panels wrong sides together, aligning all 4 corners.
- Using lilac yarn and a 4mm hook, sl st or sc the two panels together around 3 full sides, working through both layers along the outer shell round.
- Insert the 40cm x 40cm cushion form (or stuff evenly with fiberfill) through the open fourth side.
- Close the final side by sc-ing through both layers to match the other three sides, then fasten off and weave in all ends.
Beginner/Intermediate Tips
- Keep your granny square corners loose — tight corner stitches will pull the whole panel out of square and make the finished piece diamond-shaped instead of a true square.
- When working the bullion stitches for the lavender buds, wrap consistently (6–8 wraps every time) so all your buds are a uniform size — uneven wraps are the most common cause of a lumpy-looking lavender cluster.
- Block your granny square panel before adding the lace border. A damp press with a warm iron (or a spray-and-pin block) makes the shell stitches lay flatter and more even.
- If your picot loops in Rnd 2 of the border feel too tight to work into for Rnd 3, switch back up to the 4mm hook just for that round.
Variations
- Color swap: Use dusty rose or sunflower yellow for the flower clusters and a matching pastel for the shell trim, for a rose garden or wildflower version.
- Mini size: Make a 25cm x 25cm version using the same pattern with fewer granny square rounds, perfect as a small accent pillow or a lavender sachet cover.
- Two medallions: Add a second, smaller lavender medallion in one corner instead of centering just one, for an asymmetrical boho layout.
- No-trim modern version: Skip the shell lace border entirely and finish with a simple single crochet edge for a cleaner, more minimalist farmhouse look.
- Basket display: Instead of a cushion, mount the finished medallion motif alone onto a round embroidery hoop as standalone wall art.
Save this pattern now so you don’t lose it in your feed — tag your finished lavender cushion with #FoodiePlumCrochet so we can see your version bloom!



