
The Best Fluffy Pancakes recipe you will fall in love with. Full of tips and tricks to help you make the best pancakes.

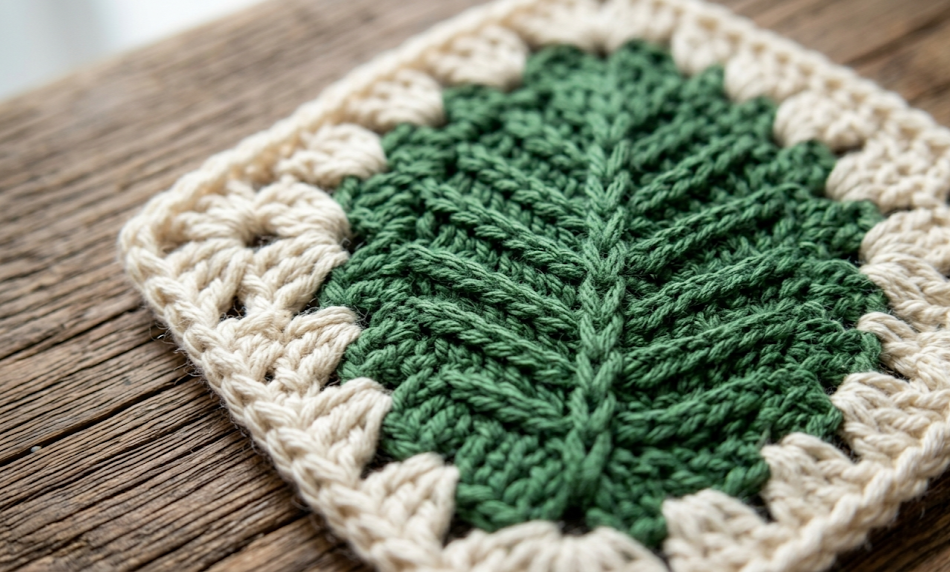
There is something undeniably satisfying about a granny square that tells a story. The Leaf Granny Square does exactly that — nestled at its center is a lush, dimensional crocheted leaf, complete with a defined midrib and elegant branching veins, all set against a classic cream open-work granny square background. The result is a block that feels simultaneously vintage and modern, botanical and geometric, cozy and refined.
This square is perfect for anyone who wants to take their granny square game beyond the basics. Whether you’re building a nature-inspired throw blanket, crafting a set of decorative cushion covers, or assembling a botanical tote bag, this 15 cm (6-inch) square is a versatile building block. It’s also an excellent standalone project — frame one, turn it into a coaster, or stitch a few together for a table runner. The cream-and-green colorway makes it feel fresh and organic, but as you’ll discover in the Variations section, the possibilities stretch well beyond that classic palette.
The pattern is rated intermediate, meaning you’ll want to be comfortable with basic stitches and simple shaping before diving in. If you can work a magic ring, execute a double crochet, and follow a granny square round without losing count, you are absolutely ready for this pattern.
| Difficulty | Time | Hook Size | Yarn Weight | Finished Size |
|---|---|---|---|---|
| Intermediate | 1.5 – 2.5 hrs | 4.0 mm (G/6) | DK / Light Worsted | ~15 × 15 cm (6″ × 6″) |
Gauge
Working in double crochet with a 4.0 mm (G/6) hook and DK weight yarn:
17 stitches and 9 rows = 10 cm × 10 cm (4 inches × 4 inches)
Always make a gauge swatch before beginning. Tension affects the finished size of the square, and consistent tension is especially important when making multiples for a larger project. If your swatch is smaller than specified, go up one hook size. If it is larger, go down one hook size.
Materials List
- Color A (Cream / Off-White): DK or light worsted weight yarn — approx. 25–30 g (55–65 yards)
- Color B (Forest Green): DK or light worsted weight yarn — approx. 15–20 g (35–45 yards)
- Crochet hook: 4.0 mm (US G/6)
- Yarn needle / tapestry needle for weaving in ends
- Scissors
- Stitch markers (optional but helpful for marking round starts)
- Blocking mat and pins (recommended for a neat, flat finish)
Abbreviations
| Abbreviation | Meaning |
|---|---|
| ch | chain |
| sl st | slip stitch |
| sc | single crochet |
| hdc | half double crochet |
| dc | double crochet |
| tr | treble crochet (yarn over twice) |
| BLO | back loop only — insert hook into the back loop of the stitch only |
| MR | magic ring — an adjustable loop used to start rounds worked in the round, which closes tightly to eliminate a hole at the center |
| sp | space |
| ch-sp | chain space |
| sk | skip |
| rep | repeat |
| pm | place marker |
| RS | right side |
| ( ) | stitch count at end of round/row |
Pattern Instructions
Part 1: The Leaf (Color B — Forest Green)
The leaf is worked flat in rows, beginning with a foundation chain, then building shape through increases and a central midrib.
Foundation:
Using Color B and a 4.0 mm hook, ch 13.
Row 1 (RS): Starting in the 2nd ch from hook, sc 1, hdc 1, dc 3, hdc 1, sc 1, sl st 1, then working the second side of the foundation chain (flip your work and insert the hook into the unused loops of the original ch on the underside — these are the bumps on the back of the chain), sc 1, hdc 1, dc 3, hdc 1, sc 2. (18 sts)
Note on working the second side of a chain: After completing the first side, do not turn. Instead, rotate the piece 180° and work back along the bottom bump loops of your original foundation chain. This creates a pointed, symmetrical leaf shape.
Row 2: Ch 1, turn. Sc 1 in first st. [Sc 1, hdc 1] in next st (increase made), hdc 1, dc 1, hdc 1, sc 1, sc 1 in the tip/turning point, sc 1, hdc 1, dc 1, hdc 1, [hdc 1, sc 1] in next st (increase made), sc 1. (20 sts)
Row 3: Ch 1, turn. Sc 1, hdc 1, dc 1, hdc 1, sc 2, sl st 1 in center tip, sc 2, hdc 1, dc 1, hdc 1, sc 1. (16 working sts + 1 sl st center)
Row 4 (Vein row — BLO): Ch 1, turn. Working in BLO only for this row, sc across all sts, sl st in center st. (All sts in BLO)
Note on BLO: Insert your hook under only the back loop of each stitch (the loop furthest from you). This leaves the front loop exposed, creating a visible ridge that mimics the veining on a real leaf.
Row 5: Ch 1, turn. Sc 1, [sc2tog] once, sc to 1 st before center, sc2tog over the 2 sts bracketing the center, sc to last 3 sts, [sc2tog] once, sc 1. (4 sts decreased)
Rep Rows 4–5 twice more, adjusting stitch count as the leaf narrows. (Leaf tip will naturally taper.)
Final row: Ch 1, turn. Sc2tog, sc to last 2 sts, sc2tog. Fasten off, leaving a 20 cm (8 inch) tail for attaching to the square later.
Block the leaf flat before assembly: pin to your blocking mat and lightly steam or wet block to coax open the vein ridges and flatten the shape.

Part 2: The Granny Square (Color A — Cream)
The square is worked in joined rounds from the center outward, with Color B used for the border.
Foundation Ring:
Using Color A, make a MR. (To make a MR: wrap yarn around two fingers to form a loop, insert hook through the loop, pull up a loop, ch 1 to secure, then work stitches into the center of the ring. Pull the tail to close the hole once Round 1 is complete.)
Round 1: Ch 3 (counts as first dc), dc 2 in MR, ch 2, dc 3 in MR, ch 2 3 times. Join with sl st to top of beginning ch-3. Pull tail snug to close center hole. (4 clusters of 3 dc, 4 ch-2 corner spaces)
Round 2: Sl st into ch-2 sp. Ch 3, dc 2 in same sp, ch 1, [dc 3, ch 2, dc 3] in next ch-2 corner sp, ch 1 3 times, dc 3 in same sp as start, ch 2. Join with sl st. (8 clusters, 4 ch-2 corners, 4 ch-1 side spaces)
Round 3: Sl st into ch-2 corner sp. Ch 3, dc 2 in same sp, ch 1, dc 3 in ch-1 sp, ch 1, [dc 3, ch 2, dc 3] in corner ch-2 sp, ch 1, dc 3 in ch-1 sp, ch 1 3 times, dc 3 in same corner as start, ch 2. Join with sl st. (12 clusters, 4 ch-2 corners, 8 ch-1 side spaces)
Round 4: Rep Round 3 pattern, adding one more dc-3 cluster per side. (16 clusters, 4 ch-2 corners, 12 ch-1 side spaces)
Round 5 (Border — Color B): Join Color B in any ch-2 corner sp. Ch 1, [sc 1, ch 1, sc 1] in corner sp, sc 1 in each dc and ch-1 sp across to next corner — rep for all 4 sides. Join with sl st. Fasten off and weave in end. (Approx. 4 corner sc-ch-sc + ~36 sc along sides — count will vary slightly based on tension)
Assembly Steps
- Weave in ends on both the leaf and the completed granny square before attaching.
- Position the leaf: Lay the blocked leaf face-up at the center of the granny square (RS facing). The tip of the leaf should point toward one corner of the square. The bottom of the leaf’s stem end should fall approximately 1 cm (½ inch) from the center of the square.
- Pin the leaf securely around its outer edges using stitch markers or sewing pins.
- Attach the leaf: Using the long tail left on the leaf and a tapestry needle, whip stitch around the entire perimeter of the leaf, catching both the leaf edge and the granny square fabric beneath. Keep stitches small and even — approximately every 3–4 mm — so the leaf lies flat without puckering.
- Secure the midrib: If your leaf has a pronounced central vein ridge, tack it down with 2–3 small invisible stitches at the center to prevent lifting.
- Final block: Once assembled, wet block the entire square. Pin to a 15 × 15 cm (6 × 6 inch) template on your blocking mat and allow to dry completely (usually 8–12 hours). This step is what gives the finished square its crisp, professional appearance.
Beginner / Intermediate Tips
Magic ring tension: The magic ring can feel awkward at first. If yours keeps unraveling, try wrapping the yarn twice around your fingers before inserting the hook. Pull the tail firmly after Round 1 is complete and lock it in place with a half hitch before continuing.
Granny square alignment: Always join your rounds with a slip stitch into the top of the beginning ch-3, not the first dc cluster. Joining in the wrong place shifts your corner alignment over time.
Leaf shaping: The leaf is intentionally worked tightly. If your leaf curls, do not panic — blocking will correct this completely. Resist the urge to go up a hook size to compensate.
BLO vein rows: It helps to use a stitch marker at the beginning of every BLO row so you don’t accidentally drop into both loops after the first few stitches.
Weaving in green ends: When weaving in Color B tails on the granny square border, run the tail through at least 3–4 stitches in the same color area so the green doesn’t peek through the cream work.

Variations
- Autumn Leaf Square: Work the leaf in shades of rust orange, burnt amber, or deep burgundy. Use an oatmeal-flecked tweed yarn for the granny square body for a cozy seasonal feel.
- Monochrome Botanical: Work both the leaf and the granny square in the same forest green but in two different textures — matte cotton for the square, shiny mercerized cotton for the leaf — so the design reads through sheen contrast rather than color contrast.
- Jumbo Floor Cushion Version: Scale up to chunky yarn with a 6.5 mm hook. Each square will measure approximately 25 × 25 cm (10 inches). Join 4 squares into a 2×2 grid and sew onto a pillow insert for a stunning botanical cushion cover.
- Mini Leaf Earrings: Using fingering weight yarn and a 2.0 mm hook, work only Part 1 (the leaf). Stiffen with fabric stiffener, block flat, and attach an earring finding to the tip. You’ll have the most charming botanical accessories for summer.
- Jungle Blanket: Work the Leaf Granny Square in five different leaf shapes — this pattern, a fern, a monstera, a cactus, and a succulent — all in varying greens, then join them alternating with solid cream squares for a lush indoor jungle throw.
Love this pattern? Save it to your Pinterest boards so you can find it anytime! Tag your finished squares with #FoodiePlumCrochet — we can’t wait to see your botanical beauties.



