The Best Fluffy Pancakes recipe you will fall in love with. Full of tips and tricks to help you make the best pancakes.
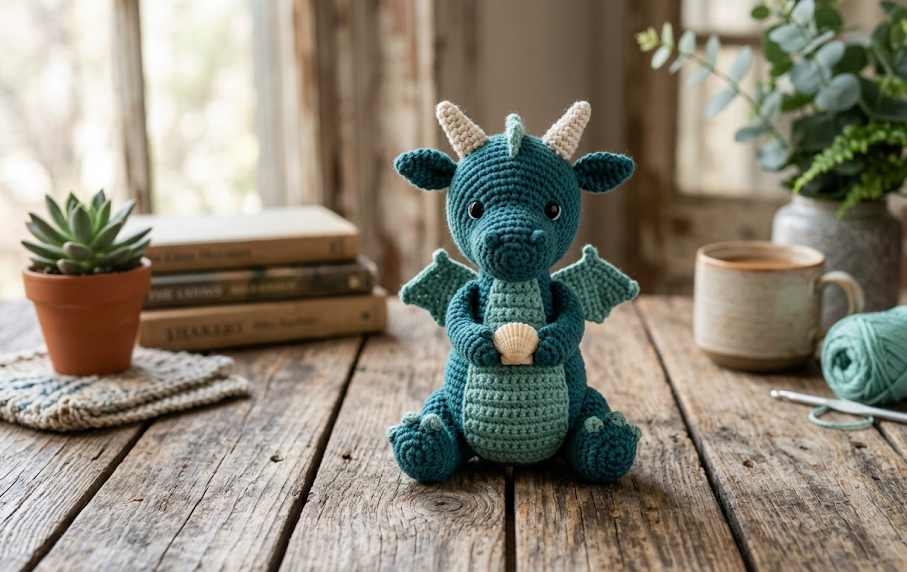
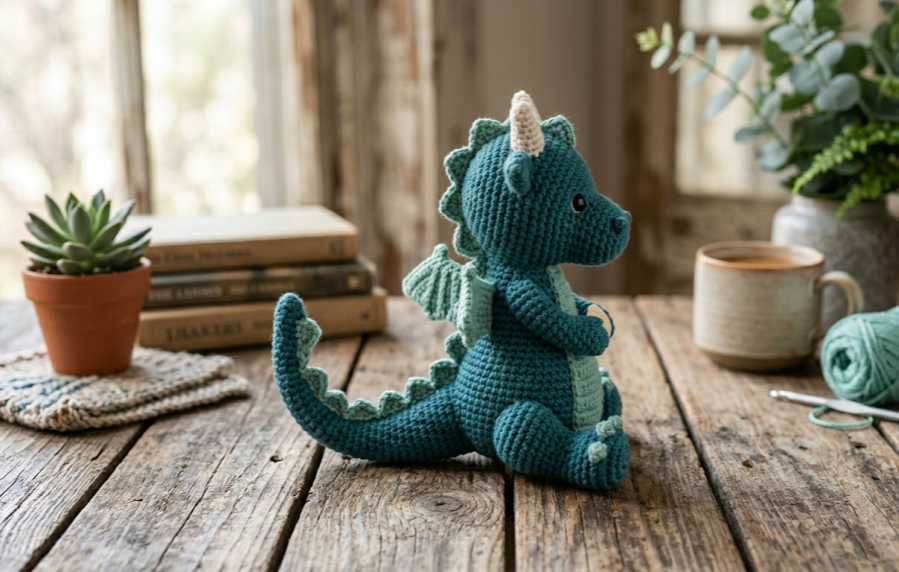
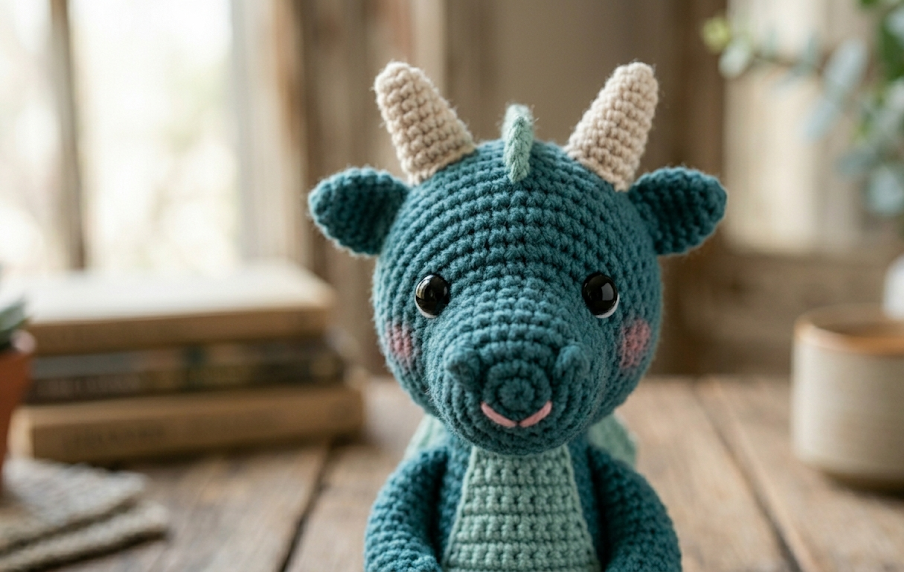
If you are searching for a magical, sea-inspired project to add to your handmade collection, look no further than Marina the Dragon. This adorable aquatic companion brings the enchanting mysteries of the deep ocean right to your crochet hook. With her striking deep teal body, contrasting seafoam green accents, gentle cream horns, and a precious little seashell cradled in her lap, Marina is designed to capture hearts. Whether you are looking to craft a whimsical nursery decoration, a unique gift for a fantasy lover, or a charming new mascot for your own workspace, this comprehensive, step-by-step pattern will guide you through creating your very own ocean-born friend.
Marina is an absolute joy to craft because her personality comes to life with every single piece you assemble. Her classic sitting posture makes her perfect for displaying on book shelves, desks, or bedside tables. Though she looks wonderfully intricate with her detailed wings, back spikes, and delicate facial expressions, the pattern breaks down into manageable sections that focus on clean, continuous rounds and simple shaping techniques. Grab your favorite yarn, settle into a cozy crafting nook, and let’s bring Marina the Dragon to life!
| Difficulty Intermediate | Time 5–7 Hours | Hook Size 3.5 mm (E) | Yarn Weight Worsted (Medium #4) | Finished Size 9 inches (23 cm) |
The Importance of Gauge in Amigurumi
When making toys, or amigurumi, maintaining a tight and even gauge is incredibly critical. If your stitches are too loose, the polyester fiberfill stuffing will peek through, ruining the seamless look of your dragon and allowing the shape to distort over time. While exact matching to a master sample is not strictly required for items that do not need to fit a human body, keeping your stitches compact ensures your dragon holds its form perfectly.
To test your tension before beginning Marina, crochet a small gauge swatch using the following specifications:
- Gauge Swatch: 20 single crochet stitches and 22 rows using a 3.5 mm (E) crochet hook and worsted weight yarn should equal a 10cm by 10cm (4 inch by 4 inch) square.
If your swatch turns out larger than 10cm, try switching to a smaller hook size (such as 3.25 mm) to tighten your stitches. If your swatch is smaller, your tension may be exceptionally tight, and you can move up to a 4.0 mm hook to achieve the desired texture.
Materials List
Before casting on your first stitch, gather all your tools and supplies. Having everything organized within arms’ reach will ensure a smooth, uninterrupted crafting experience.
- Yarn: Worsted weight yarn (Medium / Size 4) in the following colors:
- Deep Teal: Approx. 120 yards (Main body, head, arms, legs, and wing frames)
- Seafoam Green: Approx. 60 yards (Belly panel, wing membranes, back spikes, paw pads, and tail fin)
- Cream: Approx. 15 yards (Horns and optional mini shell accessory)
- Pink: Small scrap amount (For embroidering the delicate smile)
- Crochet Hook: 3.5 mm (Size E-4) aluminum or ergonomic crochet hook
- Safety Eyes: One pair of 12 mm black plastic safety eyes with secure backings
- Stuffing: High-quality 100% polyester fiberfill stuffing
- Notions: * Yarn needle (tapestry needle) with a large eye for weaving ends and assembly
- Stitch markers (essential for tracking continuous spiral rounds)
- Sharp scissors
- Optional: Pink powder blush and a cotton swab to add a soft tint to the cheeks
- Optional: A small, real decorative seashell if you prefer not to crochet one
Abbreviations Table
This pattern uses standard United States (US) crochet terminology. Refer to this convenient table if you need a quick reminder of any stitch abbreviations while working through the instructions.
| Abbreviation | Stitch / Technique Name |
| MR | Magic Ring (Magic Circle) |
| ch | Chain stitch |
| sc | Single crochet |
| inc | Increase (work 2 single crochet stitches into the same stitch) |
| dec | Invisible decrease (sc 2 stitches together using front loops only) |
| hdc | Half double crochet |
| dc | Double crochet |
| sl st | Slip stitch |
| BLO | Back Loops Only |
| st(s) | Stitch / Stitches |
| rnd(s) | Round / Rounds |
Pattern Instructions
1. Head
Using Deep Teal yarn. Worked in continuous spiral rounds.
- Rnd 1: Begin by making a Magic Ring (an adjustable loop that creates a seamless, hole-free starting circle), work 6 sc into the magic ring. Pull the yarn tail firmly to close the center hole. (6 sts)
- Rnd 2: Work 1 inc in each of the next 6 sts around. (12 sts)
- Rnd 3: Sc in the next st, inc in the next st repeat from * to * 6 times total. (18 sts)
- Rnd 4: Sc in each of the next 2 sts, inc in the next st repeat from * to * 6 times total. (24 sts)
- Rnd 5: Sc in each of the next 3 sts, inc in the next st repeat from * to * 6 times total. (30 sts)
- Rnd 6: Sc in each of the next 4 sts, inc in the next st repeat from * to * 6 times total. (36 sts)
- Rnd 7: Sc in each of the next 5 sts, inc in the next st repeat from * to * 6 times total. (42 sts)
- Rnd 8: Sc in each of the next 6 sts, inc in the next st repeat from * to * 6 times total. (48 sts)
- Rnds 9–15: Sc in each of the 48 sts around. (48 sts per round, 7 rounds total)
- Eye Placement: Pause here to insert the 12 mm safety eyes. Place them securely between Round 10 and Round 11, leaving an intellectual gap of approximately 8 to 9 stitches between them. Snap the plastic washer backings tightly onto the pins inside the head.
- Rnd 16: Sc in each of the next 6 sts, dec in the next st repeat from * to * 6 times total. Note: For the decrease (dec), use the invisible decrease technique by inserting your hook into the front loops only of the next two stitches, yarn over, pull through both loops, yarn over, and pull through remaining loops to keep the stitch smooth. (42 sts)
- Rnd 17: Sc in each of the next 5 sts, dec in the next st repeat from * to * 6 times total. (36 sts)
- Rnd 18: Sc in each of the next 4 sts, dec in the next st repeat from * to * 6 times total. (30 sts)
- Rnd 19: Sc in each of the next 3 sts, dec in the next st repeat from * to * 6 times total. (24 sts)
- Begin stuffing the head firmly with polyester fiberfill, making sure to push stuffing evenly toward the sides to round out the cheeks.
- Rnd 20: Sc in each of the next 2 sts, dec in the next st repeat from * to * 6 times total. (18 sts)
- Rnd 21: Sc in the next st, dec in the next st repeat from * to * 6 times total. (12 sts)
- Finish stuffing the head firmly until it holds a perfectly plump sphere shape.
- Rnd 22: Work 6 dec around. (6 sts)
- Fasten off, leaving a short tail. Weave the yarn tail through the front loops of the remaining 6 stitches, pull tight to close the opening, and hide the thread inside the head.
2. Horns (Make 2)
Using Cream yarn. Worked in continuous spiral rounds.
- Rnd 1: Work 4 sc into a Magic Ring. (4 sts)
- Rnd 2: Sc in the next st, inc in the next st repeat from * to * 2 times total. (6 sts)
- Rnd 3: Sc in each of the 6 sts around. (6 sts)
- Rnd 4: Sc in each of the next 2 sts, inc in the next st repeat from * to * 2 times total. (8 sts)
- Rnd 5: Sc in each of the 8 sts around. (8 sts)
- Rnd 6: Sc in each of the next 3 sts, inc in the next st repeat from * to * 2 times total. (10 sts)
- Rnds 7–9: Sc in each of the 10 sts around. (10 sts per round, 3 rounds total)
- Fasten off, leaving a 10-inch long tail for sewing. Stuff the horns lightly with fiberfill so they keep a slightly curved shape.
3. Ears & Frills (Make 2 of Each Component)
Ears (Make 2 in Deep Teal)
- Rnd 1: Work 4 sc into a Magic Ring. (4 sts)
- Rnd 2: Sc in the next st, inc in the next st repeat from * to * 2 times total. (6 sts)
- Rnd 3: Sc in each of the next 2 sts, inc in the next st repeat from * to * 2 times total. (8 sts)
- Rnd 4: Sc in each of the next 3 sts, inc in the next st repeat from * to * 2 times total. (10 sts)
- Fasten off, press flat (do not stuff), and leave a sewing tail.
Frills (Make 2 in Seafoam Green)
- Ch 6. Working into the second chain from your hook, sc 1, hdc 1, dc 1, hdc 1, sc 1. (5 sts)
- Fasten off. Sew one seafoam green frill directly onto the flat base of each deep teal ear to create a multi-layered dragon ear.
4. Body
Using Deep Teal yarn. Worked in continuous spiral rounds.
- Rnd 1: Work 6 sc into a Magic Ring. (6 sts)
- Rnd 2: Work 1 inc in each of the next 6 sts around. (12 sts)
- Rnd 3: Sc in the next st, inc in the next st repeat from * to * 6 times total. (18 sts)
- Rnd 4: Sc in each of the next 2 sts, inc in the next st repeat from * to * 6 times total. (24 sts)
- Rnd 5: Sc in each of the next 3 sts, inc in the next st repeat from * to * 6 times total. (30 sts)
- Rnd 6: Sc in each of the next 4 sts, inc in the next st repeat from * to * 6 times total. (36 sts)
- Rnd 7: Sc in each of the next 5 sts, inc in the next st repeat from * to * 6 times total. (42 sts)
- Rnds 8–14: Sc in each of the 42 sts around. (42 sts per round, 7 rounds total)
- Rnd 15: Sc in each of the next 5 sts, dec in the next st repeat from * to * 6 times total. (36 sts)
- Rnds 16–17: Sc in each of the 36 sts around. (36 sts)
- Rnd 18: Sc in each of the next 4 sts, dec in the next st repeat from * to * 6 times total. (30 sts)
- Rnds 19–20: Sc in each of the 30 sts around. (30 sts)
- Rnd 21: Sc in each of the next 3 sts, dec in the next st repeat from * to * 6 times total. (24 sts)
- Rnds 22–23: Sc in each of the 24 sts around. (24 sts)
- Stuff the body heavily, emphasizing a wide, heavy base so your dragon can sit perfectly without tipping over.
- Rnd 24: Sc in each of the next 2 sts, dec in the next st repeat from * to * 6 times total. (18 sts)
- Fasten off, leaving an extra-long 15-inch tail to securely attach the body to the head later.
5. Belly Panel
Using Seafoam Green yarn. Worked in flat rows; chain 1 at the end of rows does not count as a stitch.
- Row 1: Ch 7, starting in the second ch from hook, sc in each of the 6 chains across, turn. (6 sts)
- Row 2: Ch 1, inc in the first st, sc in each of the next 4 sts, inc in the last st, turn. (8 sts)
- Rows 3–10: Ch 1, sc across all 8 sts, turn. (8 sts per row, 8 rows total)
- Row 11: Ch 1, dec, sc in next 4 sts, dec, turn. (6 sts)
- Rows 12–16: Ch 1, sc across all 6 sts, turn. (6 sts per row, 5 rows total)
- Row 17: Ch 1, dec, sc in next 2 sts, dec, turn. (4 sts)
- Rows 18–20: Ch 1, sc across all 4 sts, turn. (4 sts)
- Fasten off, leaving a long yarn border tail. Sew this panel to the front center of the dragon’s body during final assembly.
6. Arms & Hands (Make 2)
Using Deep Teal and Seafoam Green yarn.
- Rnd 1: Using Deep Teal, work 6 sc into a Magic Ring. (6 sts)
- Rnd 2: Sc in the next st, inc in the next st repeat from * to * 3 times total. (9 sts)
- Rnds 3–10: Sc in each of the 9 sts around. (9 sts)
- Stuff the lower hand area lightly. Do not stuff the upper half of the arm.
- Claw Detail: Join Seafoam Green yarn at the tip tip of the hand. Work 3 separate small bobble stitches or tiny chains (ch 2, sl st back into base) across the front edge to represent 3 tiny seafoam claws.
- Fasten off, leaving a tail for sewing. Press the top edge flat and sew the opening closed.
7. Wings (Make 2)
Each wing consists of a deep teal support frame and a seafoam green inner membrane.
Wing Membrane (Make 2 in Seafoam Green)
- Row 1: Ch 11, starting in second ch from hook, sc 10, turn. (10 sts)
- Row 2: Ch 1, sc 8, leave the remaining 2 sts unworked to create a scalloped ridge effect, turn. (8 sts)
- Row 3: Ch 1, working in BLO (Back Loops Only to create a textured, ribbed ridge), sc 8, turn. (8 sts)
- Row 4: Ch 1, sc 6, leave remaining 2 sts unworked, turn. (6 sts)
- Fasten off.
Wing Frame (Make 2 in Deep Teal)
- Ch 12. Fasten off.
- Pin the Deep Teal chain along the top, straight edge of the Seafoam Green membrane. Using your yarn needle, sew the frame and membrane securely together. This builds a rigid, beautiful dragon wing.
8. Back Spikes (Make 4)
Using Seafoam Green yarn. Worked in continuous rounds.
- Rnd 1: Work 4 sc into a Magic Ring. (4 sts)
- Rnd 2: Sc in the next st, inc in the next st repeat from * to * 2 times total. (6 sts)
- Rnd 3: Sc in each of the next 2 sts, inc in the next st repeat from * to * 2 times total. (8 sts)
- Fasten off, leaving a sewing tail. Do not stuff. Flatten into triangles.
9. Feet (Make 2)
Using Deep Teal and Seafoam Green yarn.
- Rnd 1: Using Deep Teal, work 6 sc into a Magic Ring. (6 sts)
- Rnd 2: Work 1 inc in each of the next 6 sts around. (12 sts)
- Rnd 3: Sc in the next st, inc in the next st repeat from * to * 6 times total. (18 sts)
- Rnds 4–7: Sc in each of the 18 sts around. (18 sts)
- Rnd 8: Sc in the next st, dec in the next st repeat from * to * 6 times total. (12 sts)
- Stuff the foot firmly with fiberfill.
- Rnd 9: Work 6 dec around. (6 sts)
- Fasten off, leaving a tail. Weave tight to close.
- Paw Pads: Using your yarn needle and Seafoam Green yarn, embroider 3 small circular satin-stitch dots on the tips of each foot to look like rounded webbed toes.
10. Tail
Using Deep Teal yarn. Worked in continuous spiral rounds.
- Rnd 1: Work 4 sc into a Magic Ring. (4 sts)
- Rnd 2: Sc in each of the 4 sts around. (4 sts)
- Rnd 3: Sc in the next st, inc in the next st repeat from * to * 2 times total. (6 sts)
- Rnd 4: Sc in each of the 6 sts around. (6 sts)
- Rnd 5: Sc in each of the next 2 sts, inc in the next st repeat from * to * 2 times total. (8 sts)
- Rnd 6: Sc in each of the 8 sts around. (8 sts)
- Rnd 7: Sc in each of the next 3 sts, inc in the next st repeat from * to * 2 times total. (10 sts)
- Rnds 8–15: Continuing in this expansion pattern, add 2 increases every second round until your tail reaches a total width of 24 stitches. (24 sts)
- Stuff the tail moderately with fiberfill, ensuring it remains bendable and plush.
- Tail Fin Accent: Using Seafoam Green yarn, attach yarn directly to the narrow tip of the tail (Rnd 1) and work a small leaf pattern: (ch 4, hdc 2, sc 1, sl st) into the side to give Marina a majestic mermaid-like tail fin.
Assembly Steps
        [ Horns ]   [ Horns ]
       [Ear/Frill] [Head] [Ear/Frill]
                 \   |   /
               [  Body  ]  --- [ Wings ]
              /    /  \   \
        [Belly] [Arms] [Feet] [Tail]
- Connecting the Head and Body: Position the stuffed open end of the body (Round 24) against the bottom base of the head (around Round 19). Using your yarn needle and the long tail left from the body, whipstitch around the 18 matching stitches. Pull your stitches incredibly tight and add a tiny extra bit of stuffing just before closing to prevent any “wobbly head” syndrome.
- Attaching the Belly Panel: Centering it nicely with the facial features, pin the Seafoam Green belly panel flat against the front of the body. The top edge should rest right beneath the neckline, and the wider base should curve down toward the bottom of the body. Sew around the perimeter using a clean running stitch.
- Placing the Horns and Ears: * Sew the two cream horns to the absolute top of the head between Rounds 4 and 6, leaving roughly 3 stitches of space between them.
- Position the assembled ears/frills slightly lower on the sides of the head, approximately aligned with Rounds 8 to 10 (just a couple of rows above and behind the safety eyes).
- Securing the Feet and Seating: Pin the two completed feet to the bottom sides of the body. To ensure Marina sits perfectly flat on flat surfaces without tipping over, place the dragon on a flat table while pinning, adjusting the feet so they act as stable outriggers. Stitch them securely to the body across Rounds 6 through 9.
- Attaching the Tail: Pin the wide open base of the tail to the lower center back of the body, right where it touches the table. Sew it firmly around the edge. The tail should curl gracefully around the side of the dragon’s body to help support her seated posture.
- Mounting the Back Spikes: Line up the 4 small triangular seafoam spikes in a straight vertical column down the exact center line of the dragon’s back. The highest spike should sit right at the base of the skull, and the remaining 3 should follow down the spine, ending right where the tail begins.
- Adding Wings and Arms:
- Sew the flat upper edges of the wings onto the upper back, approximately 2 rows down from the neck joint and 4 stitches apart.
- Position the arms on the sides of the body right below the neck line. Angling them slightly forward allows her little hands to gently touch across the upper edge of her seafoam green belly panel.
Beginner/Intermediate Tips
- Master the Invisible Decrease: When executing decreases on the head and body, always use the invisible decrease method (insert hook into front loops only of the next two stitches, yarn over, pull through, yarn over, pull through). This prevents unsightly gaps or bumps from forming in your amigurumi work.
- Stitch Markers Are Non-Negotiable: Because this pattern is worked in a continuous spiral without joining each round with a slip stitch, it is very easy to lose track of your placement. Place a locking stitch marker in the very first stitch of every round and move it up as you progress.
- Embroidering Facial Features: To make sure your embroidered pink smile looks symmetrical, use straight sewing pins to mark the corners of the mouth before pulling your yarn through. This allows you to preview the expression before committing to permanent stitches.
Variations
- The Pastel Guardian: Swap out the deep teal and seafoam green for a soft pastel lilac main body combined with buttercup yellow accents. This creates a dreamy, whimsical dragon ideal for a fairytale-themed nursery.
- The Jumbo Companion: Use a thick blanket-style plush chenille yarn paired with an 8.0 mm crochet hook. This transforms the 9-inch tabletop Marina into a massive, ultra-huggable, oversized couch pillow.
- The Sparkly Deep Sea Serpent: Use a deep teal yarn that features a thin metallic thread woven directly into it. The subtle metallic shimmer mimics the iridescent glow of deep-sea marine life whenever it catches the light.
- The Seasonal Guardian: Instead of a seashell, crochet a tiny pumpkin for autumn or a tiny crimson heart for Valentine’s Day, and place it inside Marina’s hands to customize her for different seasons throughout the year!