
The Best Fluffy Pancakes recipe you will fall in love with. Full of tips and tricks to help you make the best pancakes.

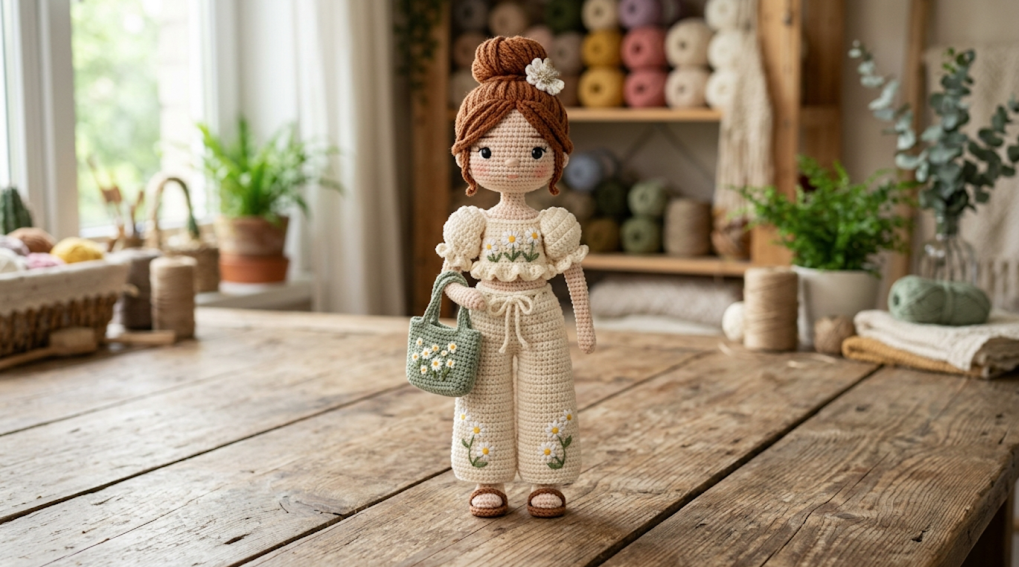
There’s something about a doll dressed head to toe in tiny daisies that makes a room feel instantly warmer, and that’s exactly the spirit behind the Daisy Meadow Boho Doll. With her messy top bun, soft curls framing her face, a breezy ruffled crop top, drawstring wide-leg pants scattered with embroidered flowers, a little sage green tote bag, and barefoot-style sandals, she looks like she just wandered out of a sunlit garden. This pattern is a love letter to spring, to handmade keepsakes, and to anyone who loves the slow, satisfying process of building a character one stitch at a time.
This doll is best suited for confident intermediate crocheters who are ready to level up, or advanced crocheters who enjoy multi-piece projects with lots of small details. Between the sculpted head and limbs, the layered hairstyle, the fitted outfit, the woven bag, and the floral appliqués, there’s a lot going on, but none of it is technically difficult on its own. It’s simply a project that rewards patience. Once finished, she makes a gorgeous shelf companion, a thoughtful handmade gift, a nursery decoration, or the centerpiece of a spring-themed photo set. Crafters who enjoy amigurumi people, fairycore decor, or cottagecore-inspired handmade pieces will find this one especially satisfying to make.
Before diving into the pattern, take a moment to read through the whole thing once. Doll patterns have a lot of small parts, and knowing the order of assembly ahead of time will save you from extra unraveling later.

|
Difficulty
Advanced
|
Time
18–22 Hours
|
Hook Size
2.5mm (C/2)
|
Yarn Weight
DK (#3)
|
Finished Size
30cm (12in)
|
Gauge
Gauge matters more for dolls than almost any other amigurumi project, because it determines whether the head, body, and limbs end up proportional to one another. For this pattern:
- 18 stitches x 20 rows = 10cm x 10cm square, worked in single crochet
- Yarn used for gauge swatch: DK weight (Light Worsted, Weight #3)
- Hook used for gauge swatch: 2.5mm (US C/2)
- Work at a tight tension throughout. A looser gauge will let stuffing peek through the stitches and make the doll’s shape look lumpy rather than smooth.
Always crochet a quick swatch before starting the head. If your swatch comes out larger than 10cm, drop to a smaller hook; if it’s smaller, size up slightly.
Materials List
Yarn (DK weight, cotton or cotton-acrylic blend recommended for stitch definition):
- Vanilla / Light Beige (skin) – approx. 50g
- Chestnut Brown (hair) – approx. 30g
- Ivory / Cream (top and pants) – approx. 60g
- Sage Green (bag, leaves, drawstring trim) – approx. 15g
- White (flower petals) – approx. 10g
- Soft Yellow (flower centers and petals) – approx. 5g
- Peach / Coral (flower accents) – approx. 5g
- Chocolate Brown (sandals) – approx. 5g
Hook:
- 2.5mm (US C/2) for all main pieces
- 2mm hook optional, for extra-fine flower detailing
Notions:
- Polyester fiberfill stuffing
- 2 x 8mm black safety eyes, or black embroidery floss for embroidered eyes
- Brown and black embroidery floss (eyebrows, eyelashes, mouth)
- Yarn / tapestry needle
- Stitch markers (locking ones work best)
- Small sharp scissors
- 2 small wooden beads (for the drawstring ends)
- 15cm of 18–20 gauge floral wire (optional, for bun support)
- Pink chalk pastel or matte blush powder, plus a cotton swab (for cheeks)
- A pencil or chopstick (for stuffing and for setting hair curls)
- Straight pins (for blocking flower motifs)
Abbreviations Table
| Abbreviation | Meaning |
|---|---|
| ch | chain |
| sc | single crochet |
| hdc | half double crochet |
| dc | double crochet |
| sl st | slip stitch |
| inc | increase (2 sc in same stitch) |
| dec | decrease (single crochet 2 stitches together) |
| MR | magic ring |
| BLO | back loop only |
| FLO | front loop only |
| st(s) | stitch(es) |
| rnd(s) | round(s) |
| rep | repeat |
| sk | skip |
| tog | together |
| ( ) | stitch count at end of round/row |
Pattern Instructions
Technique note – Magic Ring (MR): This is a starting method that lets you crochet a tight, adjustable loop instead of chaining and joining, which avoids the small hole you’d otherwise get at the center of a round. Wrap the yarn around two fingers, pull a loop through, and crochet your first round of stitches into that loop before pulling the tail to close it.
Head
Worked in Vanilla.
- Rnd 1: MR, 6 sc (6)
- Rnd 2: inc in each st around (12)
- Rnd 3: sc1, inc rep x6 (18)
- Rnd 4: sc2, inc rep x6 (24)
- Rnd 5: sc3, inc rep x6 (30)
- Rnd 6: sc4, inc rep x6 (36)
- Rnd 7: sc5, inc rep x6 (42)
- Rnds 8–15: sc even, 8 rounds total (42)
- Insert safety eyes between rounds 9 and 10, spaced 7–8 stitches apart
- Rnd 16: sc5, dec rep x6 (36)
- Rnd 17: sc4, dec rep x6 (30)
- Rnd 18: sc3, dec rep x6 (24)
- Begin stuffing firmly, adding small amounts at a time and pushing into the cheeks and chin with a chopstick
- Rnd 19: sc2, dec rep x6 (18)
- Rnd 20: sc1, dec rep x6 (12)
- Finish stuffing
- Rnd 21: dec around (6)
- Fasten off, pull tail through remaining stitches to close
Body (with legs joined at the hip)
Legs (make 2), worked in Ivory for the pant section, switching colors only if you want bare feet showing; here legs are crocheted as part of the pants, so use Ivory throughout the leg and Vanilla only if you prefer visible ankles.
- Rnd 1: MR, 6 sc (6)
- Rnd 2: inc around (12)
- Rnd 3: sc1, inc rep x6 (18)
- Rnds 4–5: sc even (18)
- Rnd 6: sc1, dec rep x6 (12)
- Rnds 7–20: sc even, 14 rounds (12)
- Fasten off Leg 1. Stuff lightly. Do not fasten off Leg 2.
Joining legs and working the body:
- Rnd 21: sc 12 across Leg 1, sc 12 across Leg 2 (24) — place a stitch marker here to mark the new round start
- Rnd 22: sc even (24)
- Rnd 23: sc3, inc rep x6 (30)
- Rnds 24–26: sc even, 3 rounds (30)
- Rnd 27: sc3, dec rep x6 (24)
- Rnds 28–30: sc even, 3 rounds (24)
- Rnd 31: sc2, dec rep x6 (18)
- Rnd 32: sc even (18)
- Stuff the body firmly, then fasten off leaving a long tail for sewing the head on
Arms (make 2)
Worked in Vanilla.
- Rnd 1: MR, 6 sc (6)
- Rnd 2: inc around (12)
- Rnd 3: sc even (12)
- Rnd 4: sc2, dec rep x3 (9)
- Rnds 5–16: sc even, 12 rounds (9)
- Fasten off, leaving an opening at the top for sewing. Stuff lightly, leaving the very top 1cm unstuffed so the arm can be flattened slightly when sewn on.
Hair Cap and Bun
Hair Cap, worked in Chestnut Brown:
- Rnd 1: MR, 6 sc (6)
- Rnd 2: inc around (12)
- Rnd 3: sc1, inc rep x6 (18)
- Rnd 4: sc2, inc rep x6 (24)
- Rnd 5: sc3, inc rep x6 (30)
- Rnd 6: sc4, inc rep x6 (36)
- Rnd 7: sc5, inc rep x6 (42)
- Rnds 8–12: sc even, 5 rounds (42)
- Fasten off, leaving a long tail for sewing onto the head
Bun, worked in Chestnut Brown:
- Rnd 1: MR, 6 sc (6)
- Rnd 2: inc around (12)
- Rnd 3: sc even (12)
- Rnd 4: dec around (6)
- Stuff lightly, fasten off, leaving a tail for sewing
Technique note – Fringe for bangs and ringlets: Cut 10cm lengths of Chestnut Brown yarn. Fold a length in half, insert your hook into a stitch on the hair cap from back to front, hook the folded loop and pull it partway through, then pull the two yarn tails through that loop and tighten into a knot. Repeat across the front hairline for bangs and down the sides for ringlets.
Technique note – Setting curls: Wrap a fringe strand tightly around a pencil or chopstick, hold it over steam from a kettle for 5–8 seconds (keep fingers a safe distance from the steam), then let it cool completely before unwinding. This sets a lasting curl shape.
Daisy Flower Motif (make 1 for the top, 4 for the pants, 3 for the bag, 2 for the hair clip — adjust quantity to taste)
- Rnd 1: MR, ch 1 (does not count as st), sc1, ch2 rep x5 into ring, join with sl st to first sc (5 ch-2 spaces)
- Petal Rnd: in each ch-2 space work (sc1, hdc1, dc1, hdc1, sc1), join with sl st to first st (5 petals)
- Fasten off, leaving a tail for sewing
- With a small scrap of Soft Yellow, sew 3–4 short straight stitches into the flower center to create the daisy’s middle
Leaf Motif (make as many as needed — approximately 6–8)
- Ch 8
- Starting in the 2nd ch from hook: sc1, hdc1, dc4, hdc1, sc1
- Ch 1, then turn to work into the unused loops along the bottom of the starting chain (technique note: this is the “second side of the chain” — flip the chain over and you’ll see a row of loops left untouched on the underside; work into those to mirror the first side and close the leaf shape)
- sc1, hdc1, dc4, hdc1, sc1
- Sl st to close (12 sts total)
- Fasten off, leaving a tail for sewing
Top (ruffled puff-sleeve crop top)
Worked in Ivory.
Bodice:
- Ch 24, join with a sl st to form a ring, being careful not to twist the chain
- Rnd 1: ch 1, sc in each ch around (24)
- Rnds 2–8: sc even, 7 rounds (24)
- Fasten off
Ruffled neckline: Join yarn at the top edge. Work (sc1, hdc1, dc1, hdc1, sc1) into every other stitch around (this shell pattern creates the flared ruffle look). Fasten off.
Sleeves (make 2):
- Ch 10, join in a ring
- Rnd 1: sc around (10)
- Rnd 2: inc evenly around to reach 15 sts total (15)
- Rnd 3: sc even (15)
- Rnd 4: work the same shell-stitch ruffle as the neckline around the sleeve edge
- Fasten off
Sew the sleeves to the top of the bodice at the shoulder seams, then sew a Daisy Flower Motif and a small leaf to the front.
Pants (wide-leg, drawstring waist)
Worked in Ivory.
Each leg (make 2):
- Ch 16, join in a ring
- Rnds 1–12: sc even, 12 rounds (16)
- Fasten off Leg 1. Do not fasten off Leg 2.
Join legs:
- Rnd 13: sc 16 across Leg 1, sc 16 across Leg 2 (32)
- Rnds 14–15: sc even, 2 rounds (32)
- Rnd 16 (eyelet round): sc3, ch2, sk2 rep around (creates 8 small eyelets for the drawstring)
- Rnds 17–18: sc even, working sc into both the ch-2 spaces and the regular stitches to keep the count at 32, 2 rounds (32)
- Fasten off
Drawstring: Chain a cord approximately 40cm long (or twist two strands of yarn together for a sturdier cord). Thread it through the eyelet round, knotting it at the front. Thread a small wooden bead onto each cord tail and tie an overhand knot just below each bead to hold it in place.
Sew 4 Daisy Flower Motifs and several leaves diagonally down the front of each pant leg, scattering them from hip to ankle as a meadow trail.
Bag
- Rnd 1: MR, 6 sc (6)
- Rnd 2: inc around (12)
- Rnd 3: sc1, inc rep x6 (18)
- Rnds 4–13: sc even, 10 rounds (18)
- Fasten off
Handle: Ch 18, sc back across the chain (17). Fasten off and sew the ends to opposite sides of the bag opening.
Sew 3 Daisy Flower Motifs and a few leaves to the front of the bag. Optional: cut a small circle of stiff plastic or cardboard and slip it into the base of the bag before lightly stuffing, to help it hold its shape.
Sandals (make 2)
Worked in Chocolate Brown.
- Rnd 1: ch 7. Working around the chain: sc 5 along one side, 3 sc into the last ch (toe end), sc 5 back along the other side, 2 sc into the end (16)
- Rnd 2: sc even (16)
- Fasten off
Straps: Make a toe strap by chaining 8, and an ankle strap by chaining 10. Sew the toe strap so it sits between where the first and second toes would be, and sew the ankle strap around the back of the ankle, mimicking a simple thong sandal.
Face Embroidery
Using black embroidery floss, stitch the eyelashes as 3 short straight stitches fanning out from the outer corner of each eye. Using brown floss, embroider a thin arched eyebrow above each eye. Add a small straight or gently curved stitch in soft pink or red for the mouth. For the cheeks, dab a small amount of pink chalk pastel or matte blush powder onto a cotton swab and gently buff it onto the cheeks in a circular motion for a soft, natural flush.
Assembly Steps
- Stuff the head firmly before closing, making sure there are no soft spots near the eyes or chin.
- Sew the head to the neck opening of the body, aligning the face forward and hiding the seam under where the hairline will sit.
- Sew the arms to the sides of the body at shoulder height, angled very slightly forward, positioning them about 1–1.5cm below the neck seam.
- Pin the hair cap over the head starting at the center back and working forward, stopping the front edge about 1cm above where the eyebrows sit, then sew in place.
- Sew the bun to the crown of the head, positioned roughly 3–4cm back from the front hairline and centered side to side.
- Add fringe strands for bangs along the front hairline and ringlets along both sides of the face, trimming each piece to about 4–5cm long once curled and set.
- Sew or glue a small Daisy Flower Motif (with a tiny leaf) to one side of the bun, about 1cm from its base.
- Dress the doll: fit the pants on first, pulling them up to the waist, then add the top over the torso. Because this outfit is sewn directly onto the body rather than removable, tack the waistband and shoulder seams in place with a few small stitches so the clothing doesn’t shift.
- Tie the drawstring into a small bow at the center front of the waistband, letting the beaded cord ends hang about 2cm below the knot.
- Attach the sandal straps to each foot, positioning the toe strap between the toes and the ankle strap around the back of the heel, securing with a few small stitches.
- Sew the bag handle over one hand or forearm so the bag itself rests against the hip, at roughly mid-thigh height.
- Finish with the face embroidery and cheek blush as the very last step, once all the hair is in place, so you can balance the features against the finished hairstyle.
- Lightly steam-block all flower motifs flat before final placement if any have curled or puckered.
Tips for Beginner and Intermediate Crocheters
- Use a stitch marker at the start of every round. Doll pieces are made of many short rounds, and it’s very easy to lose track of where a round begins, especially through the increase and decrease sequences on the head.
- Stuff in small pinches rather than large clumps, and use a chopstick or the blunt end of a pencil to push stuffing into corners like the chin, cheeks, and fingertips so the shape stays smooth rather than lumpy.
- When working the invisible decrease at the very top of the head, insert your hook into the front loops only of the next two stitches, yarn over, and pull through both loops at once. This creates a much smoother, less visible closure than a standard decrease.
- Block every flower motif before sewing it on: pin each one right-side up to a towel and hover a steam iron just above it (without touching) for a few seconds, then let it cool flat. This keeps the petals crisp and even instead of curling inward.
- When sewing small details like sandal straps or hair clips, split your yarn into a thinner strand or use embroidery floss instead, since a full strand of DK yarn can look bulky in tight spots.
- Take a photo of the doll’s face after placing the eyes but before sewing the head closed. It’s much easier to reposition eyes at this stage than after the head is fully assembled.
Variations
- Lilac Fields Doll: Swap the ivory top and pants for soft lilac, and the daisies for tiny lavender-toned flowers, for a dreamy purple-hued version.
- Autumn Harvest Doll: Replace the floral appliqués with miniature crocheted pumpkins, acorns, and golden leaves for a cozy fall-themed companion.
- Mini Meadow Doll: Work the entire pattern in fingering weight yarn with a 2mm hook for a petite 18cm version, perfect as a keychain or ornament.
- Shelf-Sitter Doll: Add a small crocheted stool or bench so the doll can sit with her legs dangling over the edge of a shelf, rather than standing.
- Beach Picnic Doll: Swap the messy bun and ringlets for two low side braids, add a tiny crocheted sun hat, and use a striped tote instead of the floral bag for a summery picnic theme.
Save This for Later!
If you loved this Daisy Meadow Boho Doll pattern, pin this post so you can find it again whenever you’re ready to start! Share your finished doll and tag your progress photos with #FoodiePlumCrochet — there’s nothing we love more than seeing these little floral friends come to life in different colorways.



