
The Best Fluffy Pancakes recipe you will fall in love with. Full of tips and tricks to help you make the best pancakes.

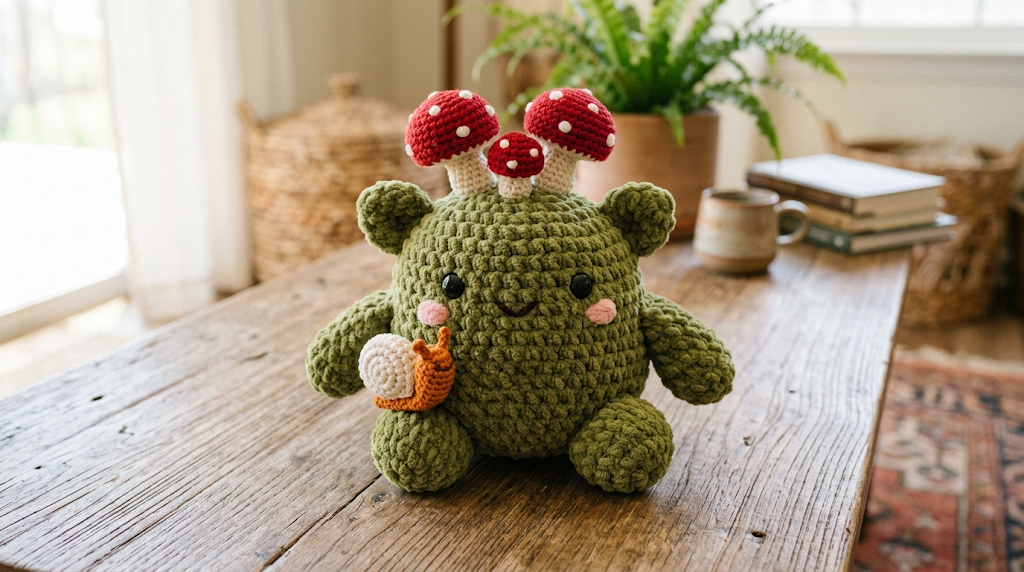
If you’ve ever wanted to crochet something that looks like it wandered straight out of an enchanted forest, this Mossy Mushroom Monster is about to become your new favorite project. This round, squishy little creature is covered in deep moss-green stitches, topped with a trio of crocheted toadstool mushrooms, and finished off with the sweetest tiny orange snail riding along its side. He’s got big sleepy eyes, soft blushed cheeks, and stubby little arms and legs that make him impossible not to squeeze.
This pattern is perfect for crocheters who love amigurumi with personality — something a little weird, a little cozy, and a lot of fun. He makes a fantastic shelf companion, a quirky gift for plant lovers and cottagecore fans, or a cuddly addition to any “forest creature” collection. If you enjoy working in the round, practicing color changes, and adding playful 3D details like mushroom caps and a spiral snail shell, this project will keep your hooks happy from start to finish.
Whether you’re an intermediate crocheter ready for a fun multi-part build, or a confident beginner who has a few amigurumi projects under your belt, this pattern walks you through every single stitch — no guesswork required.
|
Difficulty
Intermediate
|
Time
6–8 hours
|
Hook Size
4.0mm (G/6)
|
Yarn Weight
Worsted (4)
|
Finished Size
~18cm tall
|
Gauge
- Gauge: 14 stitches x 16 rows = 10cm x 10cm square in single crochet (working in continuous rounds)
- Hook used: 4.0mm (G/6 US) crochet hook
- Yarn weight used: Worsted/medium weight (Category 4) yarn, with a fluffy chenille-style yarn for the body for extra plush texture
Gauge is not critical for this project since it’s worked in the round and stuffed, but a tighter gauge is recommended to prevent stuffing from showing through the stitches. If your stitches look loose or gappy, drop down a hook size.
Materials List
- Moss green chenille or worsted-weight yarn — approximately 150g, for the body, arms, and legs
- Red worsted-weight yarn — small amount (10–15g), for mushroom caps
- White worsted-weight yarn — small amount (15–20g), for mushroom stems and polka dots
- Orange worsted-weight yarn — small amount (5g), for the snail body
- Cream or light tan yarn — small scrap, for the snail’s shell spiral and antennae
- Black yarn or 2 black safety eyes (12mm) — for the monster’s eyes
- Pink yarn or pink felt — small scraps, for cheek blush
- 4.0mm (G/6 US) crochet hook
- 3.5mm crochet hook — optional, for smaller details like the snail and mushroom stems
- Polyester fiberfill stuffing
- Stitch markers (locking markers work best)
- Yarn needle for sewing pieces together and weaving in ends
- Embroidery needle for face details
- Small amount of craft wire (18–20 gauge) — optional, for added mushroom stability
- Scissors
Abbreviations Table
| Abbreviation | Meaning |
|---|---|
| ch | chain |
| sc | single crochet |
| inc | increase (2 sc in same stitch) |
| dec | invisible decrease (single crochet 2 stitches together) |
| sl st | slip stitch |
| st(s) | stitch(es) |
| rnd(s) | round(s) |
| MR | magic ring |
| BLO | back loop only |
| FO | fasten off |
| rep | repeat |
| ( ) | stitch count at end of round/row |
Pattern Instructions
Part 1: Monster Body (worked in continuous rounds, moss green)
Use a stitch marker to mark the first stitch of every round; move it up each round.
Note on Magic Ring (MR): A magic ring lets you crochet your first round of stitches into an adjustable loop, then pull it closed completely afterward, leaving no hole. This creates a neater start than chaining and joining.
- Rnd 1: MR, 6 sc into ring (6)
- Rnd 2: inc in each st around (12)
- Rnd 3: sc, inc rep around (18)
- Rnd 4: sc 2, inc rep around (24)
- Rnd 5: sc 3, inc rep around (30)
- Rnd 6: sc 4, inc rep around (36)
- Rnd 7: sc 5, inc rep around (42)
- Rnd 8: sc 6, inc rep around (48)
- Rnd 9: sc 7, inc rep around (54)
- Rnds 10–18: sc around, no increases (54) — work 9 rounds even
- Rnd 19: sc 7, dec rep around (48)
- Rnd 20: sc around (48)
- Rnd 21: sc 6, dec rep around (42)
- Rnd 22: sc around (42)
- Rnd 23: sc 5, dec rep around (36)
Begin stuffing firmly at this point, adding more as you go and adjusting so the shape stays round.
- Rnd 24: sc 4, dec rep around (30)
- Rnd 25: sc 3, dec rep around (24)
- Rnd 26: sc 2, dec rep around (18)
Attach safety eyes between Rnds 14 and 15, spaced 7 stitches apart, centered on the front of the body. If using yarn instead of safety eyes, embroider small black circles here now while there’s still room to work.
- Rnd 27: sc, dec rep around (12)
- Rnd 28: dec around (6)
Finish stuffing the head firmly, then fasten off and close the opening using the yarn needle, weaving through the front loops of the remaining 6 stitches and pulling tight.
Part 2: Arms (make 2, moss green)
- Rnd 1: MR, 6 sc into ring (6)
- Rnd 2: inc around (12)
- Rnds 3–8: sc around (12) — work 6 rounds even
- Rnd 9: sc 2, dec rep around (9)
- Rnds 10–12: sc around (9)
Stuff lightly, then flatten the opening and sc the last round closed, or fasten off leaving a long tail for sewing flat to the body.

Part 3: Legs (make 2, moss green)
- Rnd 1: MR, 6 sc into ring (6)
- Rnd 2: inc around (12)
- Rnd 3: sc, inc rep around (18)
- Rnds 4–10: sc around (18) — work 7 rounds even
Stuff firmly. Fasten off leaving a long tail for sewing to the bottom of the body.
Part 4: Mushrooms (make 3 — small, medium, large)
Cap (red), make 3:
- Rnd 1: MR, 6 sc into ring (6)
- Rnd 2: inc around (12)
- Rnd 3: sc, inc rep around (18)
- Rnd 4: sc 2, inc rep around (24) — largest cap stops increasing here
- Rnd 5 (medium and large caps only): sc 3, inc rep around (30)
- Rnd 6 (large cap only): sc around (30)
After the increases, sc 2–3 rounds even on each cap before stopping, to create the dome shape. Stuff lightly. Fasten off, leaving the bottom open to attach to the stem.
Add white polka dots using small straight stitches or tiny white French knots scattered across the red cap with a yarn needle once the cap is complete — 5 to 7 dots per cap looks best.
Stem (white), make 3:
- Rnd 1: MR, 5 sc into ring (5)
- Rnds 2–6 (small), 2–8 (medium), 2–10 (large): sc around (5)
Technique note — closing a small tube: Because the stem is narrow, instead of decreasing at the top, simply flatten the last round and sc across through both layers to close it, or whip-stitch it shut with the yarn needle.
If extra stability is desired, insert a 4–5cm length of craft wire down the center of each stem before stuffing lightly, bending a small hook at the bottom end so it doesn’t poke through the tip. This helps the mushrooms hold their pose upright.
Sew the cap onto the top of the stem, matching the open edge of the cap to the top edge of the stem.
Part 5: Snail (orange body + cream shell)
Snail body (orange):
- Rnd 1: MR, 6 sc into ring (6)
- Rnd 2: inc around (12)
- Rnd 3: sc around (12)
- Rnd 4: sc 2, dec rep around (9)
- Rnd 5: sc around (9)
Fasten off leaving a tail for sewing. Lightly stuff.
Shell (cream, worked flat in a spiral):
- Rnd 1: MR, 6 sc into ring, do NOT join, continue in a spiral (6)
- Rnd 2: inc around (12)
- Rnd 3: sc, inc rep around (18)
- Rnd 4: sc 2, inc rep around (24)
Fasten off. This flat spiral disc becomes the shell — sew it to the back/top of the snail’s body at a slight angle.
Add two tiny crochet or yarn-wrapped antennae to the front of the snail’s head using a short chain of 4–5 stitches each, folded over and tacked down.
Assembly Steps
- Sew the legs to the bottom front of the body, spacing them about 3–4cm apart, angled slightly outward so the monster sits flat and stable.
- Sew the arms to either side of the body at the widest point, roughly in line with the eyes, angled slightly downward.
- Embroider or attach the pink cheek blush just below and outside each eye using small horizontal straight stitches, about 1.5cm wide.
- Arrange the three mushrooms across the top of the head in a gentle arc — small mushroom on one end, large in the middle, medium on the other end.
- Insert each mushroom stem 1–1.5cm deep into the top of the head and sew firmly in place from the inside and outside, making sure the wire (if used) doesn’t poke through the head fabric.
- Position the snail on the side or front-lower body of the monster and sew it down securely around the full base of its body so it looks like it’s resting on the monster’s “fur.”
- Weave in all remaining yarn ends and give the whole piece a gentle fluff if using chenille yarn, to blend stitch lines.

Beginner/Intermediate Tips
- Because the body yarn is chenille-style, stitches can be harder to see — use a stitch marker on every round, no exceptions, so you don’t lose track of your starting point.
- When stuffing the head, stuff in small handfuls and check the shape often; chenille yarn stretches more than cotton, so it’s easy to overstuff and lose the round shape.
- Keep your mushroom stems narrow and tight — a slightly smaller hook (3.5mm) for the stems compared to the body helps them stay sturdy and stand upright.
- For the invisible decrease (dec), insert your hook into the front loop of the next two stitches only, then complete as a normal single crochet — this prevents the small holes a regular decrease leaves behind.
- If your safety eyes won’t be visible enough against the dark green, add a single small white highlight stitch near the top of each eye for extra sparkle.
Variations
- Color swap: Make the monster body in lavender or dusty blue yarn for a “fairy moss creature” version instead of a forest theme.
- Size up: Add 2–3 extra increase rounds to the body and double the stuffing for an oversized cuddle-pillow version, perfect for a kid’s room.
- Seasonal swap: Replace the mushrooms with tiny crocheted pumpkins for a fall version, or holly berries for a winter holiday edition.
- Display style: Skip the legs and arms entirely and turn the body into a round pincushion or paperweight base, keeping just the mushrooms and snail on top.
- Friend pack: Make a mini version (half the increase rounds) as a tiny keychain buddy to match the full-size plush.
Save this pattern so you don’t lose it, and tag your finished mossy monster — we love seeing your makes! Pin this for later and share your version using #FoodiePlumCrochet 🍄🐌



