
The Best Fluffy Pancakes recipe you will fall in love with. Full of tips and tricks to help you make the best pancakes.

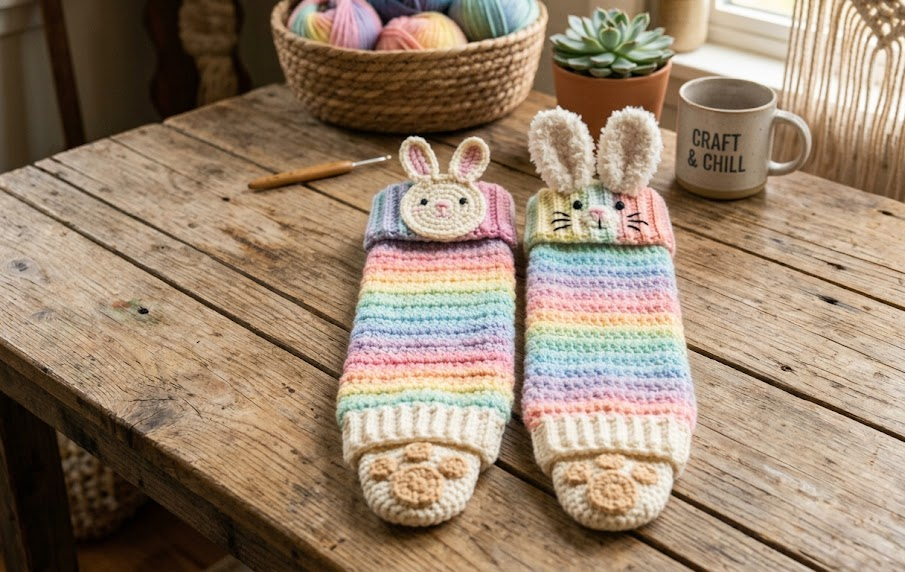
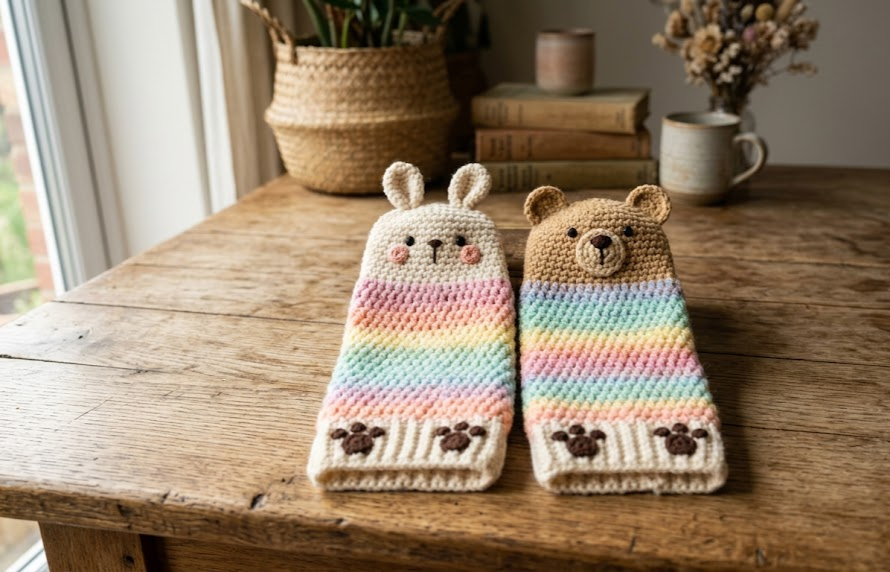
There’s something about a pair of hand-stitched leg warmers that instantly makes an outfit feel cozier, cuter, and a little more magical. This pattern brings together two adorable characters — a soft bunny and a snuggly bear — perched right at the top of a rainbow of pastel stripes. Whether you’re making these for a little one who loves stuffed animals, a teen who wants something extra fun for chilly mornings, or yourself (no judgment, these are addictive to wear), this project is a joyful one to work on. The moss stitch texture gives the stripes a plush, marshmallow-like softness, while the tiny embroidered paw prints on the soles add the kind of detail that makes people stop and ask, “wait, you MADE these?”
These leg warmers work up in manageable chunks: a face and ear section, a striped tube body, and a paw-print toe cap. Each part is simple on its own, and stacking them together is where the real magic happens. If you’ve made a few amigurumi or basic garments before, you’ll find this a satisfying step up — a chance to practice color changes, simple embroidery, and light 3D shaping, all in one project.

|
Difficulty
Intermediate
|
Time
10–12 Hours
|
Hook Size
4mm (G/6)
|
Yarn Weight
Worsted (#4)
|
Finished Size
30cm x 20cm
|
Grab your yarn basket and let’s get started.
Gauge
- 14 sts x 16 rows = 10cm x 10cm (4in x 4in) in moss stitch (alternating sc and ch-1 spaces)
- Hook used for gauge swatch: 4mm (US G/6)
- Yarn used for gauge swatch: Worsted weight (Medium, #4)
Gauge matters most here for getting a snug, stretchy fit around the leg. Work a small swatch before starting — if your stitch count is running tight, move up to a 4.5mm hook; if it’s loose, drop down to 3.75mm.
Materials List
- Worsted weight yarn (Medium, #4), acrylic or acrylic-blend recommended for washability, approximately 180g total per leg warmer:
- Cream/off-white — 40g (bunny face, bear muzzle, paw pad base)
- Tan/light brown — 25g (bear face)
- Blush pink — 20g (stripe + bunny ear inner + paw pad accents)
- Mint green — 20g (stripe)
- Lavender — 20g (stripe)
- Buttercream yellow — 20g (stripe + bear paw pad accents)
- Small amount of black — for eyes and nose embroidery
- Small amount of dark brown — for bear ear and nose shading
- 4mm (US G/6) crochet hook
- Tapestry/yarn needle
- Stitch markers (2–4)
- Scissors
- Polyester fiberfill (small amount, for ear shaping only)
- Optional: fabric glue or clear thread for securing safety eyes if using plastic eyes instead of embroidery
Abbreviations
| Abbreviation | Meaning |
|---|---|
| ch | chain |
| sc | single crochet |
| hdc | half double crochet |
| dc | double crochet |
| sl st | slip stitch |
| st(s) | stitch(es) |
| rnd(s) | round(s) |
| BLO | back loop only |
| inc | increase (2 sc in same st) |
| dec | invisible decrease (see technique note) |
| MR | magic ring |
| rep | repeat |
| ( ) | stitch count at end of round/row |
Pattern Instructions
Part 1: Animal Face (make 2 — one bunny, one bear)
Technique note — Magic Ring (MR): Instead of chaining and joining into a circle (which can leave a small hole), a magic ring lets you crochet your first round of stitches into an adjustable loop, then pull it closed tight for a seamless center.
Bunny Face
Rnd 1: With cream, MR, 6 sc into ring, pull tight, sl st to close. (6) Rnd 2: 2 sc in each st around. (12) Rnd 3: sc, inc rep around. (18) Rnd 4: sc 2, inc rep around. (24) Rnd 5: sc 3, inc rep around. (30) Rnd 6: sc 4, inc rep around. (36) Rnds 7–9: sc around, no increases. (36 each round) Fasten off, leaving a long tail for seaming to body.
Bunny Ears (make 2)
Rnd 1: With cream, MR, 6 sc into ring. (6) Rnd 2: 2 sc in each st. (12) Rnd 3: sc, inc rep around. (18) Rnds 4–7: sc around, no increases. (18 each round) Rnd 8: sc 4, dec rep around. (15)
Technique note — Invisible decrease (dec): Insert your hook into the front loop only of the next two stitches, then complete the sc as normal through both. This keeps the decrease neat and nearly invisible on the surface.
Rnd 9: sc 3, dec rep around. (12) Flatten the ear slightly and sc across the opening to close, or leave open and whip-stitch flat. Fasten off, leaving a tail. Optionally tack a small pink oval of felt or a pink sc panel to the ear front for the inner-ear detail before attaching.
Attach ears to the top of the bunny face head, about 2cm apart, angled slightly outward like real bunny ears.
Bear Face
Work same as Bunny Face rounds 1–9, using tan yarn instead of cream.
Bear Ears (make 2)
Rnd 1: With tan, MR, 6 sc into ring. (6) Rnd 2: 2 sc in each st. (12) Rnd 3: sc around, no increases. (12) Fasten off, leaving a tail. These stay small and rounded — no need to flatten as much as the bunny ears. Stuff each ear lightly with a pinch of fiberfill before closing for a slightly domed shape, then sew flat to the top sides of the bear head, spaced about 3cm apart.
Bear Muzzle
Rnd 1: With cream, MR, 6 sc into ring. (6) Rnd 2: 2 sc in each st. (12) Rnd 3: sc around. (12) Fasten off, leaving a tail. Sew the muzzle onto the lower-center front of the bear face.
Faces — Finishing
Using black yarn, embroider two small satin-stitch eyes above the muzzle (bear) or centered on the face (bunny), and a small triangle or oval nose. Use pink yarn to add rosy cheek blushes with a light, airy satin stitch on both faces.
Part 2: Striped Body Tube (make 2, one per leg warmer)
Work in continuous rounds, do not join unless noted; place a stitch marker in the first stitch of each round and move it up as you go to track your round starts.
Rnd 1: With cream, ch 30, join with sl st to form a ring being careful not to twist, ch 1. (30)
Technique note — Joining without twisting: Lay your chain flat on the table before joining; if it twists, your tube will spiral instead of sitting flat.
Rnd 2: sc in BLO of each st around. (30)
Technique note — BLO (back loop only): Instead of working under both loops of the stitch, insert your hook only under the back loop. This creates a subtle ribbed ridge that helps the top of the tube grip snugly under the face piece.
Rnds 3–4: sc in each st around (both loops now). (30 each round) Rnd 5: Switch to pink. sc around. (30) Rnd 6: sc around. (30) Rnd 7: Switch to mint. sc around. (30) Rnd 8: sc around. (30) Rnd 9: Switch to lavender. sc around. (30) Rnd 10: sc around. (30) Rnd 11: Switch to yellow. sc around. (30) Rnd 12: sc around. (30) Rnd 13: Switch to mint. sc around. (30) Rnd 14: sc around. (30) Rnd 15: Switch to pink. sc around. (30) Rnd 16: sc around. (30) Rnd 17: Switch to lavender. sc around. (30) Rnd 18: sc around. (30) Rnd 19: Switch to yellow. sc around. (30) Rnd 20: sc around. (30)
Continue repeating the stripe sequence (mint, pink, lavender, yellow, 2 rounds each) until the tube measures approximately 24cm from the top ribbed edge, ending on a full stripe.
Technique note — Carrying colors: When switching colors every 2 rounds, you can carry the unused color loosely up the inside of the tube rather than cutting and rejoining each time, which saves ends to weave in later. Just be sure not to pull it too tight or it will pucker the stripes.
Part 3: Paw Print Toe Cap (make 2)
Rnd 1: With cream, MR, 6 sc into ring. (6) Rnd 2: 2 sc in each st. (12) Rnd 3: sc, inc rep around. (18) Rnd 4: sc 2, inc rep around. (24) Rnd 5: sc 3, inc rep around. (30) Rnd 6: sc around, no increase — this should now match the 30-stitch circumference of your body tube. (30) Fasten off, leaving a long tail for seaming.
Paw Pad Detail
Using pink (for the bunny toe) or yellow (for the bear toe), embroider one large oval in the center-bottom of the toe cap and four small ovals fanned above it in a paw-print arrangement, using satin stitch or small crocheted appliqué ovals sewn on top.
Assembly Steps
- Lay the striped body tube flat and identify the top edge (the ribbed BLO round) and bottom edge (the final full stripe round).
- Pin the animal face piece to the top edge of the tube, right sides facing out, matching the 30 stitches of the tube to the 36 stitches of the face by easing the extra 6 stitches evenly around — this slight gather is normal and gives the face a rounded, sculptural look sitting above the striped ribbing.
- Using the long tail left on the face piece, whip-stitch the face to the top of the tube all the way around, working through both loops of each stitch for a secure seam.
- Pin the toe cap to the bottom edge of the tube in the same way, right sides out, and whip-stitch in place using the toe cap’s tail.
- Weave in all loose ends along the inside of the tube using a tapestry needle, running the tail through several stitches before trimming.
- Try the leg warmer on (or measure against the intended leg) to check fit — the finished piece should stretch comfortably to about 20cm circumference and sit 30cm tall, folding down slightly at the top if needed for a slouchy look.
- Repeat all steps for the second leg warmer using the alternate face (bear or bunny) so you end up with a matching, mixed pair.
Beginner/Intermediate Tips
- If your stripe rounds are curling or cupping at the transitions, try loosening your tension slightly on the first row after every color change — moss and sc fabric can tighten up around color joins.
- When seaming the face to the tube, use removable stitch markers to divide both pieces into quarters first, then match marker to marker. This spreads the stitch-count difference evenly instead of bunching it in one spot.
- For the invisible decrease on the ears, practice on a scrap swatch first if you haven’t used this technique before — it feels different from a standard decrease but gives a much cleaner point.
- Carry yarn colors up the inside of the tube neatly by looping the resting color around the working yarn every round or two; this avoids long loose strands that can catch or snag.
- If working in acrylic, a quick steam (not direct iron contact) over the finished stripes can help relax the stitches and even out the tension across the piece.
Variations
- Fox & Wolf Version: Swap the bunny and bear for a fox (orange face, white muzzle, black-tipped ears) and a wolf (grey face, white muzzle) for a woodland-themed pair.
- Solid Color Set: Skip the stripes entirely and work the tube in a single soft color per leg warmer for a simpler, quicker version that still features the animal face and paw print details.
- Ankle Sock Length: Shorten the striped tube to just 10cm tall for a cropped, ankle-warmer version that works well with sneakers or slides.
- Adult Size Upsize: Add 6 extra stitches to the starting chain (36 total) and lengthen the tube to 34–36cm for a roomier, adult-sized fit.
- No-Face Minimalist Version: Omit the face and ears entirely and simply finish the top edge with a folded cuff for a purely rainbow-striped leg warmer, perfect for beginners easing into their first colorwork project.
Save this pattern now so you don’t lose it in your feed — and tag your finished pair with #FoodiePlumCrochet so we can see your version! 🌈🐰🐻



