
The Best Fluffy Pancakes recipe you will fall in love with. Full of tips and tricks to help you make the best pancakes.

If you’ve been searching for a crochet bag pattern that feels equal parts cozy and stylish, this is the one to bookmark. The Sage Basketweave Boho Tote combines a rich, cable-inspired basketweave texture with a sturdy, everyday-practical shape, all worked up in a soft sage green worsted weight yarn. The finished bag has structure without stiffness, texture without fuss, and a strap length that makes it easy to sling over your shoulder and go.
This pattern is a wonderful project for the intermediate crocheter who has dabbled in cables or post stitches before and wants to put those skills to real use. It is not a difficult pattern once you understand the basketweave rhythm, but it does require some comfort reading stitch patterns and counting rows carefully. If you have made a cabled scarf or a textured pillow before, you already have the skills you need here.
The bag itself is roomy enough for a wallet, phone, keys, a paperback book, and the everyday odds and ends you carry, while still looking intentional and put-together. Whether you are making it for a farmers market run, a weekend trip, or as a thoughtful handmade gift, this tote strikes a great balance between form and function. Let’s get into the details so you can start crocheting today.
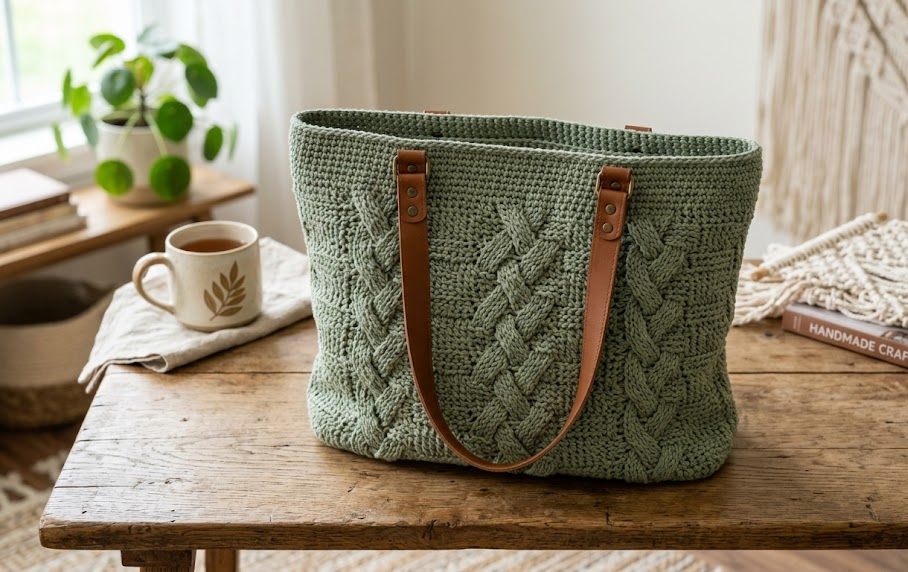
|
Difficulty
Intermediate
|
Time
12–15 Hours
|
Hook Size
5.0mm (H-8)
|
Yarn Weight
Worsted (#4)
|
Finished Size
30cm x 30cm
|
Gauge
14 sts x 16 rows = 10cm x 10cm (4in x 4in) in basketweave pattern, using a 5.0mm (H-8) hook
Always make a gauge swatch before starting. Because this pattern relies on structured post stitches, gauge can shift more than usual between crocheters. If your swatch is coming out larger than 10cm, go down a hook size. If it is coming out smaller, go up a hook size. Getting gauge right here matters because it affects how the basketweave panels line up when you seam the bag together.
Materials List
- Worsted weight yarn (Medium, #4), 100% cotton or cotton-blend recommended for structure — approximately 400g (about 800 yards) in Sage Green
- 5.0mm (H-8) crochet hook
- Yarn needle for weaving in ends and seaming
- Stitch markers (at least 4)
- One set of bag handles or two 60cm leather/faux-leather straps
- Sew-on strap connectors or D-rings (if using detachable straps)
- Fabric lining material, approximately 35cm x 70cm (optional but recommended)
- Sewing needle and thread (if adding lining)
- Scissors
- Measuring tape
Abbreviations Table
| Abbreviation | Meaning |
|---|---|
| ch | chain |
| sc | single crochet |
| dc | double crochet |
| fpdc | front post double crochet |
| bpdc | back post double crochet |
| sl st | slip stitch |
| st(s) | stitch(es) |
| rep | repeat |
| RS | right side |
| WS | wrong side |
| BLO | back loop only |
| sk | skip |
Pattern Instructions
Part 1: Front Panel
Gauge swatch note: Before beginning, chain 20 and work the basketweave pattern below for 10 rows to confirm gauge.
Row 1 (RS): Ch 43, dc in 4th ch from hook (the skipped 3 chains count as your first dc) and in each ch across. (41 sts)
Row 2: Ch 3 (counts as first dc throughout), turn. *Fpdc around next 4 sts, bpdc around next 4 sts; rep from * across, ending with dc in top of turning ch. (41 sts)
Technique note: A front post double crochet (fpdc) is worked by inserting your hook from front to back to front around the post of the stitch below, rather than into the top loops. A back post double crochet (bpdc) is worked the same way but inserting from back to front to back. This is what creates the raised basketweave texture.
Row 3: Ch 3, turn. Dc in each st across. (41 sts)
Row 4: Ch 3, turn. *Bpdc around next 4 sts, fpdc around next 4 sts; rep from * across, ending with dc in top of turning ch. (41 sts)
Row 5: Ch 3, turn. Dc in each st across. (41 sts)
Rows 6–9: Repeat Rows 2–5 once more. (41 sts at the end of every row)
Rows 10–13: Repeat Rows 2–5 once more, reversing the fpdc/bpdc placement from Rows 2 and 4 (where Row 2 said fpdc first, now do bpdc first, and vice versa) to create the alternating basketweave checkerboard look. (41 sts)
Rows 14–25: Continue repeating the 4-row basketweave sequence, alternating the post stitch placement every 8 rows, until the panel measures 30cm from the starting chain. (41 sts at the end of every row)
Fasten off, leaving a 30cm tail for seaming.

Part 2: Back Panel
Repeat Part 1 in full to create an identical second panel. Fasten off, leaving a 30cm tail for seaming.
Part 3: Side and Bottom Gusset
Row 1: Ch 13, dc in 4th ch from hook and in each ch across. (11 sts)
Row 2: Ch 3, turn. Dc in each st across. (11 sts)
Rows 3–60: Repeat Row 2 until the gusset strip measures 95cm long, which will wrap around both sides and the bottom of the bag. (11 sts at the end of every row)
Fasten off, leaving a 30cm tail for seaming.
Part 4: Top Band
Row 1: With RS facing, join yarn in the top corner of the Front Panel with a sl st. Ch 1, sc evenly across the top edge. (41 sts)
Row 2: Ch 1, turn. Sc in BLO of each st across. (41 sts)
Technique note: Working in the back loop only (BLO) means inserting your hook only under the back loop of each stitch instead of both loops. This creates a subtle ridge line that helps the top band fold neatly.
Rows 3–5: Ch 1, turn. Sc in each st across. (41 sts)
Fasten off. Repeat Rows 1–5 on the Back Panel’s top edge.
Assembly Steps
- Lay the Front Panel and Back Panel right sides up, with the Side/Bottom Gusset strip between them.
- Pin the gusset strip to the side edge of the Front Panel, starting at the top corner. Using a yarn needle and the tail from the gusset, whip stitch the pieces together, easing around the bottom corner.
- Continue pinning and stitching the gusset around the bottom of the Front Panel and up the opposite side edge, then across the top corner. You should now have the gusset attached to all three sides of the Front Panel (both sides and the bottom).
- Repeat Step 2 and 3 to attach the remaining edge of the gusset strip to the Back Panel, fully closing the bag body into a 3D shape.
- Weave in all loose ends using a yarn needle, running each tail through several stitches on the wrong side before trimming.
- If adding a fabric lining, cut two rectangles measuring 32cm x 32cm for the front and back, and one strip measuring 12cm x 97cm for the gusset, adding a 1.5cm seam allowance on all sides. Sew the lining pieces together in the same configuration as the crochet panels, then hand-stitch the lining just inside the top band of the bag, folding the raw edge under before stitching.
- Attach the strap connectors or D-rings to the top corners of the bag, roughly 2cm down from the top edge on each side, using a sewing needle and thread or by looping directly through sturdy stitches with yarn.
- Attach your 60cm straps to the connectors on both sides. If your straps are adjustable, set them so the bag hangs comfortably at hip height, typically with about 25cm of drop from the top of the bag to the top of the strap loop.

Beginner/Intermediate Tips
- If you are new to post stitches, practice the fpdc and bpdc on a small swatch before starting Row 2 of the Front Panel. The tension on post stitches is different from regular dc, and getting comfortable first will save frustration later.
- Use a stitch marker at the start of every basketweave row so you always know which side is the right side, since the pattern looks similar on both sides at a glance.
- When seaming the gusset to the panels, pin generously every few centimeters. The gusset strip has fewer stitches across than the panel is wide, so even distribution matters more than stitch-for-stitch matching.
- If your basketweave squares are coming out rectangular instead of square, adjust your row count within each 4-row block rather than your stitch count, since row gauge is more commonly the culprit.
- Block your two panels before seaming. Pin them to measurements on a towel, mist lightly with water, and let dry fully. This flattens the basketweave texture and makes assembly much easier.
Variations
- Color Block Version: Work the Front and Back Panels in two contrasting colors, such as sage green and cream, switching colors at the halfway point of each panel for a modern color-block look.
- Mini Crossbody: Reduce the starting chain to 31 sts and shorten the gusset to 70cm for a smaller crossbody-sized version, perfect for evenings out.
- Chunky Weekend Tote: Work the same pattern in a bulky weight yarn with a 6.5mm hook for an oversized, cozy weekend bag with dramatic texture.
- Fringed Bottom Edge: Add a row of long fringe along the bottom seam of the gusset for a bohemian, tasseled finish.
- Two-Tone Handles: Instead of leather straps, crochet your own strap using a simple sc tube worked over cording, alternating two yarn colors every few centimeters for a striped handle.
Save This Pattern
If you loved this textured tote as much as we loved designing it, save this pin so you can find it again when you’re ready to crochet. Share your finished bags and tag us — we always love seeing your version come to life. #FoodiePlumCrochet



