
The Best Fluffy Pancakes recipe you will fall in love with. Full of tips and tricks to help you make the best pancakes.

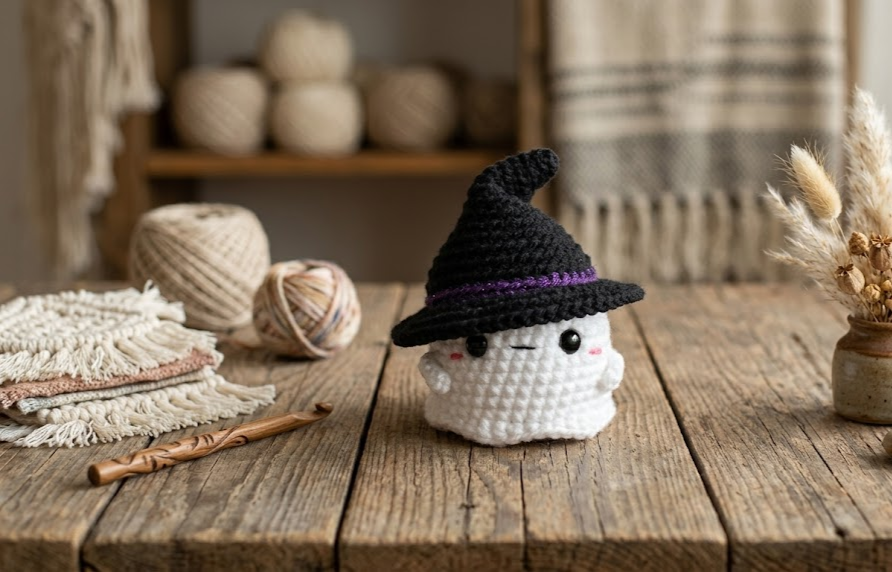
If you’re looking for the perfect blend of spooky and adorable this Halloween season, this Witch Ghost Amigurumi is exactly what your crochet basket has been missing. With its round, huggable white body, sweet stitched-on smile, rosy cheeks, and a tiny black witch hat trimmed in sparkly purple, this little friend brings all the charm of Halloween without any of the fright. It’s an ideal project for crocheters who want a quick, satisfying makes that doubles as a shelf decoration, a gift, or a fun addition to a fall-themed garland. Whether you’re an intermediate maker looking to build your amigurumi skills or a confident beginner ready for your first shaping project, this pattern walks you through every stitch so you can recreate this little ghost exactly as shown, right down to the jaunty bend in the hat’s tip.
This project is worked entirely in continuous rounds (no joining, no turning), which makes it beginner-friendly once you get comfortable with the amigurumi basics. The body uses simple increases and decreases to create that classic rounded ghost silhouette, while the wavy bottom edge is created using a simple front-post technique that gives it those signature “flowing” ghost tails. The hat is worked separately and simply rests on top, or can be tacked down with a few stitches for a permanent look.
Grab your hook and a couple of yarn colors, and let’s get started on this quick, cozy Halloween make.
|
Difficulty
Intermediate
|
Time
3–4 Hours
|
Hook Size
3.0mm
|
Yarn Weight
Worsted (4)
|
Finished Size
9cm Tall
|
Gauge
18 stitches x 20 rows = 10cm x 10cm (4in x 4in) in single crochet, worked in continuous rounds
Hook used for gauge swatch: 3.0mm
Yarn used for gauge swatch: Medium worsted weight (Weight 4) acrylic yarn
Gauge is not critical for this project since it is a stuffed toy, but working slightly tighter than usual (using a hook one size smaller than recommended for the yarn) will help prevent stuffing from showing through your stitches.
Materials List
- Worsted weight yarn (Weight 4) in White — approx. 25g
- Worsted weight yarn (Weight 4) in Black — approx. 20g
- Sparkly/metallic worsted weight yarn in Purple — small amount, approx. 2g (for hatband)
- 3.0mm crochet hook
- Two 6mm black safety eyes (or black beads/embroidery floss for eyes)
- Polyester fiberfill stuffing
- Pink blush (chalk pastel, blush powder, or pink felt-tip marker) for cheeks
- Tapestry/yarn needle
- Stitch marker
- Small amount of cardstock or plastic canvas (optional, for hat brim stiffness)
- Fabric glue or hot glue (optional, for securing hat to head)
Abbreviations Table
| Abbreviation | Meaning |
|---|---|
| MR | Magic Ring |
| ch | Chain |
| sc | Single Crochet |
| inc | Increase (2 sc in same stitch) |
| dec | Invisible Decrease |
| st(s) | Stitch(es) |
| rnd(s) | Round(s) |
| BLO | Back Loop Only |
| FLO | Front Loop Only |
| sl st | Slip Stitch |
| FPsc | Front Post Single Crochet |
Technique Notes:
- Magic Ring (MR): A starting technique that creates an adjustable loop, allowing you to close the center hole tightly after your first round is complete, leaving no gap.
- Invisible Decrease (dec): Insert your hook into the front loop only of the next two stitches, yarn over, and pull through both loops, then complete as a normal single crochet — this creates a smoother, less visible decrease than a standard one.
- Back Loop Only (BLO): Work your stitch only through the back loop of the stitch below, leaving the front loop free — this creates a visible ridge line, useful for defining edges.
- Front Post Single Crochet (FPsc): Insert your hook from front to back around the post (the vertical part) of the stitch below, rather than into the top loops — this creates a raised, textured stitch used here for the wavy ghost hem.
Pattern Instructions
Part 1: Ghost Body
Worked in continuous rounds. Do not join unless instructed. Use a stitch marker to track the beginning of each round.
Rnd 1: 6 sc in MR (6)
Rnd 2: inc in each st around (12)
Rnd 3: sc, inc repeat around (18)
Rnd 4: sc 2, inc repeat around (24)
Rnd 5: sc 3, inc repeat around (30)
Rnd 6: sc 4, inc repeat around (36)
Rnd 7–13: sc around, no increases (36) — 7 rounds total
Rnd 14: sc 4, dec repeat around (30)
Rnd 15: sc around (30)
Rnd 16: sc 3, dec repeat around (24)
Stuff the body firmly at this point, adding more stuffing as you close the bottom.
Rnd 17: sc 2, dec repeat around (18)
Do not continue decreasing the whole way closed — instead, this round becomes the base for the wavy ghost hem detailed below.
Wavy Hem Detail (Ghost Tails):
With the 18 remaining stitches, you will now create the flowing bottom edge instead of closing the ghost flat.
Rnd 18: Working in BLO only, sc around (18) — this creates a defined ridge line for the wave detail to attach to later.
Fasten off, leaving a 20cm tail for sewing.
To create the wavy tail effect seen in the reference photo, use the front loops left free from Rnd 17 to work three separate scalloped tabs directly onto the body: attach yarn in any front loop, then in that same loop and the next 5 loops work (sc, hdc, dc, hdc, sc) to form one soft wave, sl st to fasten that section, then skip 0–1 st and repeat two more times evenly around the front loops until three wave tabs are formed. Weave in all ends.

Part 2: Face
- Attach the safety eyes between Rnd 9 and Rnd 10 of the body, spaced approximately 1.5cm apart, before you finish stuffing.
- Using black yarn or embroidery floss, embroider a small curved smile below and between the eyes using a simple backstitch or straight stitch line, about 1cm wide.
- Apply pink blush to the cheeks, roughly 1cm below and to the outside of each eye, using a small circular motion with a cotton swab or soft brush for a soft, rounded blush effect.
Part 3: Witch Hat — Brim
Rnd 1: 6 sc in MR (6)
Rnd 2: inc in each st around (12)
Rnd 3: sc, inc repeat around (18)
Rnd 4: sc 2, inc repeat around (24)
Rnd 5: sc 3, inc repeat around (30)
Rnd 6: sc 4, inc repeat around (36)
Rnd 7: sc 5, inc repeat around (42)
Rnd 8: sc around, BLO only (42) — this back loop round creates the ridge where the cone will be attached.
Fasten off brim, leaving a long tail for assembly.
Optional stiffening: Trace the brim onto cardstock or plastic canvas, cut slightly smaller than the crocheted circle, and sandwich it between two brim layers if you’d like your hat to hold its shape without stuffing. For the soft look shown in the reference photo, this is optional and can be skipped.
Part 4: Witch Hat — Cone
Rnd 1: 6 sc in MR (6)
Rnd 2: inc in each st around (12)
Rnd 3: sc, inc repeat around (18)
Rnd 4: sc around (18)
Rnd 5: sc 4, inc repeat around, then sc 3 more (21) — this uneven increase begins shaping the lean of the hat tip.
Rnd 6–9: sc around (21) — 4 rounds
Rnd 10: sc 5, dec repeat around (18)
Rnd 11: sc around (18)
Rnd 12: sc 4, dec repeat around (15)
Rnd 13: sc around (15)
Rnd 14: sc 3, dec repeat around (12)
Begin lightly stuffing the tip only (leave the base of the cone unstuffed so it can be sewn flat to the brim).
Rnd 15: sc, dec repeat around (8)
Rnd 16: dec around (4)
Fasten off, leaving a tail. Weave the tail through the front loops of the last round, pull gently to close, and secure. Do not pull the tip stitches too tight if you want the natural relaxed bend seen in the reference photo — instead, bend the top of the cone gently to one side once stuffed and tack it in place with a couple of hidden stitches from the tip down to the side of the cone.
Part 5: Hatband
With purple sparkle yarn, chain a length that wraps snugly around the base of the cone (approximately 20–24 sts depending on your gauge).
Row 1: sc in 2nd ch from hook and each ch across, sl st to join into a ring. (Sc into the “2nd ch from hook” means skipping the very first chain, since that first chain simply anchors your starting loop.)
Fasten off, leaving tails on both ends for sewing. Slip the band ring over the base of the cone and sew in place using a whip stitch along both top and bottom edges of the band.
Part 6: Hat Assembly
- Turn the brim so the BLO ridge (Rnd 8) faces up.
- Center the base of the cone (with hatband already attached) over the middle of the brim.
- Using the cone’s base tail, whip stitch the cone to the brim, going through the BLO ridge stitches on the brim and around the base edge of the cone all the way around.
- Weave in all ends.

Assembly Steps
- Firmly stuff the ghost body before fully closing Rnd 17, focusing extra stuffing in the upper rounded portion for a plump shape.
- Attach the safety eyes between Rnd 9–10, spaced 1.5cm apart, before final stuffing.
- Embroider the smile and apply cheek blush as described in Part 2.
- Complete the wavy hem tabs along the BLO front loops of Rnd 17, spacing the three waves evenly (roughly every 6 stitches).
- Assemble the hat by attaching the cone to the brim as described in Part 6.
- Center the finished hat on top of the ghost’s head, tilting it slightly to one side to match the relaxed, playful angle in the reference photo.
- If you’d like the hat permanently attached, apply a small dot of fabric glue or a few hidden stitches at the point of contact between the hat brim and the top of the ghost’s head. Otherwise, leave it removable so the hat can rest on and off freely.
- Give your ghost a final fluff and shape check, gently reshaping the wavy tail tabs with your fingers if needed.
Beginner/Intermediate Tips
- If your invisible decreases (dec) are leaving visible gaps, make sure you’re picking up only the front loops of each stitch — grabbing both loops will create bulkier decreases that don’t blend in as well.
- Stuff a little at a time as you go rather than all at once at the end — this prevents lumps and makes it much easier to get a smooth, round body shape.
- When working the wavy hem tabs, keep consistent tension across all three waves by counting your stitches out loud as you go, since uneven tabs are the most common mistake on this pattern.
- If your hat won’t hold its lean, add a pipe cleaner or small piece of floral wire down the center of the cone before stuffing — bend it to the angle you want, then stuff around it.
- Safety eyes are much easier to place accurately before you add too much stuffing; press the body flat against a table to check eye spacing looks even from the front before locking the washers in place.
Variations
- Color Swap: Make the ghost in soft pastel pink or lavender for a “friendly ghost” spring version instead of Halloween.
- Size Up: Use bulky weight yarn and a 5.0mm hook to make a giant 20cm plush version perfect for a Halloween pillow or door decoration.
- No-Hat Option: Skip the witch hat entirely and add a small crocheted pumpkin instead for a simpler beginner project.
- Garland Display: Make 5–6 mini versions using a smaller MR count and string them together on twine with small pom-poms between each for a Halloween mantel garland.
- Witch Squad: Change the hatband color for each ghost (orange, green, purple, black glitter) to make a matching set of little witch ghost friends.
Save This Pattern
Loved making this Witch Ghost Amigurumi? Save this pattern to your Halloween crochet board so you can find it again next spooky season, and share your finished ghost using #FoodiePlumCrochet — we’d love to see your version!



