
The Best Fluffy Pancakes recipe you will fall in love with. Full of tips and tricks to help you make the best pancakes.

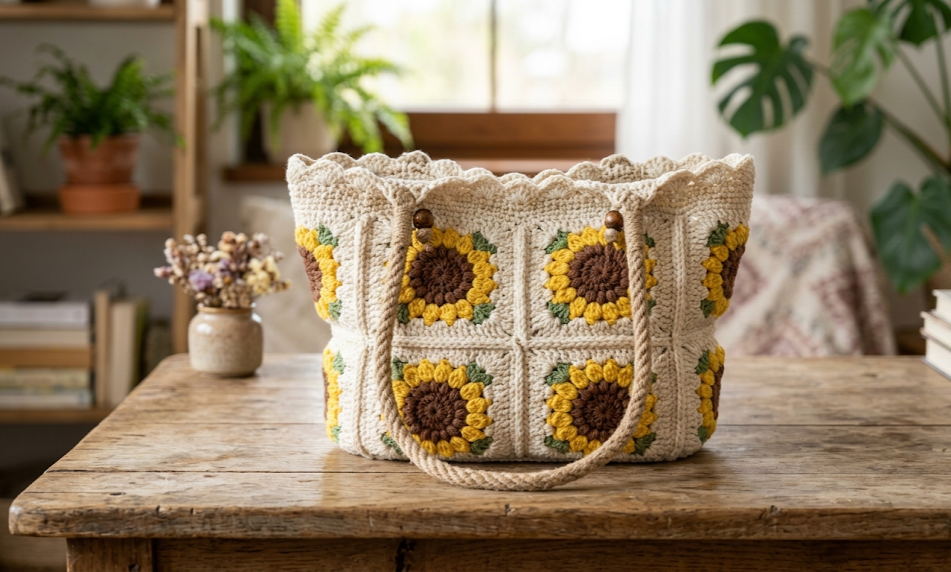
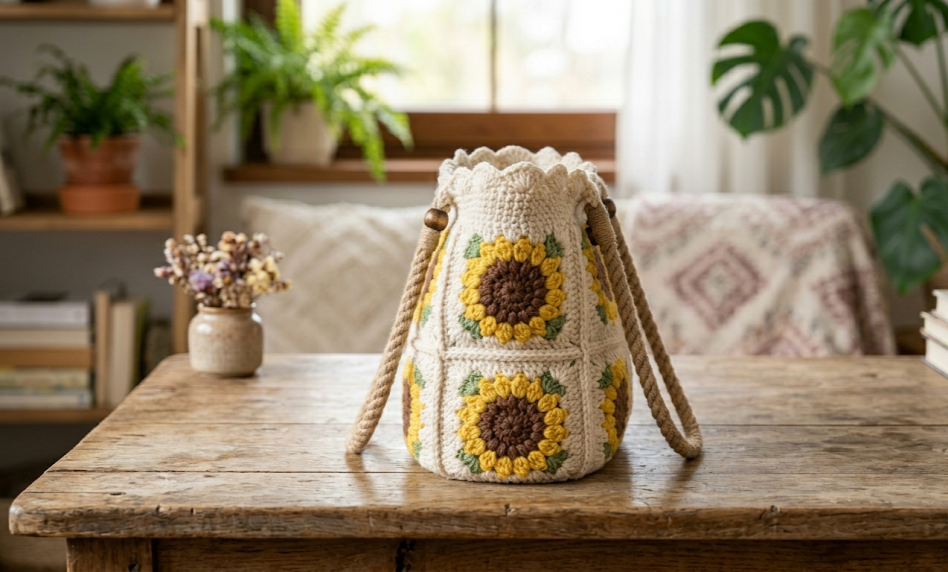
There’s something about a sunflower that just makes people smile, and this tote bag captures that feeling in every stitch. Made from a patchwork of golden sunflower granny squares joined with soft cream yarn and finished with a delicate scalloped edge, this bag is equal parts cottagecore charm and everyday function. It’s roomy enough to carry your market finds, your knitting project, or just your everyday essentials, and sturdy enough to actually use, not just admire on a shelf.
This pattern is perfect for the crocheter who has made a granny square before and wants to take the next step into shaping, colorwork, and assembly. It’s not a beginner’s first project, but it’s far from intimidating either. If you can chain, single crochet, double crochet, and follow a round, you have everything you need to make this bag your own. Grab your hooks and a stack of yarn in sunny yellows, leafy greens, and warm browns, because this one is going to become your new favorite “grab and go” bag.
By the end of this pattern, you’ll have a one-of-a-kind tote that looks like it walked straight out of a sunflower field and into your closet, ready for farmers markets, beach days, or just carrying your latest crochet project in style.
|
Difficulty
Intermediate
|
Time
10–14 Hours
|
Hook Size
4.0mm (G/6)
|
Yarn Weight
Worsted (4)
|
Finished Size
48cm x 32cm
|
Gauge
Gauge matters here because it determines how sturdy and well-fitted your finished bag will be. Before starting the full pattern, make a quick gauge swatch.
- 14 stitches and 15 rows = 10cm x 10cm square in single crochet, using a 4.0mm (G/6) hook with worsted weight (Medium, Category 4) cotton or cotton-blend yarn
- For the sunflower granny squares specifically: one finished square measures approximately 18cm x 18cm using a 4.0mm hook
- Always make a swatch first. If your square comes out smaller than 18cm, go up a hook size. If larger, go down a hook size. Bag yarn should be a sturdy cotton or cotton-blend for structure, so gauge can vary slightly by brand.
Materials List
- Cream/Ecru yarn (Color A) – worsted weight cotton, approximately 400g, for the background of the granny squares, bag body, and border
- Sunflower Yellow yarn (Color B) – worsted weight cotton, approximately 150g, for the petals
- Chocolate Brown yarn (Color C) – worsted weight cotton, approximately 50g, for the flower centers
- Leaf Green yarn (Color D) – worsted weight cotton, approximately 60g, for the leaf accents
- 4.0mm (G/6) crochet hook
- 3.5mm crochet hook (optional, for a tighter border)
- Yarn needle for weaving in ends
- Stitch markers
- Scissors
- Fabric lining material, approximately 0.5m (cotton canvas or duck cloth recommended)
- Sewing needle and thread, or sewing machine, to attach lining
- Two lengths of cotton rope or cord, approximately 50cm each, for handles (or crochet your own handles using Color A)
- Optional: fusible interfacing for extra bag structure
Abbreviations Table
| Abbreviation | Meaning |
|---|---|
| ch | chain |
| sl st | slip stitch |
| sc | single crochet |
| hdc | half double crochet |
| dc | double crochet |
| tr | treble crochet |
| st(s) | stitch(es) |
| rnd(s) | round(s) |
| rep | repeat |
| sk | skip |
| sp | space |
| BLO | back loop only |
| MR | magic ring |
| yo | yarn over |
| FO | fasten off |
| ( ) | stitch count at end of round/row |
Pattern Instructions
Part 1: Sunflower Granny Square (make 6)
Technique Note – Magic Ring (MR): A magic ring is an adjustable loop that lets you crochet your first round of stitches into it, then pull the tail to close the center hole completely, leaving no gap. This gives sunflower centers a clean, tight middle.
Round 1 (Color C – Brown):
Make a magic ring. Ch 1 (does not count as a stitch). Work 10 sc into the ring. Pull tail to close ring tightly. Sl st to first sc to join. (10 sc)
Round 2 (Color B – Yellow):
Join Color B in any st. Ch 1. In next st work (sc, dc, sc) — this creates one petal. Rep from * around in each of the 10 sts. Sl st to join in first sc. (10 petals)
Round 3 (Color B – Yellow):
Working behind the petals from Round 2, insert hook into the back loop of the skipped stitches from Round 1 (the base stitches behind the petals). Ch 2, work (sc, dc, dc, sc) into the same back-loop stitch space to create a second, larger petal layer. Rep from * around 10 times. Sl st to join. (10 large petals)
Round 4 (Color A – Cream, forms the square base):
Join Color A in the space between two petals at what will become a corner. Ch 3 (counts as first dc), work 2 dc in same sp, ch 1, in next sp between petals work (3 dc, ch 2, 3 dc) — this is a corner, ch 1, rep until you have 4 corners evenly spaced around the flower, joining sides with (3 dc) cluster in remaining spaces between petals. Sl st to join to top of ch-3. (4 corners, 16 dc total + ch-1 sps)
Round 5 (Color A – Cream):
Ch 3 (counts as first dc), dc in each st around, working (3 dc, ch 2, 3 dc) in each corner ch-2 space, and 3 dc in each ch-1 space along the sides. Sl st to join. (Square should now measure approximately 16cm x 16cm; finished square will reach 18cm after border)
Part 2: Leaf Accents (make 4 per square needed, attach to corners)
Row 1 (Color D – Green):
Ch 8. Starting in 2nd ch from hook, sc in each ch across to last ch. (7 sc)
Technique Note – Working the Second Side of a Chain: After working across one side of your starting chain, you rotate the piece and work back down the opposite side of the same chain to create a symmetrical leaf shape, rather than starting a new chain.
At the end of the row, do not turn. Instead, work 3 sc into the very last chain stitch to round the leaf tip, then rotate your piece 180 degrees and work back along the unused bottom loops of the same starting chain. Sc in each of the next 7 unused loops. (17 sc total around leaf)
Sl st to first sc to close. FO, leaving a 15cm tail for attaching.
Make 4 leaves and set aside; you will attach them in Assembly.
Part 3: Textured Filler Square (make 6, alternates with sunflower squares)
Round 1 (Color A – Cream):
Make a magic ring. Ch 3 (counts as first dc). Work 11 dc into ring. Sl st to join to top of ch-3. (12 dc)
Round 2:
Ch 3 (counts first dc), dc in same st, ch 1, sk 1 st, (dc, dc) in next st. Rep from * around. Ch 1, sl st to join. (24 dc, 12 ch-1 sps)
Round 3:
Ch 3, 3 dc in next ch-1 sp, ch 1. Rep around. Sl st to join. (36 dc, 12 ch-1 sps)
Round 4 (corners):
Ch 3, dc in next 2 sts, (3 dc, ch 2, 3 dc) in next ch-1 sp [corner], dc in next 8 sts, ch 1. Rep around, adjusting last repeat to join evenly. Sl st to join. (Square should measure approximately 16cm x 16cm to match sunflower squares)
Part 4: Joining the Squares
Lay out your 6 sunflower squares and 6 filler squares in 2 rows of 6, alternating sunflower and filler squares in a checkerboard pattern (this matches the photo reference where sunflowers and a neutral textured square alternate).
Using Color A and a flat slip-stitch join or whip stitch through the back loops, join all 12 squares into one large rectangle, 6 squares wide by 2 squares tall. Your joined panel should measure approximately 96cm x 32cm before border and folding.
Part 5: Scalloped Border
Round 1 (Color A):
With right side facing, join Color A at any corner of the joined panel. Sc evenly around the entire outer edge, working 3 sc in each outer corner to keep it flat. Sl st to join. (Stitch count will vary by panel size; count and note your total for reference in Round 2)
Round 2 (Scallop edge — top edge of bag only):
Along the top edge only, sk 1 st, work 5 dc in next st, sk 1 st, sl st in next st. Rep from * across the top edge. FO. (Creates the shell scallop trim seen at the bag opening)
Assembly Steps
- Fold your joined 6×2 panel in half widthwise so you have a bag shape 48cm wide and 32cm tall, with the fold becoming the bottom of the bag.
- Sew or crochet the two side seams closed using Color A and a whip stitch, leaving the top open.
- Cut your fabric lining to match the interior dimensions of the bag, adding 1.5cm seam allowance on all sides. Sew the lining into a matching bag shape with a finished top edge folded under by 2cm.
- Insert the lining inside the crocheted bag, wrong sides together, and hand-stitch the lining’s top folded edge to the inside top edge of the crochet bag, just below the scalloped border round.
- Attach the 4 green leaf motifs to the top corners of the 4 outer-corner sunflower squares, stitching through the leaf base and securing with the tail left from Part 2. Position leaves so they point outward and slightly upward.
- Attach the rope handles by folding each 50cm length in half and stitching the folded ends securely to the inside top edge of the bag, 12cm in from each side seam, sewing through both the crochet fabric and the lining for extra strength. Reinforce with several passes of thread or a small crocheted tab over the attachment point.
- Weave in all remaining yarn ends using a yarn needle, securing each end by running it through several stitches on the wrong side.
- Steam block the finished bag lightly to even out the granny squares and help the scalloped border lie flat.
Beginner/Intermediate Tips
- When crocheting the brown sunflower centers, keep your tension slightly tighter than usual; this keeps the magic ring from peeking through as the petals are added on top.
- The two petal layers (Rounds 2 and 3) are the trickiest part of this pattern. Take your time finding the back-loop stitches from Round 1 for Round 3 — using a stitch marker on the first stitch of Round 1 before you start Round 2 makes them much easier to locate later.
- Block each granny square individually before joining. Pinning them to the same exact size first makes your finished panel far more even and professional-looking.
- When joining squares, work on a flat surface and pin pieces together first so your sunflower motifs line up perfectly in rows.
- If your rope handles feel too thin for a heavy bag, double up the cord or crochet a fabric sleeve around the rope before attaching for extra durability.
Variations
- Color Swap: Try a sunset palette with orange and red petals instead of yellow, or go monochrome with all-cream squares for a textural, minimalist tote.
- Mini Pouch Version: Make just 2 sunflower squares and join them into a small zippered pouch or clutch instead of a full tote, perfect for a quick gift.
- Wall Hanging Display: Frame a single finished sunflower square in a wooden hoop and hang it as boho wall art instead of using it in a bag.
- Crossbody Strap Style: Swap the short rope handles for one long crocheted strap using Color A, creating a crossbody bag instead of a hand-carried tote.
If you make this sunflower tote, I would love to see it. Save this pattern to your crochet board so you don’t lose it, and tag your finished bag with #FoodiePlumCrochet so the whole community can cheer you on.



