
The Best Fluffy Pancakes recipe you will fall in love with. Full of tips and tricks to help you make the best pancakes.

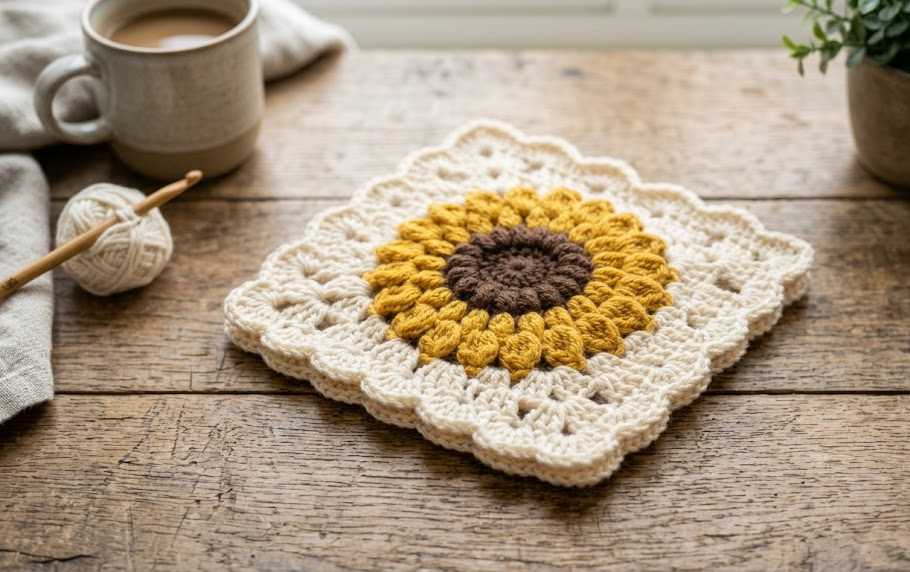
There’s something about a sunflower that just makes people smile, and this crochet sunflower granny square captures that same warmth in yarn form. With a rich chocolate-brown center surrounded by two layers of golden mustard petals and finished off with a soft ivory granny square border, this motif looks just as at home as a single coaster or mug rug as it does joined into rows for a full sunflower blanket. It’s a cheerful, sunny project that works up faster than you’d think, and it’s endlessly customizable once you’ve learned the basic shaping.
This pattern is written for confident beginners who have made a standard granny square before and are ready to try their first layered flower motif, as well as intermediate crocheters who want a quick, satisfying weekend project. The construction combines a classic front-loop/back-loop petal technique with a traditional granny square shell border, so you’ll walk away with two skills in one square. Whether you’re crocheting a single square as a gift tag, stringing several together as coasters, or planning a whole blanket of sunflowers, this pattern gives you everything you need to finish the project using only what’s written here.

|
Difficulty
Intermediate
|
Time
4–5 Hours
|
Hook Size
5mm (US H/8)
|
Yarn Weight
Worsted (#4)
|
Finished Size
15cm x 15cm (6in x 6in)
|
Gauge
Gauge isn’t critical for a single motif, but it will affect your finished size, especially if you’re planning to join multiple squares.
- 14 sts and 14 rows = 10cm x 10cm (4in x 4in) in dc, using a 5mm (US H/8) hook
- Yarn used for gauge swatch: worsted weight (Medium, #4)
- Always make a small gauge swatch first if you plan to make multiple squares that need to match in size, and adjust your hook up or down a size as needed.
Materials List
- Yarn A (Ivory/Cream) — worsted weight (#4), approximately 30g / 65m — used for the granny square border
- Yarn B (Golden Mustard Yellow) — worsted weight (#4), approximately 20g / 45m — used for the petals
- Yarn C (Dark Chocolate Brown) — worsted weight (#4), approximately 10g / 20m — used for the flower center
- Hook: 5mm crochet hook (US H/8)
- Yarn/tapestry needle for weaving in ends
- Scissors
- Stitch marker (optional, useful for marking the first stitch of each round)
Abbreviations Table
| Abbreviation | Meaning |
|---|---|
| ch | chain |
| sl st | slip stitch |
| sc | single crochet |
| dc | double crochet |
| tr | treble crochet |
| st(s) | stitch(es) |
| sp | space |
| rnd | round |
| BLO | back loop only |
| FLO | front loop only |
| MR | magic ring |
| sk | skip |
| beg | beginning |
| rep | repeat |
| [ ] | repeat instructions inside brackets the stated number of times |
| ( ) | stitch count at the end of a round/row |
Pattern Instructions
Part 1: Flower Center (Yarn C — Dark Brown)
Round 1: Make a magic ring (a technique where you loop the yarn into a ring and crochet stitches into it, then pull the tail to close the center tightly with no gap). Ch 1 (does not count as a stitch), work 10 sc into the ring, pull the tail to close, join with a sl st to the first sc. (10 sts)
Fasten off and weave in the tail, or carry the brown yarn to the wrong side and loosely catch it in later stitches if you prefer fewer ends.
Part 2: Petals (Yarn B — Golden Mustard)
The layered petal look in the photo comes from working two petal rounds into the same round of stitches — one round into the back loops only, and a second round into the front loops only. Working into only one loop at a time (BLO or FLO) means the other loop is left free for the second petal layer to be added into afterward. This is what creates the two-tier, dimensional sunflower effect.
Round 2 (short petals, BLO): Join gold yarn with a sl st in the back loop only of any st from Round 1. Ch 2, dc in the same back loop, ch 2, sl st in the back loop of the next st. Repeat from * around. (10 petals)
Fasten off.
Round 3 (long petals, FLO): Join gold yarn with a sl st in the front loop of the same starting stitch used for Round 2. Ch 3, [dc, tr, dc] all in the same front loop, ch 3, sl st in the front loop of the next st. Repeat from * around. (10 petals)
Fasten off. You should now have two layers of petals radiating outward, with the shorter petals sitting behind the longer ones, just like the reference photo.

Part 3: Granny Square Border (Yarn A — Ivory)
Round 4 (base round): Join ivory yarn with a sl st in the space directly behind any petal, working into the base of the Round 1 stitches. Ch 3 (counts as first dc throughout the pattern), work 23 more dc evenly spaced around the base of the flower, join with a sl st to the top of the beginning ch-3. (24 dc)
Round 5 (first corner round): Sl st into the next st. Ch 3, dc in the same st, ch 2, 3 dc in the same st (this completes your first corner group). Ch 1, sk 2 sts, 3 dc in next st, ch 1, sk 2 sts, work this side pattern until you reach the next corner point, then work (3 dc, ch 2, 3 dc) in the corner st. Repeat around for all 4 corners, ch 1 to close the last side, join with a sl st to the top of the beginning ch-3. (40 dc total, plus 4 corner ch-2 sps and 4 side ch-1 sps)
Round 6 (final corner round): Sl st into the next corner ch-2 sp. Ch 3, (2 dc, ch 2, 3 dc) all in the same corner sp. Ch 1, 3 dc in next ch-1 sp, repeat along the side, working a 3-dc group in every ch-1 space, until you reach the next corner. Work (3 dc, ch 2, 3 dc) in each corner sp. Continue around all 4 sides and corners, ch 1 to close the final side, join with a sl st to the top of the beginning ch-3. Fasten off. (64 dc total, plus 4 corner ch-2 sps and 8 side ch-1 sps)
Your square should now measure approximately 15cm x 15cm (6in x 6in). If you’d like a larger square, simply repeat Round 6’s shaping (working 3-dc groups into every ch-1 sp and corners into every corner sp) for one or two additional rounds before fastening off.
Assembly Steps
- Weave in all ends. Use a yarn needle to weave each tail through the backs of nearby stitches for about 5cm, then trim close to the work. Weave brown and gold tails into the wrong side behind the petals so they stay hidden.
- Block the square. Pin the finished square to a blocking mat or towel, gently stretching the corners so the sides measure an even 15cm. Lightly steam or spritz with water and let dry fully. This flattens the granny square rounds and helps the petals sit open and even.
- If joining multiple squares (for a blanket, coasters, or garland), lay your squares in the desired grid and join using a whip stitch or slip-stitch seam through the back loops of the outer round, working one square-side length at a time (approximately 15cm per seam).
- Optional backing: For a coaster or mug rug, whip stitch the finished square to a same-size piece of felt for extra stability and a padded base.
Beginner/Intermediate Tips
- When working the magic ring in Round 1, pull the tail firmly before you start Round 2 — a loose center is the most common flaw in flower motifs and it will show once the petals are added.
- Keep tension slightly looser than usual on the tr stitches in Round 3; treble crochets tend to pull tight and can distort the petal points if worked too snugly.
- Use a stitch marker in the first stitch of Rounds 4–6 so you always know where your round begins and ends, since the corner counts can be easy to lose track of.
- If your corners look pointed rather than square after Round 6, try blocking — most “wonky corner” issues resolve with a light steam block rather than a stitch count problem.
- Carry yarn tails along the inside of the petals as you switch colors between Rounds 2 and 3 to cut down on the number of ends you need to weave in later.
Variations
- Autumn Harvest Palette: Swap the gold petals for a mix of burnt orange and rust, and use a deep forest green instead of ivory for a fall-themed square.
- Mini Sunflower Coasters: Work the same pattern with a sport weight yarn and a 4mm hook for a smaller, coaster-sized version, perfect for a set of four.
- Sunflower Blanket: Make 30 or more squares in the same colorway and join them in a 5×6 grid for a full-size lap blanket with a continuous sunflower field look.
- Two-Tone Border: Work Round 4 in ivory and Rounds 5–6 in a soft sage green for a garden-inspired frame around the sunflower.
- Amigurumi-Style Pillow: Crochet two squares, stuff lightly with fiberfill, and whip stitch the edges together for a decorative sunflower throw pillow.
Save this pattern to your favorite crochet board so you can find it again next time you’re ready to make one — and tag your finished squares #FoodiePlumCrochet so we can see your sunflowers bloom!



