The Best Fluffy Pancakes recipe you will fall in love with. Full of tips and tricks to help you make the best pancakes.
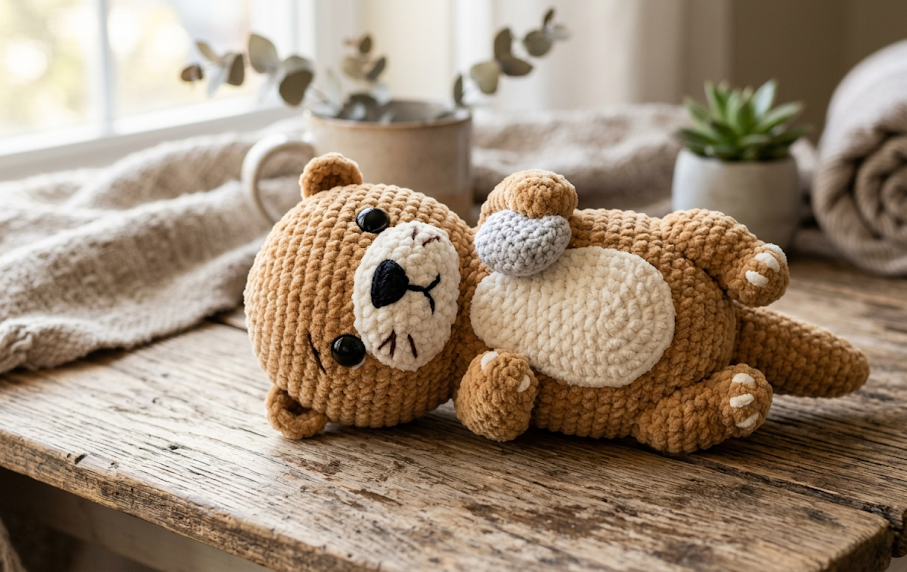
There is something irresistible about a crochet otter lying on its back, tiny paws in the air, cream belly on full display — and this free amigurumi pattern delivers exactly that. Soft, squishy, and endlessly huggable, this crochet otter is worked in chunky chenille yarn that gives it a velvety, almost plush-toy finish without ever picking up a needle and thread for extra texture. Whether you are making it as a nursery decoration, a gift for an ocean-lover, or simply a joyful weekend project for yourself, this pattern is designed to take you from magic ring to finished otter with clear, round-by-round instructions and no guesswork.
At roughly 30 cm (12 inches) long when lying flat, this otter has the satisfying heft of a real stuffed animal. The body is worked in warm caramel tan, the belly insert in cream, and the tiny toe details add a touch of personality that photographs beautifully. This is an intermediate amigurumi — not because any single stitch is difficult, but because the piece has several separate parts that are assembled at the end. If you have crocheted a basic amigurumi head and body before, you are absolutely ready for this one.
|
Difficulty Intermediate |
Time 6–9 Hours |
Hook Size 5.0 mm |
Yarn Weight Bulky / Size 5 |
Finished Size ~30 cm / 12 in |
Gauge
Before beginning, work a gauge swatch in the round using your hook and yarn: 10 sc × 11 rows = 10 cm × 10 cm (approximately 4″ × 4″). Hook used: 5.0 mm (H/8). Yarn weight: Bulky / Size 5 (chunky chenille or velvet yarn). Because amigurumi tension is personal and gauge affects finished size, adjust hook size up or down by 0.5 mm if your swatch is significantly larger or smaller. A tighter fabric is preferred to prevent stuffing from showing through.
Materials List
- Yarn A — Tan/Caramel Brown: approximately 200 g of bulky chenille or velvet yarn (e.g., Bernat Blanket yarn, Lion Brand Pound of Love in caramel, or any similar size 5 chenille)
- Yarn B — Cream/Off-White: approximately 50 g of the same yarn in cream or ivory
- Hook: 5.0 mm (H/8) crochet hook
- Safety eyes: 2 × 12 mm black safety eyes
- Polyfill stuffing: approximately 150 g
- Yarn needle (tapestry needle) for assembly and weaving ends
- Stitch markers: at least 2
- Black embroidery floss or black yarn: for nose and smile embroidery
- Scissors
- Pins for positioning parts before sewing
Abbreviations
| Abbreviation | Meaning |
|---|---|
| MR | Magic ring — adjustable loop used to start rounds with no center hole |
| ch | Chain |
| sc | Single crochet |
| inc | Increase — work 2 sc in the same stitch |
| dec | Invisible decrease — insert hook through front loops of next 2 stitches together, yarn over and pull through both loops, yarn over and pull through 2 loops |
| sl st | Slip stitch |
| BLO | Back loop only — work through the back loop of the stitch only |
| FLO | Front loop only — work through the front loop of the stitch only |
| st(s) | Stitch(es) |
| rnd | Round |
| rep | Repeat |
| [ ]× | Repeat instructions inside brackets the number of times indicated |
Pattern Instructions
All pieces are worked in continuous rounds (no joining, no turning) unless otherwise stated. Use a stitch marker to mark the first stitch of each round and move it up as you work.
Part 1: Head
Use Yarn A (tan). Begin with a magic ring (MR: pull the yarn end to form an adjustable loop; work into the loop, then pull the tail to close the center).
Rnd 1: 6 sc into MR. (6)
Rnd 2: [inc] × 6. (12)
Rnd 3: [sc, inc] × 6. (18)
Rnd 4: [sc 2, inc] × 6. (24)
Rnd 5: [sc 3, inc] × 6. (30)
Rnd 6: [sc 4, inc] × 6. (36)
Rnd 7: [sc 5, inc] × 6. (42)
Rnds 8–14: sc around. (42) — 7 rounds straight.
Rnd 15: [sc 5, dec] × 6. (36)
Rnd 16: [sc 4, dec] × 6. (30)
— Attach safety eyes between Rnds 10–11, about 8–9 stitches apart. The invisible decrease: insert hook through front loops only of next 2 sts simultaneously, yarn over, pull through both front loops, yarn over, pull through 2 loops on hook. This closes tighter than a standard dec.
Rnd 17: [sc 3, dec] × 6. (24) — Begin stuffing firmly.
Rnd 18: [sc 2, dec] × 6. (18)
Rnd 19: [sc, dec] × 6. (12)
Rnd 20: [dec] × 6. (6) — Fasten off, leave long tail. Close remaining gap with yarn needle.
Part 2: Body
Use Yarn A (tan).
Rnd 1: 6 sc into MR. (6)
Rnd 2: [inc] × 6. (12)
Rnd 3: [sc, inc] × 6. (18)
Rnd 4: [sc 2, inc] × 6. (24)
Rnd 5: [sc 3, inc] × 6. (30)
Rnd 6: [sc 4, inc] × 6. (36)
Rnds 7–18: sc around. (36) — 12 rounds straight.
Rnd 19: [sc 4, dec] × 6. (30)
Rnd 20: [sc 3, dec] × 6. (24)
Rnd 21: [sc 2, dec] × 6. (18) — Stuff body firmly.
Rnd 22: [sc, dec] × 6. (12)
Rnd 23: [dec] × 6. (6) — Fasten off, leave long tail. Close gap.

Part 3: Belly Patch
Use Yarn B (cream). Work in rows.
Foundation: ch 7, turn.
Row 1: sc in 2nd ch from hook, sc 5. (6) ch 1, turn.
Rows 2–3: inc, sc 4, inc. (8) ch 1, turn each row.
Rows 4–8: sc across. (8) ch 1, turn.
Row 9: dec, sc 4, dec. (6) ch 1, turn.
Row 10: dec, sc 2, dec. (4) Fasten off, leave long tail for sewing.
Part 4: Ears (make 2)
Use Yarn A (tan).
Rnd 1: 6 sc into MR. (6)
Rnd 2: [inc] × 6. (12)
Rnd 3: sc around. (12) — Sl st to join. Fasten off, leave long tail. Do not stuff.
Part 5: Arms (make 2)
Use Yarn A (tan).
Rnd 1: 6 sc into MR. (6)
Rnd 2: [inc] × 6. (12)
Rnds 3–9: sc around. (12) — 7 rounds straight.
Lightly stuff the lower half only. Flatten the top and sc across through both layers to close (6 sc). Fasten off, leave long tail.
Part 6: Legs (make 2)
Use Yarn A (tan).
Rnd 1: 6 sc into MR. (6)
Rnd 2: [inc] × 6. (12)
Rnd 3: [sc, inc] × 6. (18)
Rnds 4–5: sc around. (18)
Rnd 6: [dec] × 3, sc 12. (15) — This shapes the foot.
Rnds 7–12: sc around. (15) — 6 rounds straight.
Lightly stuff. Flatten top and sc across through both layers (7–8 sc). Fasten off, leave long tail.
Part 7: Toe Pads (make 6 — 3 per foot)
Use Yarn B (cream).
Rnd 1: 5 sc into MR. (5) — Sl st to join. Fasten off, leave tail. Do not stuff.
Part 8: Tail
Use Yarn A (tan).
Rnd 1: 6 sc into MR. (6)
Rnd 2: [inc] × 6. (12)
Rnds 3–7: sc around. (12) — 5 rounds straight.
Rnd 8: [dec] × 6. (6) — Lightly stuff. Fasten off, leave tail.
Assembly Steps
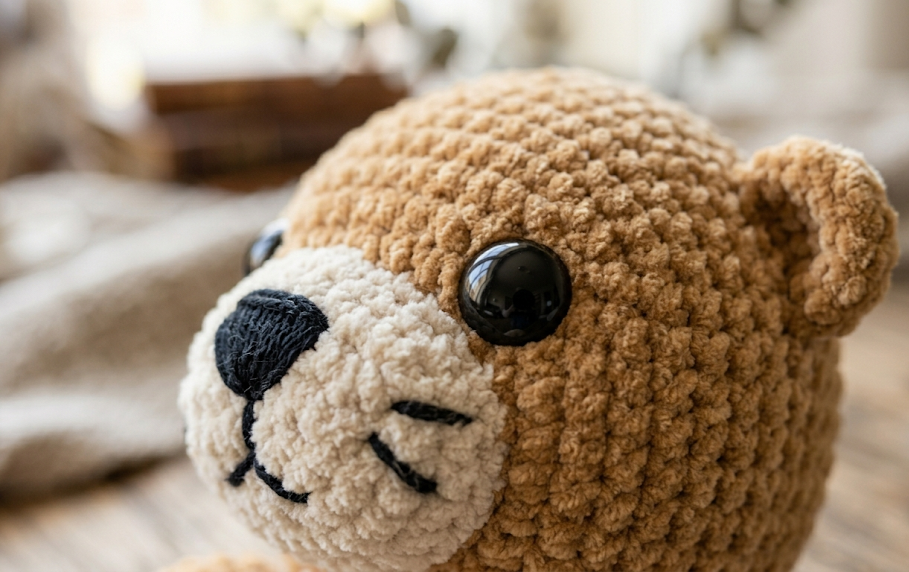
- Embroider the face. Using black embroidery floss or a short length of black yarn threaded on a yarn needle, stitch a small inverted triangle nose centered below the eyes (approximately 2–3 rounds below the eye line). Add a short curved smile below the nose — about 1 cm wide. Knot securely inside the head.
- Attach the belly patch. Pin the cream belly oval centered on the front of the body, starting about 3 rounds up from the base. Sew around the entire perimeter with the yarn tail and a yarn needle, using small whip stitches. Weave in ends.
- Sew toe pads to feet. Pin 3 cream circles evenly spaced across the flat underside of each foot. Sew each in place with its yarn tail. The circles sit side by side across the pad.
- Attach head to body. Position the head on top of the body with the face angled slightly upward. The neck opening of the head should overlap the top of the body by approximately 1.5 cm. Pin in place. Using a long length of Yarn A, sew through alternating stitches of the head and body opening all the way around. Pull firmly and knot securely inside.
- Attach ears. Pin one ear on each side of the head, approximately 3 rounds from the top center, spaced about 10 stitches apart. The flat edge of each ear faces forward. Sew around the flat edge using the yarn tail.
- Attach arms. Pin one arm to each side of the body, 3–4 rounds down from the head joint. The flat closed end of the arm is the attachment point. Sew through the flat edge and into the body securely. The arms should point outward and slightly forward, mimicking the floating-on-back otter pose.
- Attach legs. Pin the legs to the lower front of the body, approximately 4–5 rounds up from the base, one on each side. Sew the flat top edge of each leg firmly to the body. Angle them outward so the feet point away from the body.
- Attach tail. Sew the tail centered on the back of the body at the very base, using the yarn tail. The tail should protrude outward and upward slightly.
- Final check. Weave in all remaining ends. Fluff the chenille yarn with your fingernail or a soft bristle brush to restore texture where the yarn was compressed by sewing.
Beginner & Intermediate Tips
- Chenille yarn splits easily. Always insert your hook under both strands of a stitch, not between the yarn’s fibers. Work slowly and use good lighting.
- Magic ring tension. Pull the yarn tail firmly after completing Rnd 1 to close the center completely before moving to Rnd 2. A loose center creates a visible hole.
- Invisible decrease matters here. Standard decreases leave a visible bump on the surface; the invisible decrease (through front loops only) keeps the fabric smooth — important on the face of a plush toy.
- Overstuff slightly. Chenille yarn compresses with handling. Stuffing a little firmer than you think necessary results in a better-shaped finished piece.
- Stitch marker discipline. Move your stitch marker at the start of every single round. Losing your count in chenille yarn — where stitches are hard to see — means unknitting many rounds.
- Safety eye placement is permanent. Once the backing clicks onto the safety eye post, it cannot be removed without destroying the eye. Fit them loosely first and check placement from the front before snapping the back on.
Variations
- Baby otter: Use a 3.5 mm hook with DK weight yarn to make a miniature version at roughly 15 cm. Perfect for a keychain or bag charm with a small split ring attached to the head.
- Otter couple: Make two in slightly different tan shades — one warm caramel, one darker chocolate brown — and position them holding hands (arms sewn together) for a shelf display or gift set.
- Ocean nursery mobile: Make three otters in graduating sizes and hang them from a driftwood branch with fishing line at different lengths for a sea-themed crib mobile.
- Seasonal otter: Add a tiny crocheted heart in red yarn stitched to the belly patch for Valentine’s Day, or a small green crocheted leaf cluster for an autumn woodland version.
- Sea otter with clam: Crochet a small flat oval in grey yarn (6 rounds, starting with ch 4) and sew it into one of the otter’s arms so it appears to be holding a clam shell — a nod to the real animal’s famous tool use.
If you make this crochet otter pattern, save it to your Pinterest boards so you can find it again — and share your finished otter with #FoodiePlumCrochet so the whole community can see your work! 🦦