
The Best Fluffy Pancakes recipe you will fall in love with. Full of tips and tricks to help you make the best pancakes.

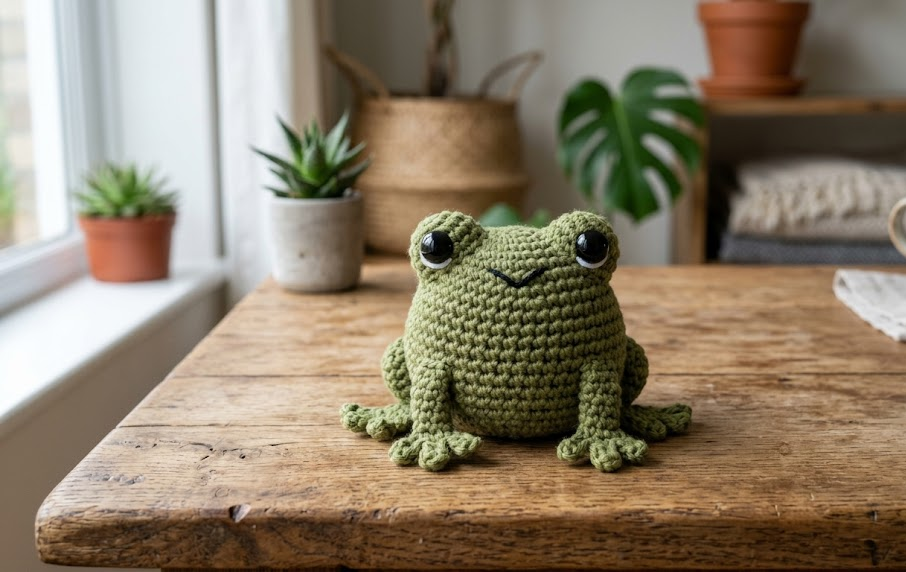
If you’ve ever wanted a project that finishes almost as fast as it starts, this tiny frog is it. Standing at barely two inches tall, this little amigurumi frog is soft, round, plush, and impossibly cute — the kind of make you can finish during a single movie or a slow afternoon with tea. It’s crocheted in a velvety yarn that gives it a squishy, huggable texture, with two glossy safety eyes that give it all the personality of a much bigger toy.
This pattern is perfect for beginners who already know the basics of single crochet and want to practice shaping small amigurumi pieces, and it’s just as satisfying for intermediate crocheters looking for a quick palette-cleanser project between bigger makes. Because the frog is worked in the round with simple increases and decreases, it’s a wonderful confidence-builder if you’re new to amigurumi shaping. Make one in moss green for a classic look, or whip up a whole pond in blue, red, mustard, and mint to match — they’re addictive once you start.
Frogs like this one are popular for keychains, bag charms, desk friends, plant pot companions, or tiny gifts tucked into a card. Because the finished size is so small, a single skein of yarn can make several frogs, making this an excellent stash-buster and a wonderful pattern to sell as a set at craft fairs.
Below you’ll find the complete gauge, materials, abbreviations, and full round-by-round instructions you need to make your own tiny frog from start to finish — no additional references required.
|
Difficulty
Beginner–Intermediate
|
Time
2–3 Hours
|
Hook Size
2.5mm
|
Yarn Weight
Velvet / Light Worsted
|
Finished Size
~5cm (2 in) tall
|
Gauge
Gauge is not critical for amigurumi (a slightly bigger or smaller frog is still adorable), but matching gauge will keep your frog close to the finished size listed below and will help stuffing show through less.
- 22 stitches x 24 rows = 10cm x 10cm, worked in single crochet
- Hook used: 2.5mm
- Yarn used: Velvet/chenille-style yarn, light worsted weight
Work tightly — amigurumi is always crocheted at a smaller, denser gauge than garment crochet so that stuffing doesn’t peek through the stitches.
Materials List
- Velvet/chenille yarn, light worsted weight, in moss green (main color) — approximately 15g / 25m
- Small amount of white or cream velvet yarn for the belly panel — approximately 3g
- 2.5mm crochet hook
- Pair of 6mm black safety eyes
- Polyester fiberfill stuffing
- Stitch marker (or scrap yarn) to mark round starts
- Yarn needle for weaving in ends and sewing pieces together
- Small amount of black embroidery thread (optional, for a stitched smile)
- Scissors
Abbreviations
| Abbreviation | Meaning |
|---|---|
| MR | Magic Ring — an adjustable loop used to start a round without a hole in the center |
| ch | Chain |
| sc | Single Crochet |
| inc | Increase — 2 single crochets worked into the same stitch |
| dec | Invisible Decrease — worked through the front loops only of the next two stitches together, pulled through as one stitch, to reduce stitch count without a visible bump |
| BLO | Back Loop Only — inserting the hook only under the back loop of the stitch, leaving the front loop free |
| st(s) | Stitch(es) |
| rnd(s) | Round(s) |
| sl st | Slip Stitch |
| ( ) | Stitch count at the end of the round or row |
Pattern Instructions
Body (worked bottom to top, in one continuous piece)
Start with the base of the body.
Rnd 1: MR, 6 sc into the ring (6) Technique note: A Magic Ring is made by wrapping the yarn into a loop, crocheting your first round of stitches over both strands of the loop, then pulling the tail to close the center hole tight.
Rnd 2: inc in each st around (12) Rnd 3: (sc, inc) around (18) Rnd 4: (2 sc, inc) around (24) Rnd 5: (3 sc, inc) around (30) Rnd 6–9: sc around, no increases (30) — repeat this round 4 times total Rnd 10: (3 sc, dec) around (24) Rnd 11: (2 sc, dec) around (18) Rnd 12: sc around (18)
Begin stuffing the body firmly now, adding more as you close the top.
Rnd 13: (sc, dec) around (12) Rnd 14: dec around (6)
Fasten off, leaving a 15cm tail. Weave the tail through the front loops of the remaining 6 stitches, pull tight to close, and secure the end inside the body.
Head (worked separately, then attached)
Rnd 1: MR, 6 sc into the ring (6) Rnd 2: inc in each st around (12) Rnd 3: (sc, inc) around (18) Rnd 4: (2 sc, inc) around (24) Rnd 5–7: sc around, no increases (24) — repeat 3 times total
Insert safety eyes now, spacing them 4 stitches apart on Rnd 5, before continuing. Push the safety eye posts through from the outside and secure the plastic backing firmly on the inside before stuffing.
Rnd 8: (2 sc, dec) around (18)
Stuff the head firmly, filling all the way into the eye area so the head keeps a rounded shape.
Rnd 9: (sc, dec) around (12) Rnd 10: dec around (6)
Fasten off, leaving a 20cm tail for sewing the head to the body.
Front Legs (make 2)
Rnd 1: MR, 5 sc into the ring (5) Rnd 2: sc around (5) Rnd 3: inc in each st around (10) Rnd 4: sc around (10)
Flatten the last round and single crochet through both layers to create the flat foot shape, working 5 sc across the flattened opening to close it (5). Do not stuff — front legs stay flat and unstuffed for a natural froggy pose. Fasten off, leaving a 15cm tail for attaching.
Back Legs (make 2, larger than front legs)
Rnd 1: MR, 6 sc into the ring (6) Rnd 2: inc in each st around (12) Rnd 3: (sc, inc) around (18) Rnd 4–5: sc around (18) Rnd 6: (sc, dec) around (12)
Lightly stuff the top half only, leaving the last 2 rounds unstuffed and flat, then flatten and single crochet closed across the opening, working 6 sc to close (6). Fasten off, leaving a 15cm tail for attaching.
Belly Panel (optional, worked flat)
Using cream or white velvet yarn:
Row 1: ch 6, sc in 2nd ch from hook and each ch across (5) Technique note: “2nd ch from hook” means skipping the very first chain you made and beginning your single crochets in the next one, which keeps your stitch count accurate.
Row 2–5: ch 1, turn, sc across (5) — repeat 4 times total
Fasten off, leaving a 15cm tail. This oval panel will be sewn to the front of the body before attaching the head.

Assembly Steps
- Sew the belly panel to the front of the body, centered vertically, starting about 1 round up from the base and ending about 1 round below the neck.
- Position the head on top of the body so the face angles slightly forward and downward, giving the frog its characteristic squat posture. Pin or hold in place, then use the tail from the head to whip stitch it securely around the entire neck opening.
- Attach the two back legs to the lower sides of the body, roughly at the same height as Rnd 8–9 of the body, angled outward and slightly to the back so the frog can “sit.”
- Attach the two front legs just above and slightly forward of the back legs, near Rnd 10–11 of the body, angled outward and slightly downward so the flat feet rest against the table.
- Space all four legs evenly, roughly 1.5cm apart at the base, so the finished frog balances on its own without tipping forward or backward.
- If adding a mouth, use black embroidery thread to stitch a small curved smile centered below the eyes, about 3–4mm below the eye line.
- Weave in all remaining yarn tails and trim closely.
Beginner/Intermediate Tips
- Because this project is so small, count your stitches after every single round — it’s easy to lose track, and a miscount early on throws off the rest of the shaping.
- Use a stitch marker in the very first stitch of every round; with such a tiny piece it’s almost impossible to spot the round’s start otherwise.
- Stuff a little at a time as you go rather than all at once at the end — this keeps the shape rounder and prevents lumps.
- Velvet yarn splits easily, so crochet a bit more slowly than usual and keep an eye on your hook tip to make sure it’s catching both strands of each stitch.
- If your safety eyes look too close together or too far apart once inserted, don’t panic — you can pop the backing off before stuffing and reposition as many times as needed.
Variations
- Color Swap: Make a whole rainbow pond using blue, red, mustard, and mint velvet yarn instead of moss green for a colorful frog family display.
- Size Up: Work the same pattern in a worsted weight cotton yarn with a 3.5mm hook for a medium-sized frog, roughly double the finished size.
- Keychain Version: Skip the legs entirely and attach a keyring loop to the top of the head for a simplified, ultra-fast keychain frog.
- Plant Pot Frog: Add a curved wire loop to one back leg so the finished frog can perch on the rim of a small potted plant.
- Ombre Frog: Use a color-changing or gradient velvet yarn for the body so the frog shifts from a deep forest green at the base to a light mint at the head.
Save this pattern to your crochet board so you always have it on hand, and tag your finished frogs #FoodiePlumCrochet — I’d love to see your tiny pond come to life!



