
The Best Fluffy Pancakes recipe you will fall in love with. Full of tips and tricks to help you make the best pancakes.

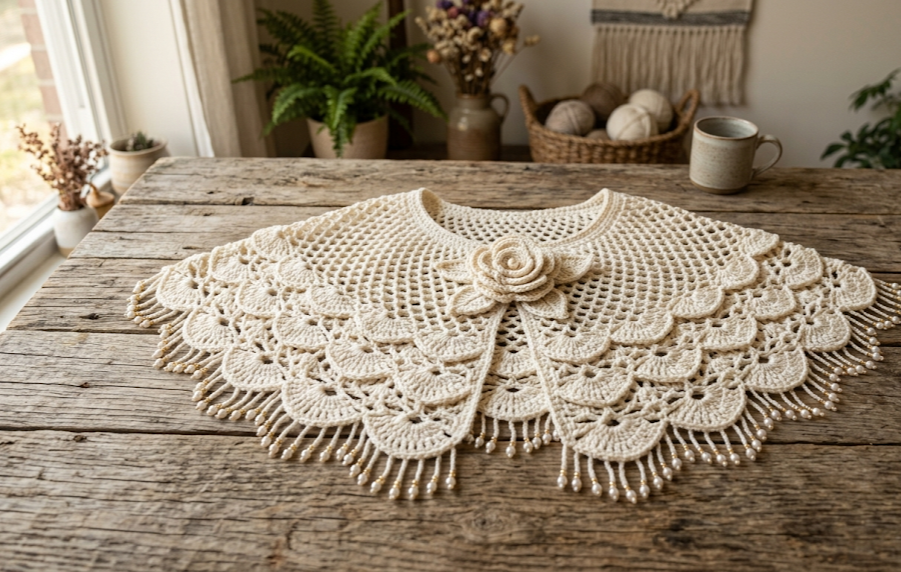
If you’ve ever wanted a piece that feels like an heirloom the moment it comes off your hook, this is it. The Vintage Rose Lace Capelet is a soft, ivory shoulder wrap built from layers of open shell-stitch lace, finished with a dimensional rolled rose at the center front and a delicate beaded fringe along the hem. It drapes over the shoulders like a piece of antique lace, equally at home over a wedding gown, a slip dress for a summer evening, or a simple blouse on a cool afternoon.
This capelet is designed for the crocheter who already feels comfortable with basic stitches and is ready to stretch into shell patterns, picot edging, and a layered floral motif. It isn’t a weekend beginner project, but it isn’t intimidating either — every round is written out fully, every stitch count is given, and every tricky technique gets a plain-language explanation the first time it shows up. If you can work a double crochet and follow a stitch count, you can make this.
The finished capelet sits high on the shoulders and fans out into three cascading layers of scalloped lace, each one a little longer than the one above it, so the whole piece moves and catches light the way real Victorian lace does. The rose sits just off-center on the right shoulder, anchoring the drape of the mesh underneath it and hiding the working ends of several rounds at once — a clever bit of construction as well as a beautiful focal point.
Because the entire piece is worked in one warm, neutral ivory, it photographs beautifully and pairs with nearly anything. But don’t feel locked into that palette — the variations section below has four different directions you can take this same pattern, from blush pink bridal tones to a moody charcoal version for autumn.
Grab a comfortable chair, good light, and let’s get into it.
|
Difficulty
Intermediate
|
Time
12–15 Hours
|
Hook Size
3.5mm (E/4)
|
Yarn Weight
DK (#3 Light)
|
Finished Size
One Size (~38cm Drop)
|
Gauge
18 sts x 9 rows = 10cm x 10cm in shell stitch pattern, using a 3.5mm (E/4) hook and DK weight (#3 Light) yarn.
Always work a 12cm x 12cm gauge swatch in shell stitch before starting. Because this capelet relies on drape, a gauge that runs even slightly tight will make the piece sit stiffly on the shoulders instead of flowing. If your swatch comes out smaller than the stated gauge, move up a hook size (try 4mm); if it comes out larger, drop down to 3mm.
Materials List
- Yarn: 4 skeins (approx. 800m / 875yds total) DK weight (#3 Light) yarn in Ivory/Cream — a cotton-acrylic or cotton-bamboo blend gives the best stitch definition and drape
- Hook: 3.5mm (US E/4) crochet hook
- Notions:
- Yarn needle for weaving in ends
- Stitch markers (at least 4)
- 40–50 small pearl or glass beads (4mm), pre-strung onto fringe strands or attached with a needle
- Sewing needle and matching thread (to secure the rose center and bead fringe ends)
- Fabric glue or a few drops of clear nail polish (optional, to stiffen rose center)
- Blocking pins and a blocking mat
Abbreviations Table
| Abbreviation | Meaning |
|---|---|
| ch | chain |
| sl st | slip stitch |
| sc | single crochet |
| hdc | half double crochet |
| dc | double crochet |
| tr | treble crochet |
| sk | skip |
| sp | space |
| st(s) | stitch(es) |
| rep | repeat |
| rnd(s) | round(s) |
| row(s) | row(s) |
| sh | shell (a group of dc worked into one stitch/space) |
| picot | ch 3, sl st into first ch of the 3 to form a small loop |
| BLO | back loop only |
| FLO | front loop only |
| MR | magic ring |
| yo | yarn over |
| ( ) | stitch count at end of round/row |
Pattern Instructions
Part 1: Neckline Foundation
This forms the snug band that sits at the base of the neck and anchors the whole capelet.
Magic ring (MR) technique note: A magic ring lets you start a round with no hole in the center — wrap yarn around two fingers, chain 1, then work your first round of stitches into the loop. Pull the tail to close the loop tight once the round is complete.
Row 1: Ch 90, sl st to first ch to join into a ring, being careful not to twist the chain. Ch 1 (counts as turning ch). (90 sts)
Row 2: Sc in each ch around. (90 sc)
Row 3: Ch 3 (counts as first dc), dc in next st, *sk 1 st, sh (3 dc) in next st, sk 1 st, dc in next 2 sts, rep from * around, join with sl st to top of ch-3. (30 shells)
Row 4: Ch 3, *dc in next 2 sts, sh in center st of next shell, dc in next 2 sts, rep from * around, join. (30 shells)
Part 2: Layer One — Shell Lace Body
This is the uppermost cascading layer, worked flat in rows from the neckline foundation down.
Row 1: Working into the front loops only (FLO) of Row 4 — this leaves the back loop free to anchor Layer Two later — ch 1, sc in each shell space and each dc around the front edge of the neckline band (skip the back of the work). (96 sts)
FLO technique note: Working in the front loop only means inserting your hook under just the loop closest to you, leaving the back loop sitting free for a future round to pick up — this is how the layers stack without bulk.
Row 2: Ch 4 (counts as dc + ch 1), sk 1 st, *5 dc in next st, sk 2 sts, sc in next st, sk 2 sts, rep from * across, end with dc in last st. (16 shell groups)
Row 3: Ch 1, sc in first dc, *ch 3, sc in 3rd dc of next shell, ch 3, sc in next sc, rep from * across, ending with sc in top of turning ch. (32 ch-3 spaces)
Row 4: Ch 1, sc in first sc, *7 dc in next ch-3 sp, sc in next sc, rep from * across. (16 shell groups, 7 dc each)
Row 5 (scallop edge): Ch 1, sc in first dc, *ch 1, sk 1 dc, sc in next dc, rep from * across each shell, then sl st into next sc and rep across row. (continuous scallop, count varies by shell — approx. 96 sts)
Row 6 (picot trim): Sl st across to first point of each scallop, work picot (ch 3, sl st in first ch), sl st to next point, rep across entire row, fasten off and weave in end.

Part 3: Layer Two — Mid Lace Drop
Worked the same way as Layer One but starting 4cm lower and made 6cm longer, to create the cascading effect.
Row 1: Join yarn with sl st in back loop (BLO) of any st along Row 4 of Part 1 (the loop you left free earlier). Ch 1, sc evenly around. (96 sts)
BLO technique note: Picking up only the back loop here is what lets this layer hang independently behind Layer One rather than stacking directly on top of it, giving the capelet its layered depth.
Rows 2–6: Repeat Rows 2–6 of Part 2 exactly, but add one extra repeat of Row 2’s shell sequence evenly spaced around (18 shell groups instead of 16) to account for the increased circumference of this lower, wider section. (108 sts after Row 2; counts adjust proportionally through Rows 3–6)
Part 4: Layer Three — Longest Drop with Fringe
This is the bottom-most, longest layer, where the beaded fringe is added.
Row 1: Join yarn with sl st in any unused loop along the joining round of Part 1 (the foundation row), ch 1, sc evenly around. (90 sts)
Rows 2–5: Repeat Rows 2–5 of Part 2, working 20 shell groups instead of 16 to accommodate the widest point of the capelet. (counts adjust proportionally; finish Row 5 with approx. 110 sts along the scalloped edge)
Row 6 (fringe row): At each point of the scallop, attach 3 strands of yarn each 25cm long using the standard fringe-knot method (fold strands in half, pull folded loop through stitch with hook, pull tails through loop, tighten). Thread 1–2 pearl beads onto the center strand of each fringe group before knotting, sliding the bead down to sit 3cm from the top before securing the knot below it so it can’t slip off. Trim all fringe ends evenly to 12cm length once complete.
Part 5: Rolled Rose Motif
Worked separately, then sewn on.
Row 1: Ch 36.
Row 2: Working into the 2nd ch from hook, *sk 1 ch, 5 dc in next ch, sk 1 ch, sl st in next ch, rep from * across row. (You’ll get 6 “petal” scallops along the strip.) (36 sts total along base)
Technique note — rolled rose construction: This strip is not joined into a round. Instead, you’ll roll the finished strip into a spiral, like rolling up a ribbon, with the scalloped edge facing outward. Each scallop becomes one petal as it spirals.
Assembly of rose: Starting at one end of the strip, begin coiling it tightly, keeping the straight (chain) edge at the bottom/center and letting the scalloped edge fan outward and slightly upward with each turn. Use a sewing needle and matching thread to tack through the layers every quarter-turn as you coil, securing the spiral so it holds its shape permanently. Continue coiling until you reach the end of the strip, then tack the final end securely to the underside.
Assembly Steps
- Block all three lace layers and the neckline band separately before joining: pin out the scalloped edges so each point is crisp, mist with water, and let dry fully (4–6 hours). This step is essential for lace to lie flat rather than curl.
- Layer the three capelet sections in order from the neckline outward: Layer One sits closest to the neck, Layer Two drapes about 4cm below where Layer One ends, and Layer Three drapes a further 5cm below Layer Two, creating the tiered cascade.
- With right side facing up, lay Layer Three flat first, then center Layer Two on top of it, then Layer One on top of that, aligning all back-loop anchor points at the neckline (these are the loops you picked up in BLO/FLO in Parts 2–4).
- Using a yarn needle and matching yarn, whip-stitch through all anchor-point loops at the neckline only, joining the three layers together in one continuous seam around the neck opening. The layers should remain free-hanging below this seam — do not stitch them together anywhere else.
- Position the rolled rose motif at the right shoulder, roughly 6cm to the right of center front and 2cm down from the neckline edge.
- Pin the rose in place, then sew it down firmly using a sewing needle and thread, stitching through the flat underside of the spiral and catching all three capelet layers underneath it, concealing the seam allowance and any yarn ends from Step 4.
- Weave in all remaining loose ends on the wrong side using a yarn needle, running each tail through at least 5cm of stitching before trimming.
- Try the capelet on a mannequin or dress form and let it hang for 24 hours before final fringe trimming, as lace and fringe will relax and drop slightly under their own weight.

Beginner/Intermediate Tips
- If counting shell groups across a round feels tricky, place a stitch marker at the start of every 4th shell as you go — it turns a 16–20 shell round into four manageable quarters.
- The picot trim (Row 6 of each layer) goes much faster if you pre-count your scallop points and place a marker on every 5th one before you start, so a mid-row interruption doesn’t cost you your place.
- When threading beads onto fringe, do all your bead-threading for an entire layer in one sitting before you knot any fringe — it’s much faster than threading and knotting one at a time.
- If your rolled rose looks loose or “wilted” once finished, add a few drops of fabric stiffener or clear-drying glue to the underside before it’s fully sewn on; let it dry flat for an hour before attaching.
- Use a removable stitch marker (not a safety pin) in the very first stitch of every round — losing your round start point in lace this open is the single most common reason this pattern gets frogged.
Variations
- Blush Bridal Capelet — Work the entire piece in a soft blush or champagne DK yarn, swap the pearl bead fringe for tiny seed pearls, and add a small spray of crocheted baby’s breath beside the rose for a bridal accessory.
- Mini Shoulder Version — Stop after Layer One and finish with the picot trim directly; skip Layers Two and Three entirely for a cropped, modern shrug-style capelet that takes a third of the yarn and half the time.
- Moody Autumn Wrap — Work in a charcoal or deep rust DK-weight wool blend, skip the bead fringe in favor of simple tassel fringe, and replace the rose with a single oversized crocheted leaf motif.
- Statement Necklace Capelet — Omit Layers Two and Three completely, keep only the neckline band and Layer One, and use the saved yarn to make the rose in a contrasting jewel tone (emerald or sapphire) as a bold statement collar.
- Two-Tone Ombre — Work Layer One in your main color, Layer Two in a slightly lighter shade, and Layer Three in the lightest shade, creating a soft ombre cascade from neckline to hem.
Save This for Later
This Vintage Rose Lace Capelet is the kind of piece you’ll reach for the second a special occasion shows up on the calendar — so don’t lose the pattern in the scroll. Pin it now to your crochet board and tag your finished version so we can see it!
#FoodiePlumCrochet



