
The Best Fluffy Pancakes recipe you will fall in love with. Full of tips and tricks to help you make the best pancakes.

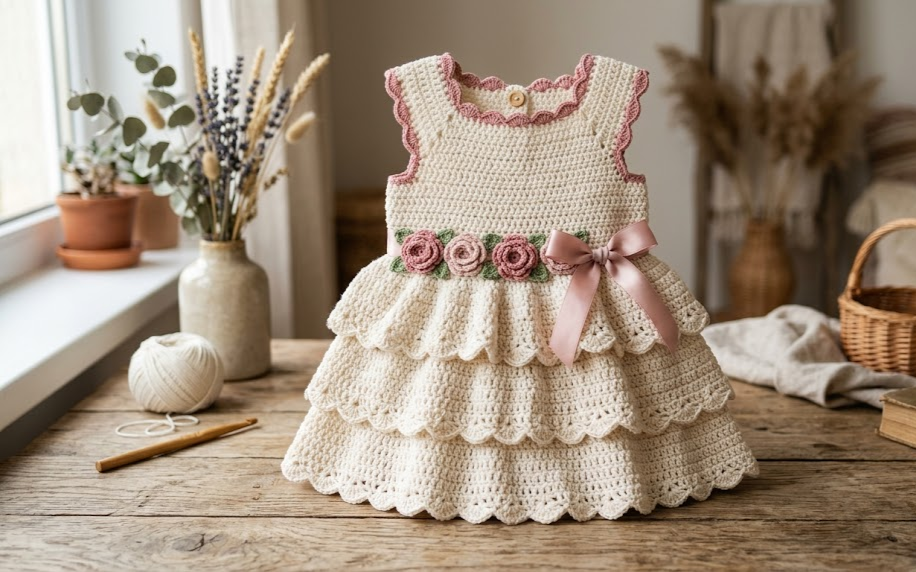
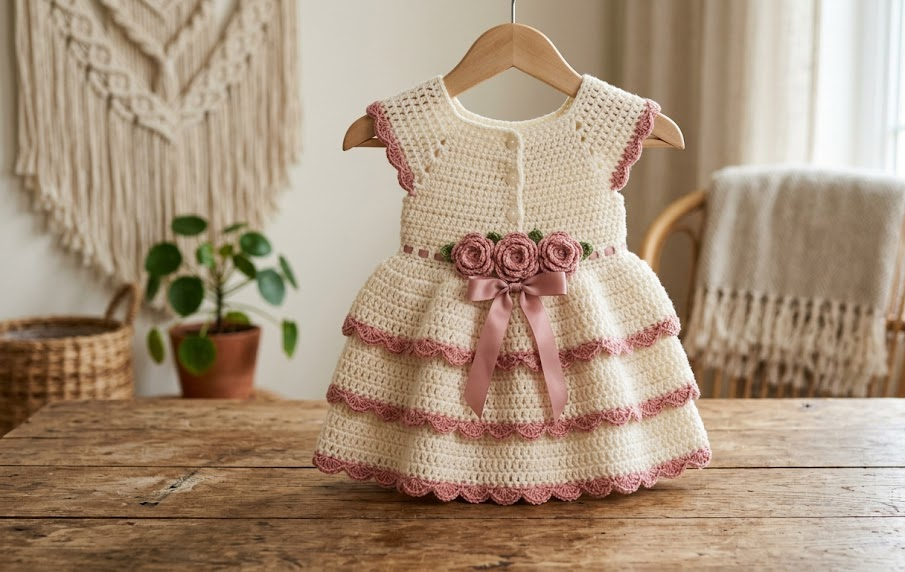
There is something truly special about handmade baby clothes, and this Vintage Rose Ruffle Baby Dress captures that magic perfectly. With its delicate lace bodice, three cascading ruffled tiers, and soft dusty rose trim, this crochet dress feels like something plucked straight out of a storybook. It is the kind of piece that gets passed down through generations, worn for christenings, birthday photoshoots, garden parties, or simply for the joy of dressing a little one in something made with love.
This pattern is designed for babies aged 0 to 6 months and pairs beautifully with a matching sun hat and Mary Jane booties, creating a complete heirloom-style outfit. The ivory base color keeps the dress soft and timeless, while the dusty rose scalloped edging and rosette flowers add just the right touch of vintage charm. Whether you are crocheting this for your own daughter, a baby shower gift, or a special photography prop, this dress is guaranteed to become a treasured keepsake.
While the layered skirt and lace bodice give this dress an elegant, complex look, the techniques used are approachable for anyone comfortable with basic stitches and simple increases. Grab your hook and your softest cotton yarn, and let’s get started.
|
Difficulty
Intermediate
|
Time
18–22 hours
|
Hook Size
2.5mm (B/1–C/2)
|
Yarn Weight
Fingering / Sport
|
Finished Size
0–6 months
|
Gauge
20 sc x 22 rows = 10cm x 10cm (4in x 4in), worked with a 2.5mm hook and fingering weight cotton yarn.
Always crochet a gauge swatch before starting. A swatch that is too loose will result in a dress that is too large and less structured; too tight, and the fabric will not drape properly for the ruffled tiers. Adjust your hook size up or down as needed to match gauge.
Materials List
- Fingering/sport weight cotton yarn, ivory (MC) — approximately 250g / 900 yards
- Fingering/sport weight cotton yarn, dusty rose (CC) — approximately 60g / 220 yards
- Small amount of extra dusty rose and ivory yarn for rosette flowers
- 2.5mm (US B/1–C/2) crochet hook
- Tapestry/yarn needle
- Stitch markers (at least 4)
- 20 inches of narrow ivory satin ribbon, ⅛ inch wide
- 1 small snap fastener or button for back closure
- Scissors
Abbreviations
| Abbreviation | Meaning |
|---|---|
| ch | chain |
| sl st | slip stitch |
| sc | single crochet |
| hdc | half double crochet |
| dc | double crochet |
| tr | treble crochet |
| sk | skip |
| st(s) | stitch(es) |
| rep | repeat |
| rnd | round |
| sp | space |
| BLO | back loop only |
| FLO | front loop only |
| MR | magic ring |
| inc | increase |
| dec | decrease |
| YO | yarn over |
| RS | right side |
| WS | wrong side |
Pattern Instructions
Part 1: Yoke / Bodice
The bodice is worked flat, top-down, in ivory (MC), then split for the front and two back panels to create the back opening.
Row 1 (RS): With MC, ch 61. Sc in 2nd ch from hook and in each ch across. (60 sc)
Row 2: Ch 1, turn. Sc in each st across. (60 sc)
Row 3 (raglan increase row): Ch 1, turn. This row establishes 4 raglan increase points to shape the armholes: 8 sc (back), inc, 2 sc (raglan), inc, 20 sc (front), inc, 2 sc (raglan), inc, 20 sc (back), inc, 2 sc (raglan), inc, 8 sc (back). Note: an “inc” here means 2 sc worked into the same stitch. (68 sc)
Rows 4–10: Continue working even rows of sc, and on every RS row repeat the raglan increase pattern (2 sc increased at each of the 4 raglan points, 8 sc increased total per RS row). By the end of Row 10, you will have approximately 108 sc.
Technique note: Raglan shaping creates diagonal seam lines from the neckline to the underarms, which is what gives the bodice its fitted, dress-like shape without separate sleeve pieces.
Row 11 (dividing row): Ch 1, turn. Sc across the first 20 sts (right back), ch 2 and skip the next 14 sts (underarm), sc across the next 40 sts (front), ch 2 and skip the next 14 sts (underarm), sc across the remaining 20 sts (left back). (84 sts total: 20+2+40+2+20)
Fasten off. The bodice is now complete and ready for the skirt.
Part 2: Skirt Tier 1 (Attached at Waist)
Rnd 1: Join MC in first st of the bodice bottom edge (the 84-st edge from Row 11). Ch 1, sc in each st around, working sc2tog evenly 4 times to smooth the underarm gaps. (80 sc) Join with sl st to first sc.
Rnd 2: Ch 3 (counts as first dc), dc in same st, *sk 1 st, 2 dc in next st; rep from * around. (160 dc) Join with sl st to top of ch-3.
Rnd 3: Ch 1, sc in each st around. (160 sc) Join.
Rnd 4: Ch 1, *sc in next st, ch 2, sk 1 st; rep from * around. (80 sc, 80 ch-2 sps)
Rnd 5: Sl st into next ch-2 sp, ch 3, 4 dc in same sp (shell made), *sk next sc, sc in next ch-2 sp, sk next sc, 5 dc in next ch-2 sp; rep from * around, ending with sl st to first ch-3. (40 shells)
Fasten off MC. Join CC (dusty rose) for the scalloped trim in Part 5 once all tiers are complete, OR attach the CC scallop to each tier as you finish it — either method works.
Part 3: Skirt Tier 2
Worked the same as Tier 1 but attached to the WRONG SIDE of Tier 1’s Round 3 (the plain sc round), one round below the shell edge, so it layers underneath and peeks out.
Rnd 1: With MC, join in the back loop only (BLO) of Tier 1, Round 3. Technique note: working in BLO leaves the front loop free, which is what allows Tier 2 to fold downward and outward, creating the tiered ruffle effect. Ch 1, sc in each BLO around. (160 sc)
Rnds 2–5: Repeat Rnds 2–5 from Part 2 exactly. (Ending in 40 shells)
Fasten off.
Part 4: Skirt Tier 3 (Longest, Bottom Layer)
Rnd 1: With MC, join in BLO of Tier 2, Round 1. Ch 1, sc in each st around, working 2 sc in every 4th st to flare the final tier. (200 sc)
Rnd 2: Ch 3, dc in same st, *sk 1 st, 2 dc in next st; rep from * around. (200 dc)
Rnd 3: Ch 1, sc in each st around. (200 sc)
Rnd 4: Ch 1, *sc in next st, ch 2, sk 1 st; rep from * around. (100 sc, 100 ch-2 sps)
Rnd 5: Sl st into next ch-2 sp, ch 3, 4 dc in same sp, *sk next sc, sc in next ch-2 sp, sk next sc, 5 dc in next ch-2 sp; rep from * around. (50 shells)
Fasten off.
Part 5: Scalloped Edging (All Three Tiers)
With CC (dusty rose), join at any shell top on the edge of a tier.
Rnd 1: Ch 1, sc in same st, *sk 2 dc, 5 dc in next st (between shells), sk 2 dc, sc in next st; rep from * around. Fasten off.
Repeat this edging round on the bottom edges of Tier 1, Tier 2, and Tier 3.
Part 6: Rosette Flowers (Make 3)
Rnd 1: With CC, MR, ch 3, work 11 dc into ring, sl st to top of ch-3 to join. Technique note: a magic ring is a small adjustable loop that allows you to close the center hole completely, unlike a standard chain ring. (12 dc)
Rnd 2 (petals): *Ch 3, sl st into next st; rep from * around, working a ch-3 picot petal into each of the 12 sts. Fasten off, leaving a 6-inch tail for sewing.
Make 2 more rosettes the same way. Optionally add tiny ivory 3-dc leaf shapes beside each rosette for contrast.
Part 7: Sleeve Edging
At each armhole ch-2 gap, join CC and work 1 rnd of sc evenly around the opening (approximately 16 sc), then sl st to close. This neatens the armhole and adds a thin rose-colored trim to match the neckline.
Part 8: Neckline & Back Opening
Rnd 1: With CC, join at the neckline edge (top of bodice, Row 1). Ch 1, sc evenly around the neck opening, approximately 60 sc. Join with sl st.
Do not fasten off — continue with Rnd 2 for the back tie channel: ch 1, sc in each st around, working this as a second neat round to reinforce the edge. Fasten off.
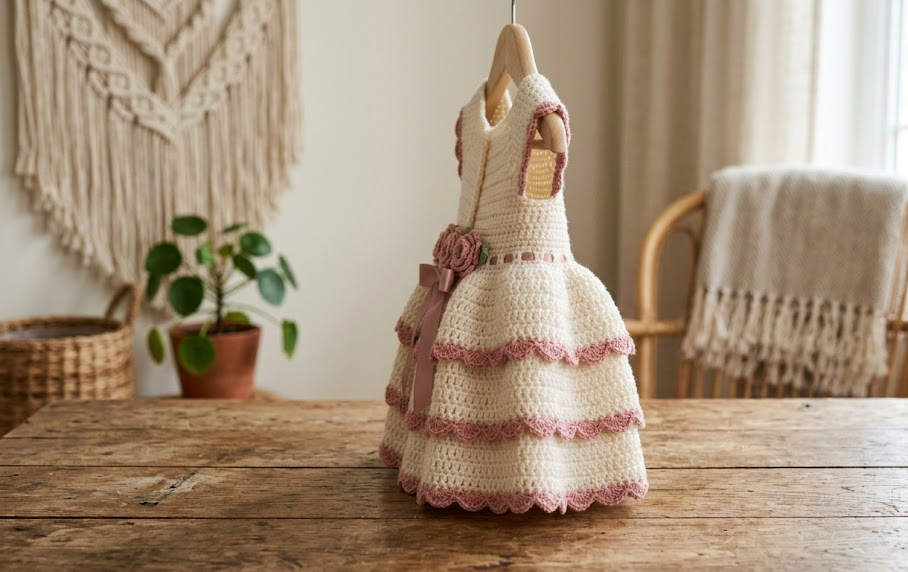
Cut ribbon into two 10-inch lengths. Weave one through the top corner of each back panel to act as ties, or sew a snap fastener at the center back for a more secure closure.
Assembly Steps
- Weave in all yarn ends from the bodice and each skirt tier before joining pieces together.
- Attach Tier 1 directly to the base of the bodice as instructed in Part 2, Round 1 — this seam sits right at the natural waistline.
- Layer Tier 2 approximately 1.5cm below the top edge of Tier 1’s plain sc round (Round 3), working into the back loops only so the tier drapes forward and down.
- Layer Tier 3 the same way, approximately 1.5cm below Tier 2’s Round 1, using the flare increase described in Part 4 to keep the hem full and bell-shaped.
- Sew the three rosette flowers side by side at the center front waistline, spacing them about 1cm apart, directly over the seam where the bodice meets Tier 1.
- Thread the 20-inch ivory ribbon through the waistline seam (through the tops of the Round 1 stitches of Tier 1) and tie in a small bow at the front, beneath the rosettes.
- Attach the snap fastener or sew the ribbon ties at the back opening, positioned about 2.5cm from the top neckline edge.
- Steam block the finished dress lightly, gently opening the shell scallops on each tier so they lie flat and lofted rather than curled.
Beginner/Intermediate Tips
- Use stitch markers on the first stitch of every round in the skirt tiers — with this many stitches, it is very easy to lose your place.
- When working into the back loop only (BLO) for the tiered ruffle effect, go slowly on your first round; the front loops left behind can be tricky to avoid catching by accident.
- Block each skirt tier separately with pins before assembly if your shells are curling inward — this makes the final layered look far crisper.
- Cotton yarn does not have as much stretch as acrylic, so try the bodice on your baby (or a similarly sized doll) after Row 10 before dividing for the back opening, to confirm the fit.
- Keep tension consistent in your shell rounds; uneven shells will show clearly along the scalloped hem.
Variations
- Pastel Rainbow Version: Make each of the three tiers a different soft pastel (blush, mint, lilac) for a whimsical layered rainbow effect.
- Flower Girl Size-Up: Recalculate the starting chain and repeat the raglan increase rows further to size the pattern up to 12–24 months for a flower girl dress.
- Beach Photoshoot Style: Swap the cotton yarn for a bamboo-cotton blend in white, and add a wide-brim matching sun hat (see companion pattern) for a breezy summer photoshoot set.
- Holiday Edition: Work the trim and rosettes in deep red and forest green for a festive Christmas or holiday photo dress.
- Heirloom Keepsake: Use a fine crochet cotton thread (size 10) with a smaller 1.75mm hook for an extra delicate, lace-like finish perfect for christening gowns.
Save This Pattern
If you love this Vintage Rose Ruffle Baby Dress, save this pin so you can find it again when you’re ready to crochet it! Tag your finished project and share your version — we love seeing your makes. Don’t forget to pin it for later using #FoodiePlumCrochet.



